

BMW 3-Series and 4-Series Forum (F30 / F32) | F30POST
>
DIY: Shifter Trim rem/inst incl. wrapping

| 07-15-2016, 12:41 PM | #1 |
|
Schmollbraten

12512
Rep 1,985
Posts |
DIY: Shifter Trim rem/inst incl. wrapping
This guide explains step by step how to remove the trim with frame, disconnect the trim, wrap it, reinstall the whole thing and avoid any damage.
You would need a hairdryer, a sharp knife or scalpel and a lot of patience. Start your work with removing the frame, insert a small screwdriver or a plastic spatula into the gap and move it upwards. To avoid scratches, use a paper pad under your tool.  Move the assembly easy over the shiftknob  Now turn around and find the row of the metal shims over the plastic studs.  Do not try to pull the shims just over the studs, because those are soft plastic and will be torn at certain tension load. Insert a small screwdriver into the gap and bend one of the flaps aside. Then move the shim to the corner where the flap is bended and pull easily without risk down the stud.  After removing the shim you could place the screwdriver above the bended flap and push it gently down again to get the origin shape and function for reuse.  After rebending  Now you got all necessary shims removed, let the three ones remain on their studs.  Just tilt the trim out of the frame, you would encounter a little resistance at the top and bottom noses, try to move the trim such way to get them out without too much force.  Now, with the former blue wrap removed or no further wrapping done place the trim onto the raw cutted piece of wrap, in this case Dinoc-421.  With a scissor cut roughly the shape of the trim, dont cut too close at the edges at this time.  Now start your way inside the trim and cut out roughly the space, also here obey to cut not too close to the edges.  Looks like this if its done.  Top view. Remember: At this time the wrap is finally placed and slightly glued with its own adhesive but not final connected to the trim.  Now its time to cut the outer borders closer to the trim like this.  Use a hairdryer to let the wrap come tight and without bubbles and blisters to the trim like shown. You'll have to experience on your own on which corner to start, but I would recommend you the 12 o'clock position into view of installation. Make your way clockwise around.  Now we'll do the finetuning cut inside.  Close enough.  Now an important thing: To avoid frizzled or blistered corners caused by shoven material, cut the wrap at the corners like shown within the red circles.  You'll see the result immediately after final heat application and moving the wrap into its positions.  Inside view, obey the very small overstands of wrap. The more less material you leave, the closer and tighter the trim would fit later onto the frame.  Now we are ready to reinstall, retilt the trim into the frame and move it around to get all noses into their holes.  Turn around and it must look like this. 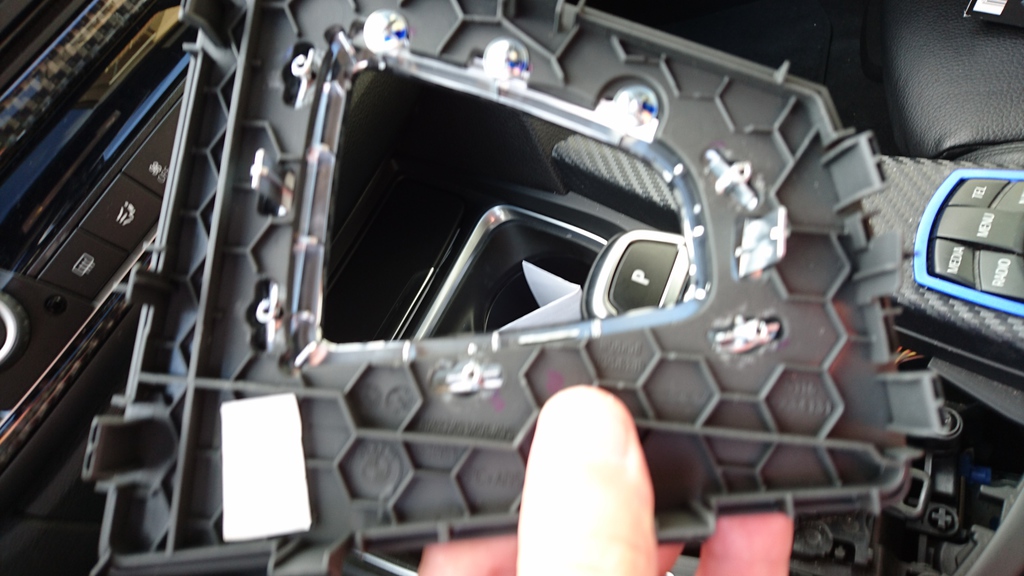 Now reinstall the shims around the studs by just pressing them tight to the studs.  Turn around again and ensure proper connection and appearance of the trim to the frame. At this time you would see all places where too much material was left below, so that the trim would stay a little off the frame.  Move again over the shifter, place onto its rest and press the frame back into its rest. You'll determine a little resistance at the shift leather boot, caused by less space. Press gently and the trim should proper fit around.  Ready to use. Thats it. 
__________________
Citizen of ///M - Town, where too much is just right Some say, that my scrotum has its own small gravity field and when Im slowing down that brake lights come on at my buttox  |
|
Appreciate
10
tsukasa3617.50 evdok822.50 chet8227.50 BMWMPR76.50 gt-[r]10.00 haagm58809.50 aliosman37752.50 LittleSamurai4.50 Walker_CW28.00 |
| 12-13-2019, 06:35 AM | #4 |
|
Captain
 
810
Rep 919
Posts
Drives: F30 328d Sport Line
Join Date: Jan 2018
Location: South Carolina
|
One step I would add to the above is to make sure to clean and dry the trim piece before laying the vinyl. I'm using isopropyl alcohol to clean my trim.
|
|
Appreciate
0
|
| 12-13-2019, 07:13 AM | #5 |
|
Captain
810
Rep 919
Posts
Drives: F30 328d Sport Line
Join Date: Jan 2018
Location: South Carolina
|
25 minutes from car to complete. Thanks for the write up! So glad I wrapped instead of purchasing a cf or abs cover. Thanks also to JB Cars for his video.
|
|
Appreciate
3
|
Post Reply |
| Bookmarks |
|
|


