

BMW 3-Series and 4-Series Forum (F30 / F32) | F30POST
>
▀▄ eas | DIY: LCI Taillight Upgrade for F30 3-Series

| 10-05-2015, 04:37 PM | #1 |
|
General
 
8115
Rep 18,813
Posts
Drives: BMW
Join Date: Nov 2005
Location: Anaheim, CA
|
▀▄ eas | DIY: LCI Taillight Upgrade for F30 3-Series
The M3 has been on the market for a little over a year and already we're seeing the LCI taillights on the MY12 models.
Unlike it's E90 predecessor which included changes to the trunk, the F30/F80 LCI Taillight upgrade is a simple taillight swap that can be accomplished by the DIY type. 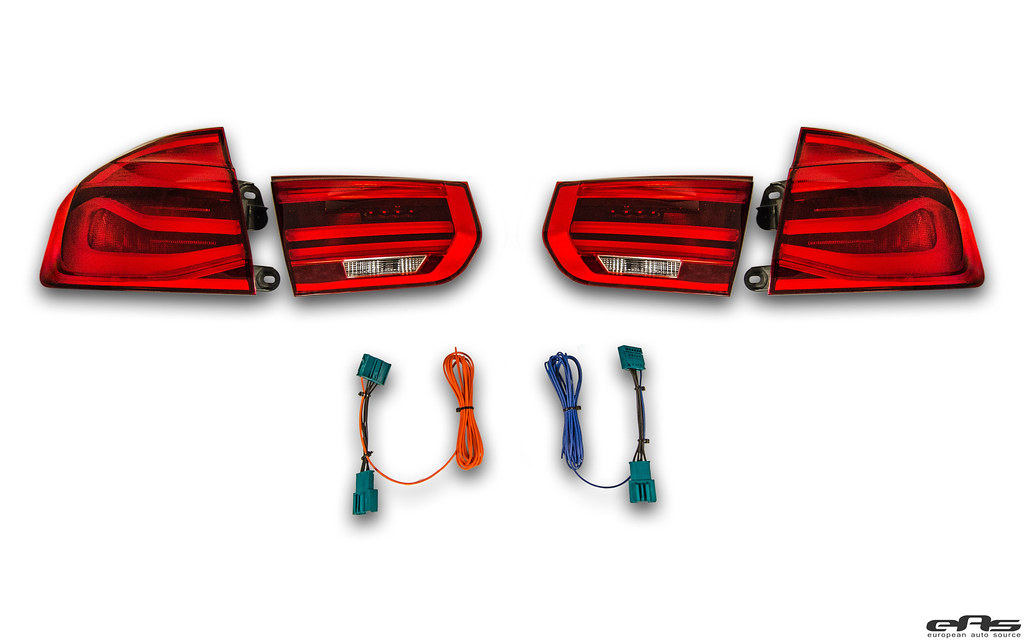 The release of the 2016 LCI (Life Cycle Impulse) introduced some minor improvements to the vehicle. On the exterior side, most noticeably with the taillights. This DIY will give a quick overview for those to update their lighting to update the rear of their 2012 3-Series (and 2015 M3) Sedan to appear like the 2016 models. 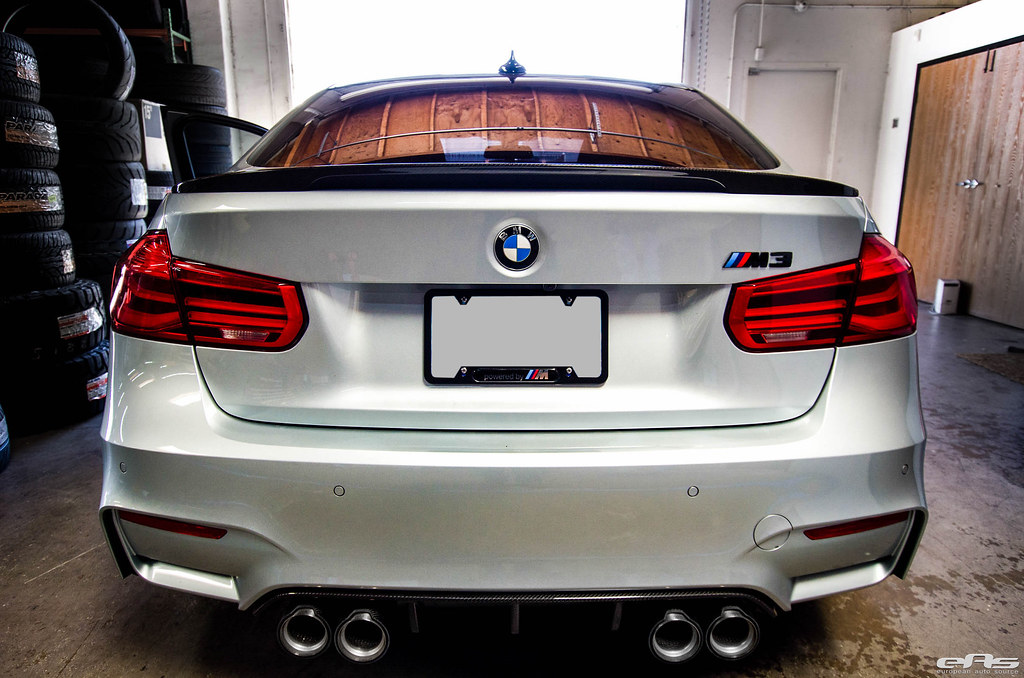 An LCI Upgrade from EAS consists of Inner/Outer taillamps, trunk lamps (4 total) and Plug and Play (PnP) harnesses. History EAS has been performing R&D on taillight retrofits for a number of years, leading back to the E46 M3 models. We were at the forefront of the E92 taillight swap back in early 2010, with open Q&A sessions to fully explain the steps and show a bit behind the scenes on R&D: http://www.m3post.com/forums/showthread.php?t=382162 http://www.m3post.com/forums/showthread.php?t=382162 http://www.e90post.com/forums/showthread.php?t=372215 Let's begin:
__________________
Tom G. | european auto source (eas)
email: tom@europeanautosource.com · web: https://europeanautosource.com· tel 866.669.0705 · ca: 714.369.8524 x22 GET DAILY UPDATES ON OUR BLOG · FACEBOOK · YOUTUBE · FLICKR · INSTAGRAM Last edited by tom @ eas; 10-05-2015 at 05:33 PM.. |
| 10-05-2015, 04:38 PM | #2 |
|
General
8115
Rep 18,813
Posts
Drives: BMW
Join Date: Nov 2005
Location: Anaheim, CA
|
Our kit will include 4 taillights (inner/outer) and Left/Right harnesses. Coding is required once installation is completed.
Pre-installation 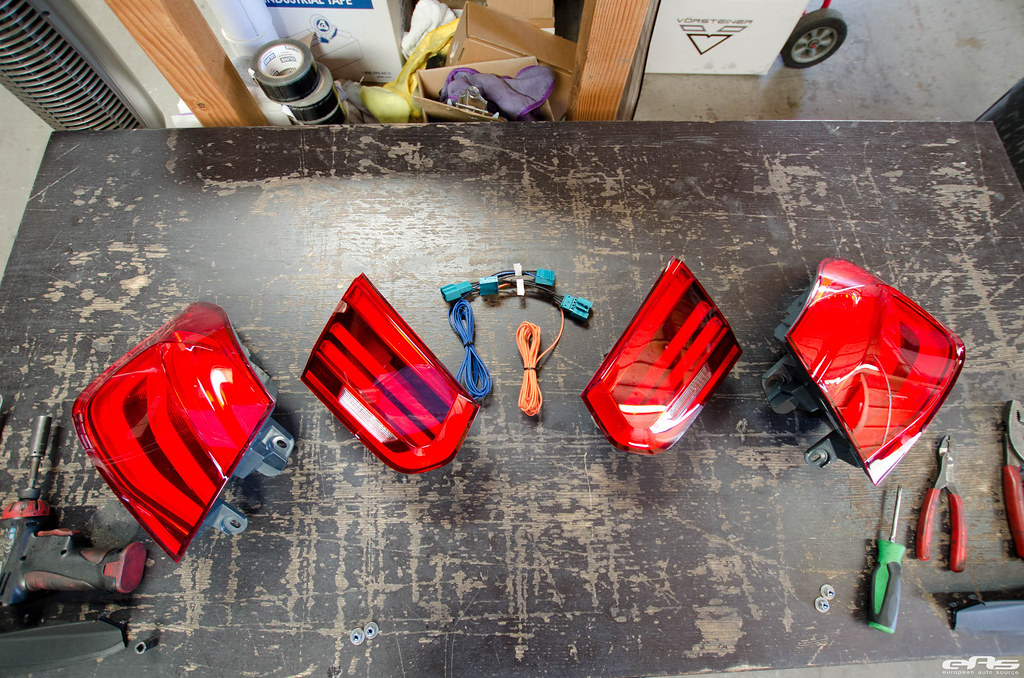 Kit contents - Left LCI Outer Taillight - Left LCI InnerTaillight - Right LCI Outer Taillight - Right LCI Inner Taillight - Left/Right Drip Rails - Wiring Harness Kit Tools required - 3/8" Ratchet - 10mm socket - 8mm socket - Phillips screwdriver - Trim removal tool - Pliers - Wire Cutters/Strippers - Terminal Crimpers Installation 1. Open Trunk 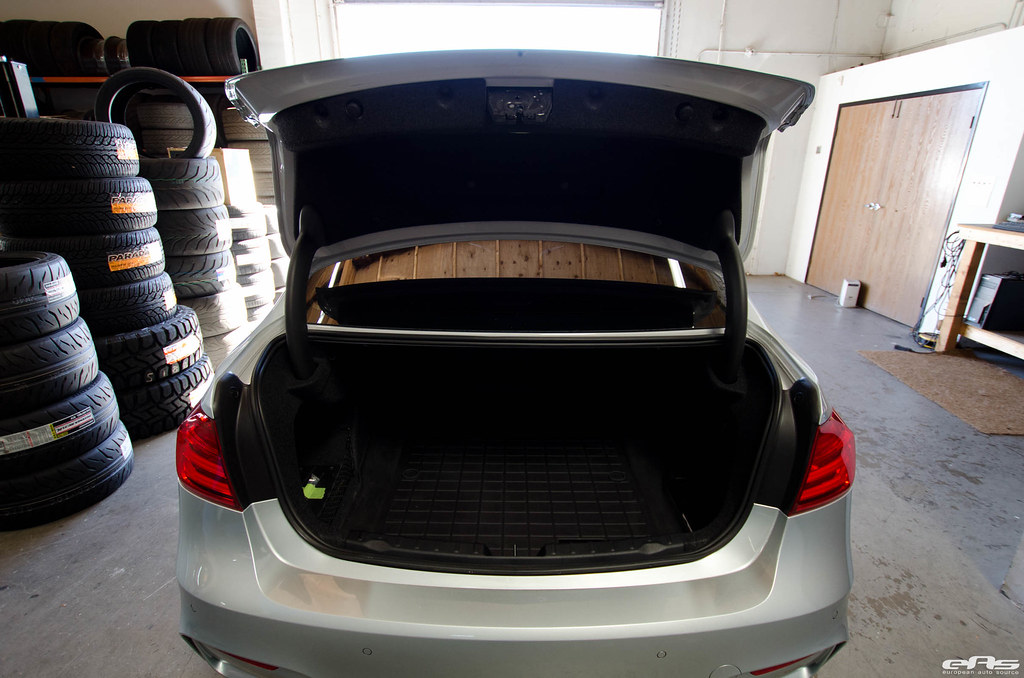 2. Remove Left/Right Drip rails. These are secured in by a plastic screw and pull away. 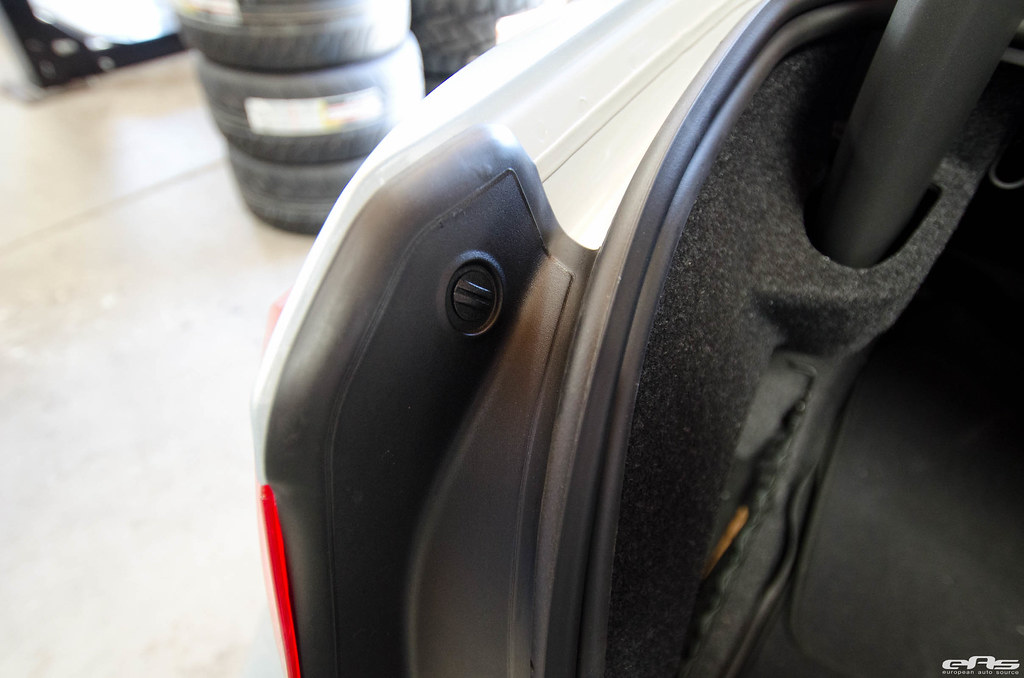 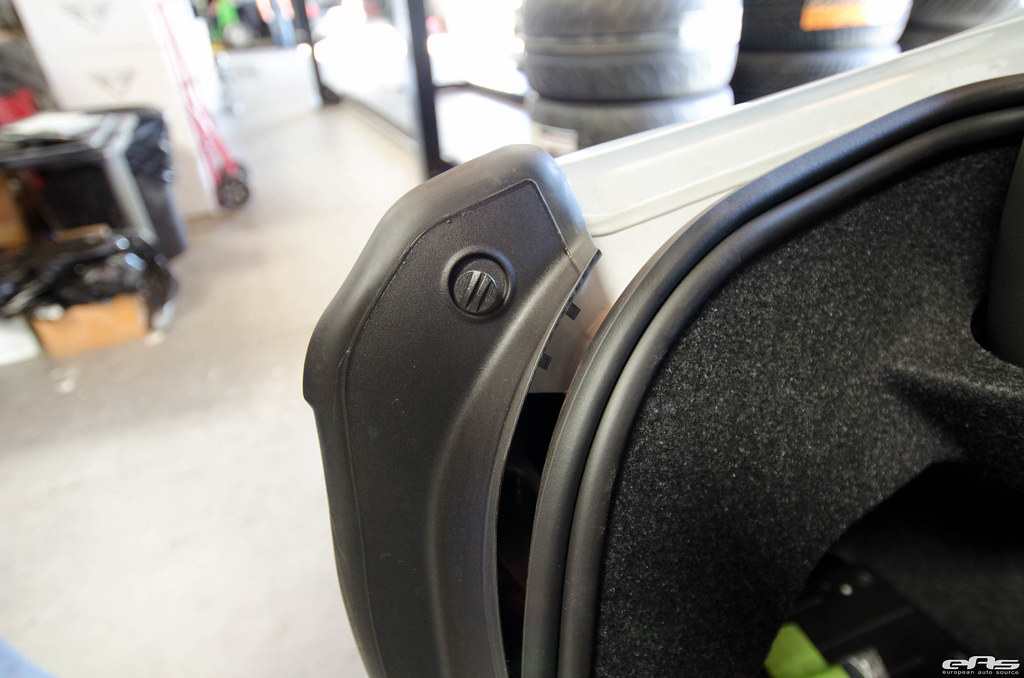 3. Remove (2) 10mm nuts securing taillight. 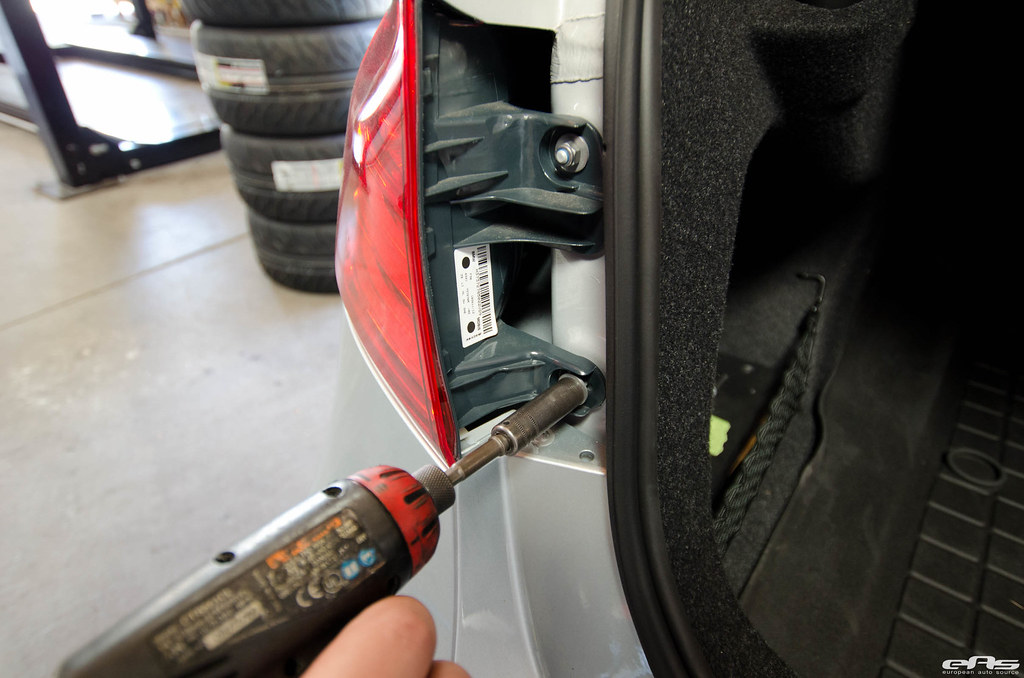 4. Remove Left taillight. Repeat above steps on Right side. 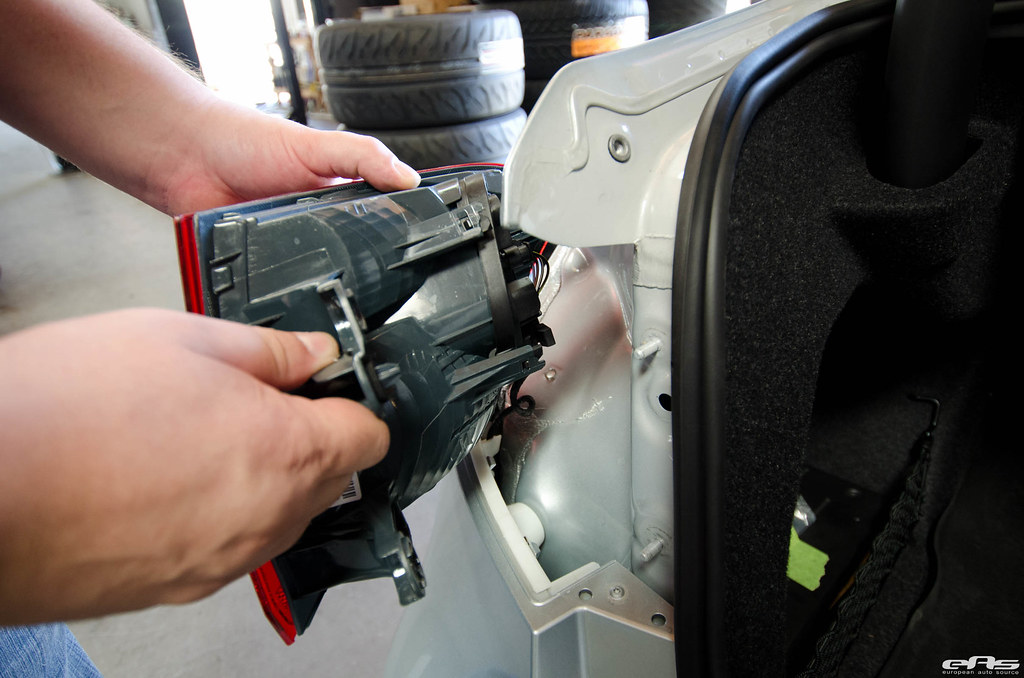 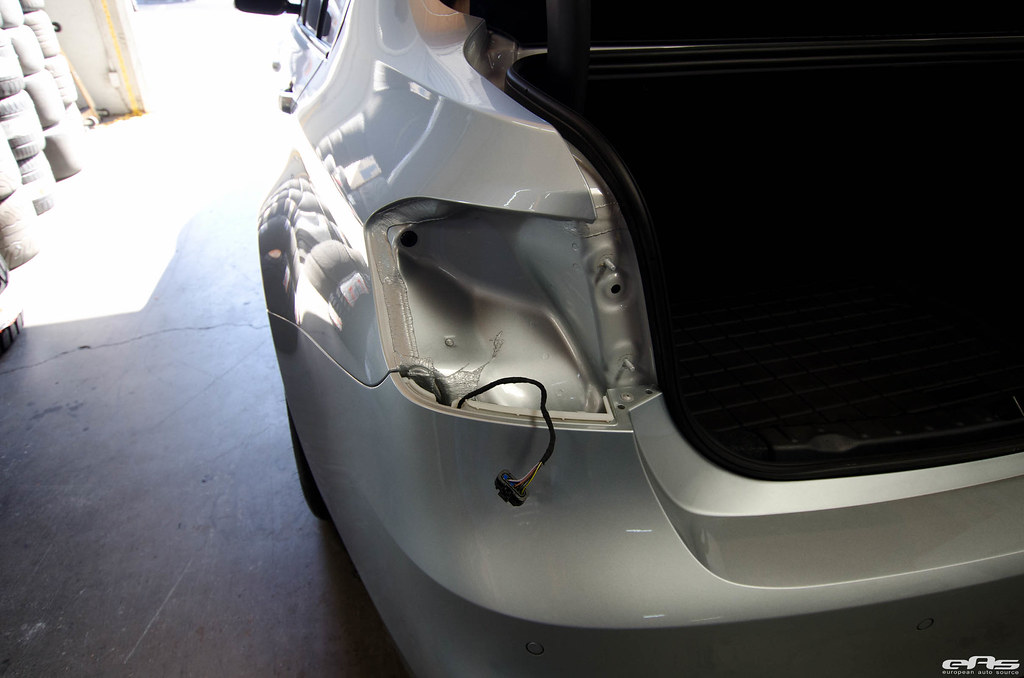 5. Removing Trunk Liner: The Trunk Liner is held in by 8 plastic phillips screws and 2 compression rivets. The phillips screws are very easy to strip so extra care must be taken to remove. 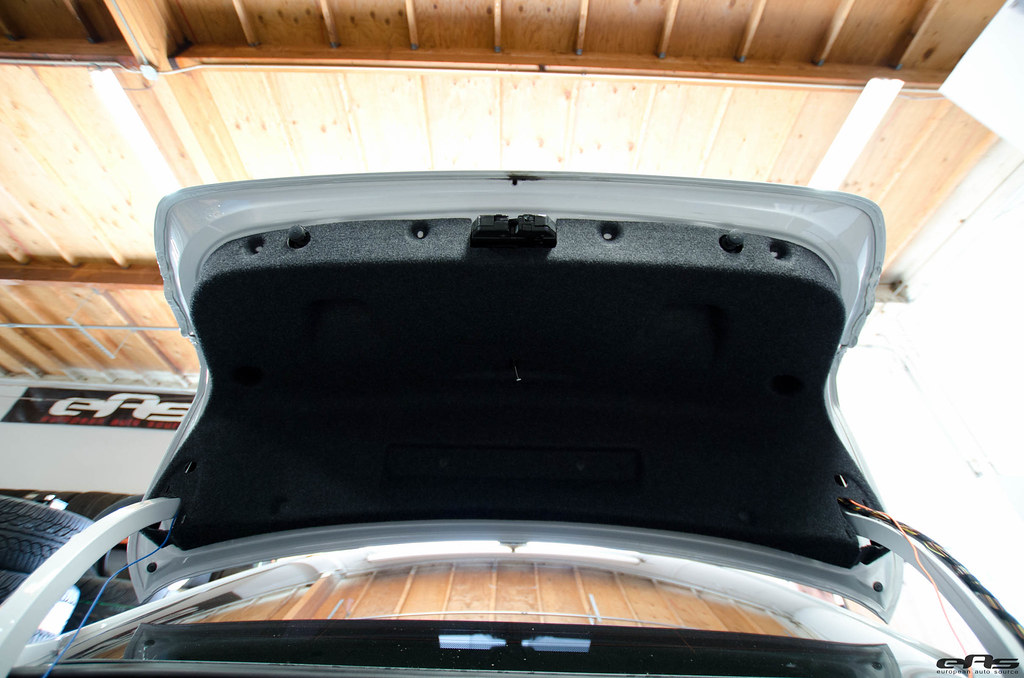 6. Carefully unscrew the plastic screw about halfway. 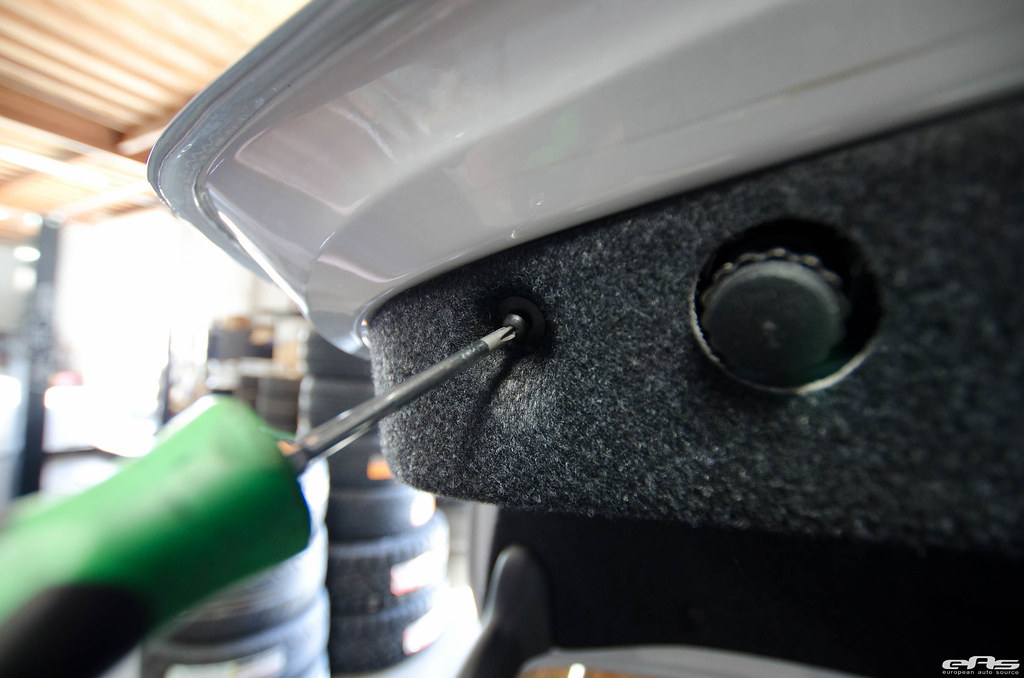 7. Fully remove screw out of place with trim removal tool. Repeat steps for remaining plastic screws 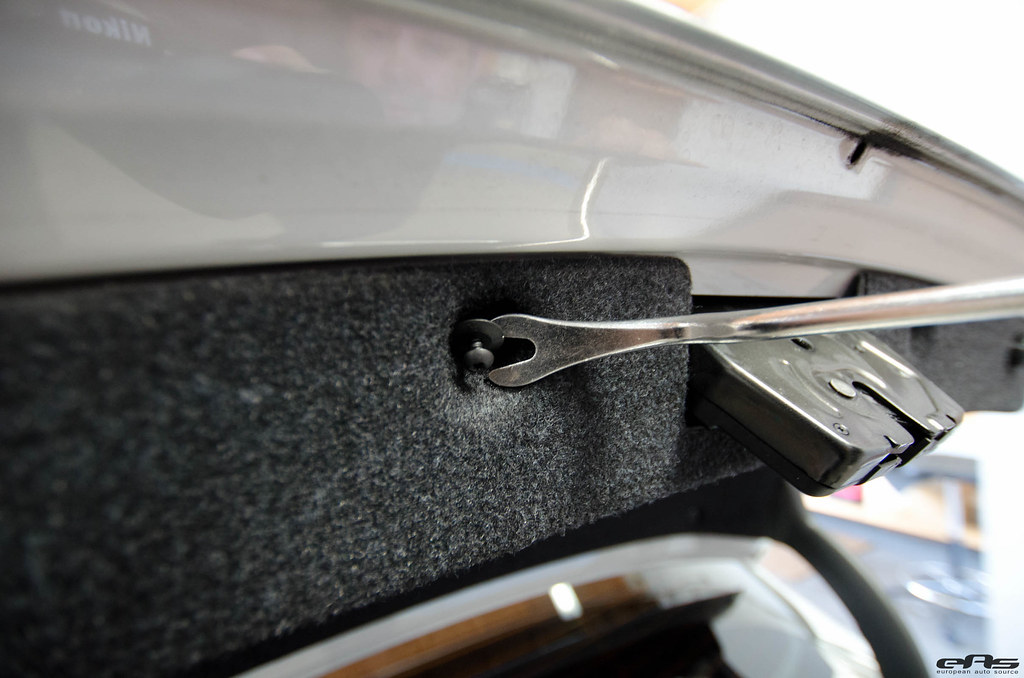 8. Remove plastic compression rivets. 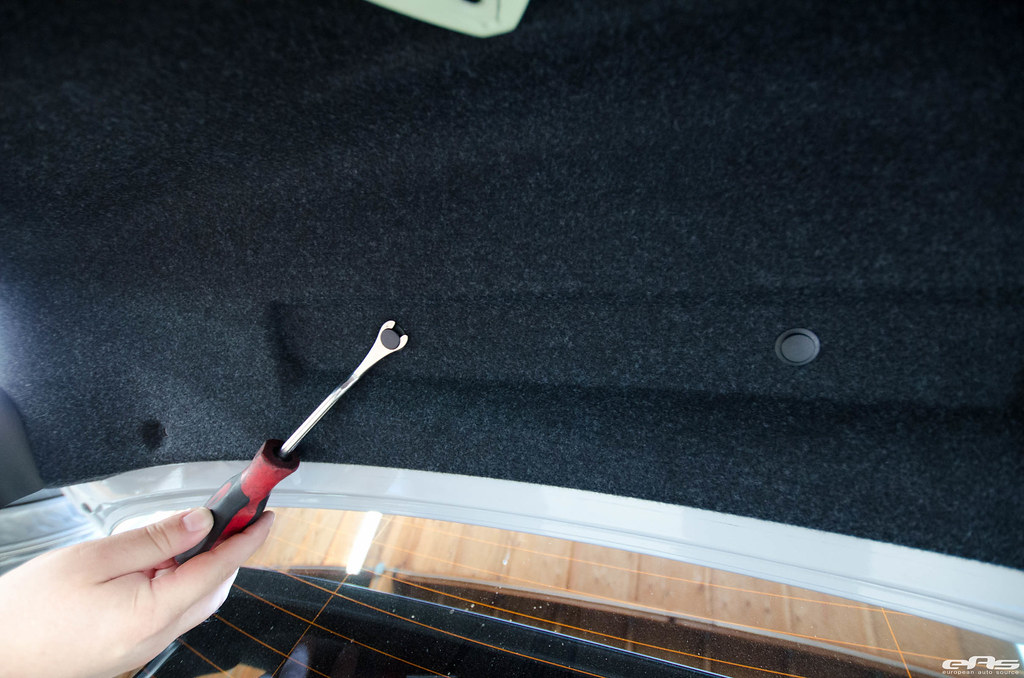 9. Remove Trunk Release handle.  10. Remove trunk bracket covers. They are held in by (2) plastic clips, which are pried free. Repeat steps for remaining cover. 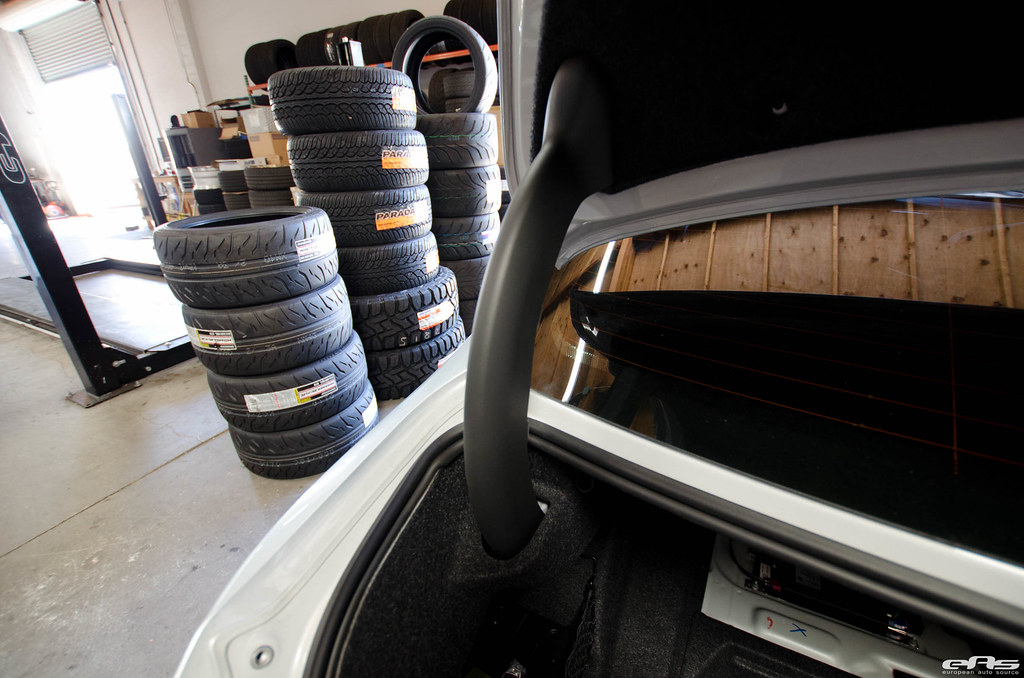 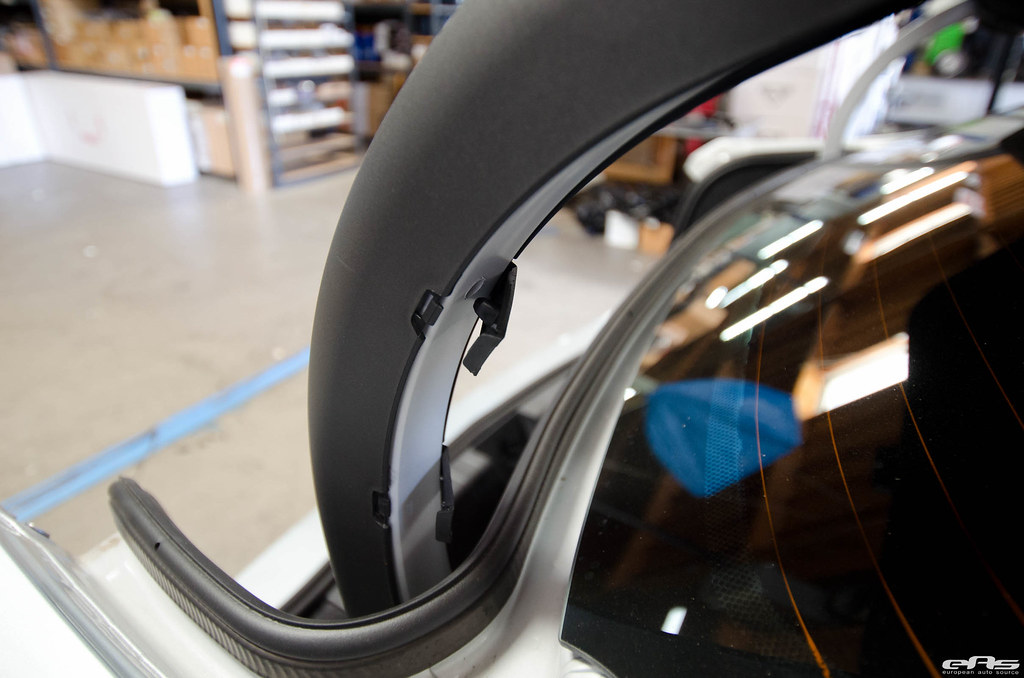 11. Remove Trunk Liner out of place and set aside 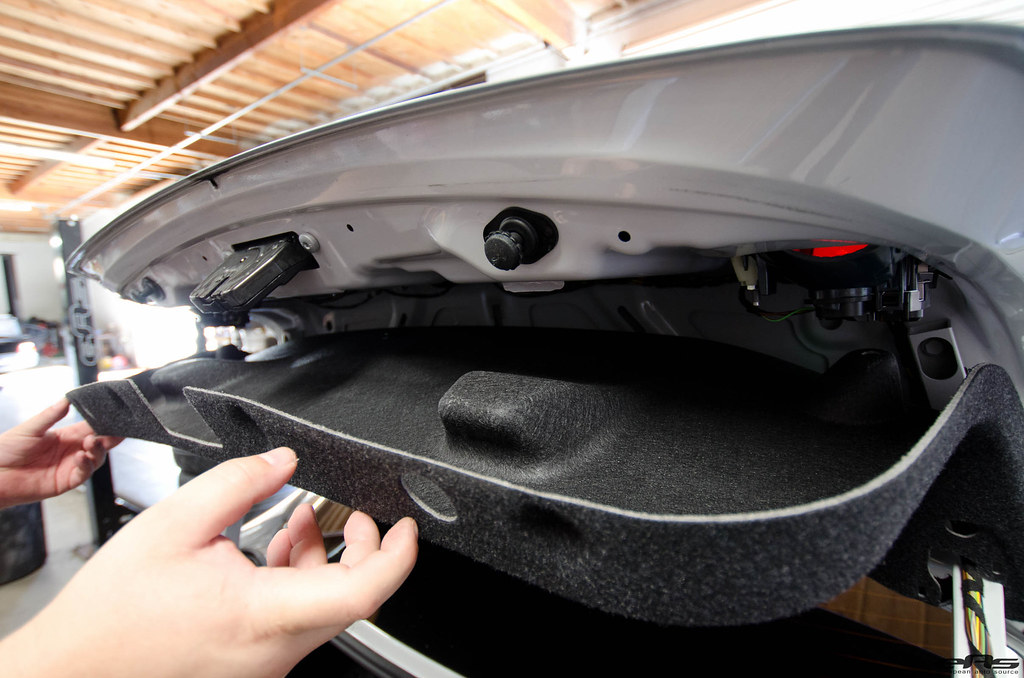 12. Unplug connector from inner taillight, remove nut with 10mm socket and set aside from vehicle. Repeat steps for other side. 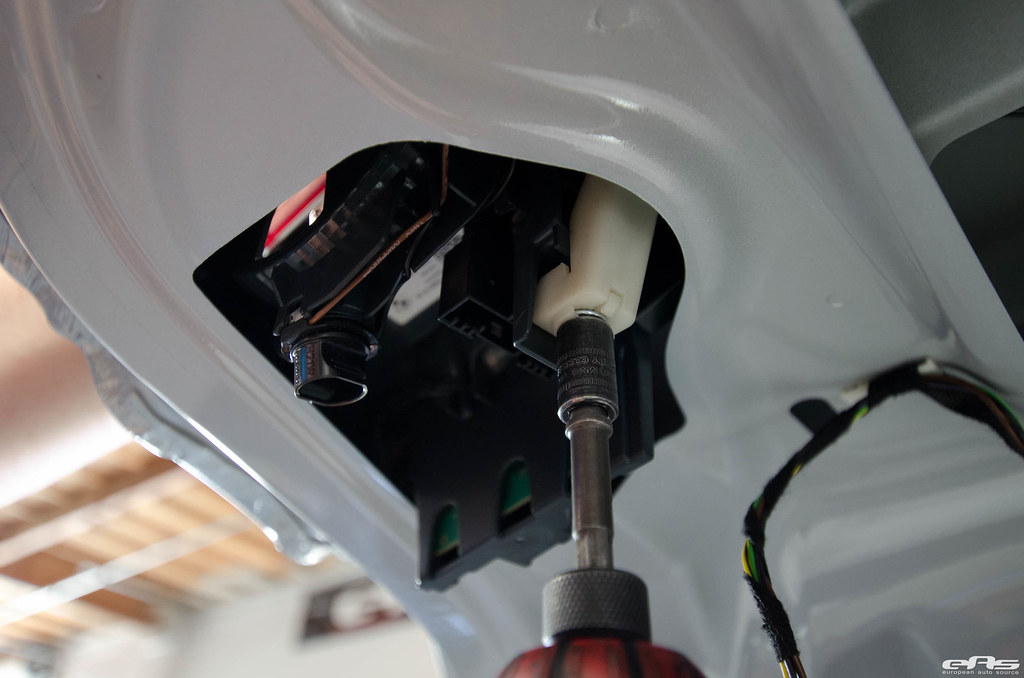 13. Halfway done. Step back and admire progress. 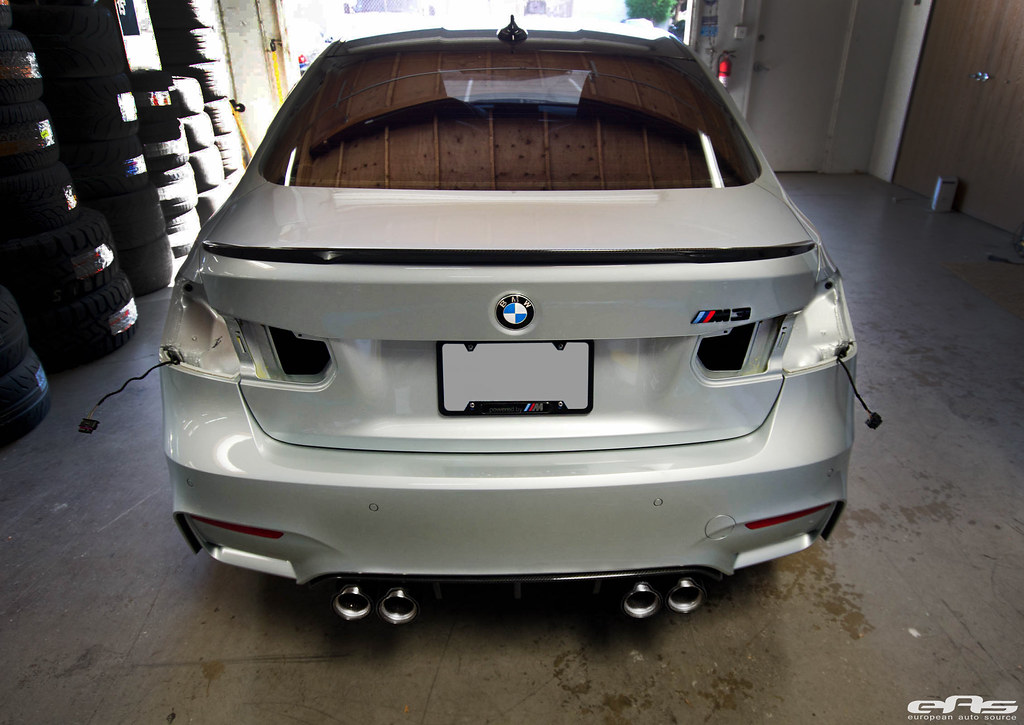
__________________
Tom G. | european auto source (eas)
email: tom@europeanautosource.com · web: https://europeanautosource.com· tel 866.669.0705 · ca: 714.369.8524 x22 GET DAILY UPDATES ON OUR BLOG · FACEBOOK · YOUTUBE · FLICKR · INSTAGRAM |
|
Appreciate
2
|
| 10-05-2015, 04:39 PM | #3 |
|
General
8115
Rep 18,813
Posts
Drives: BMW
Join Date: Nov 2005
Location: Anaheim, CA
|
Harness repinning In the next series of steps, we will be repinning the Outer Taillight connectors. This is a basic procedure and only requires a few steps, and completely reversible. Overview of steps being performed - LEFT TAILLIGHT Remove Black/Yellow from Position #1 and insert into Position #2 Remove Black/White Wire from Position #2 and insert into position #1 Remove Grey/Violet wire from Position #5 and insert into position #4 ScotchLock clamped onto Black/White wire (POS1) 14. Start with LEFT Outer Taillight connector. 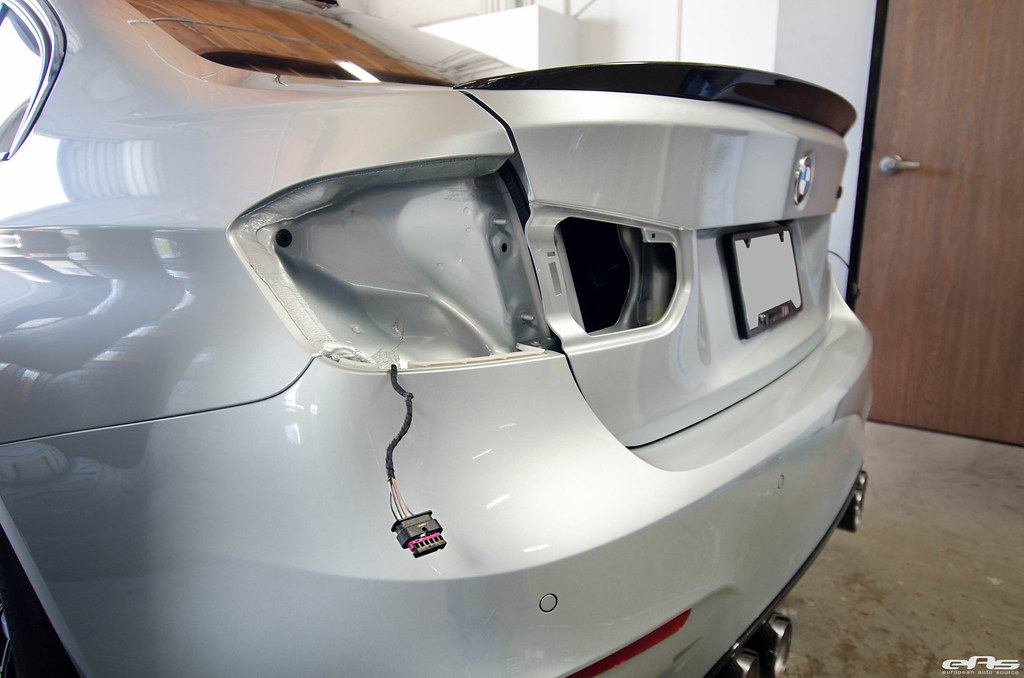 15. Remove the purple retaining clip by sliding sideways. This will allow the pins to be properly removed. 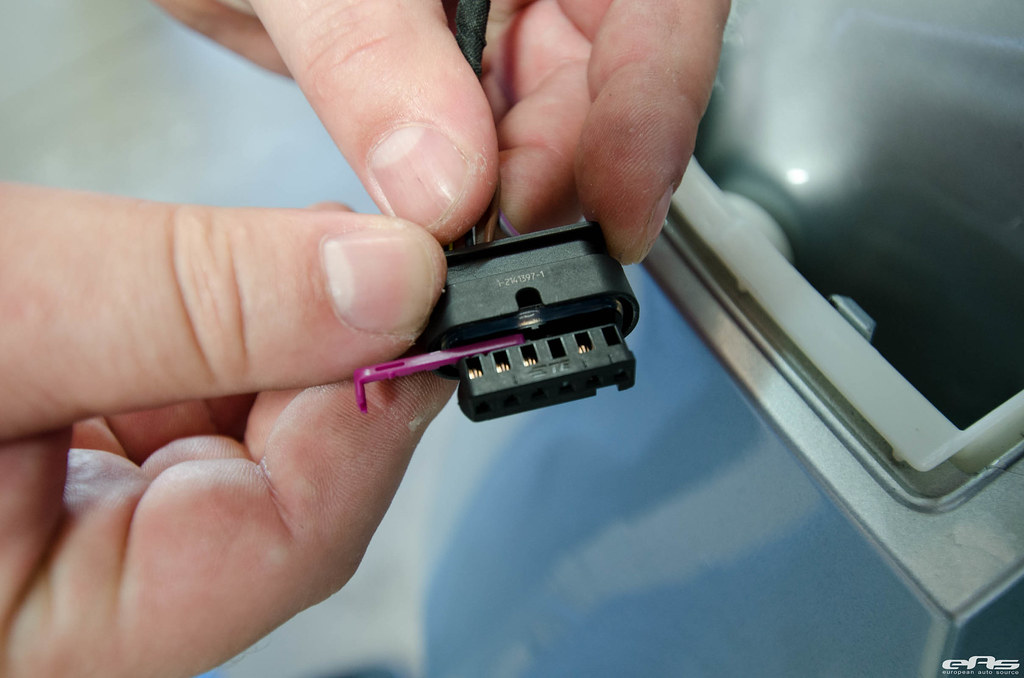 16. Remove the weatherproof plug in plug position #4 with a pick tool and set aside. We will be replacing this later. 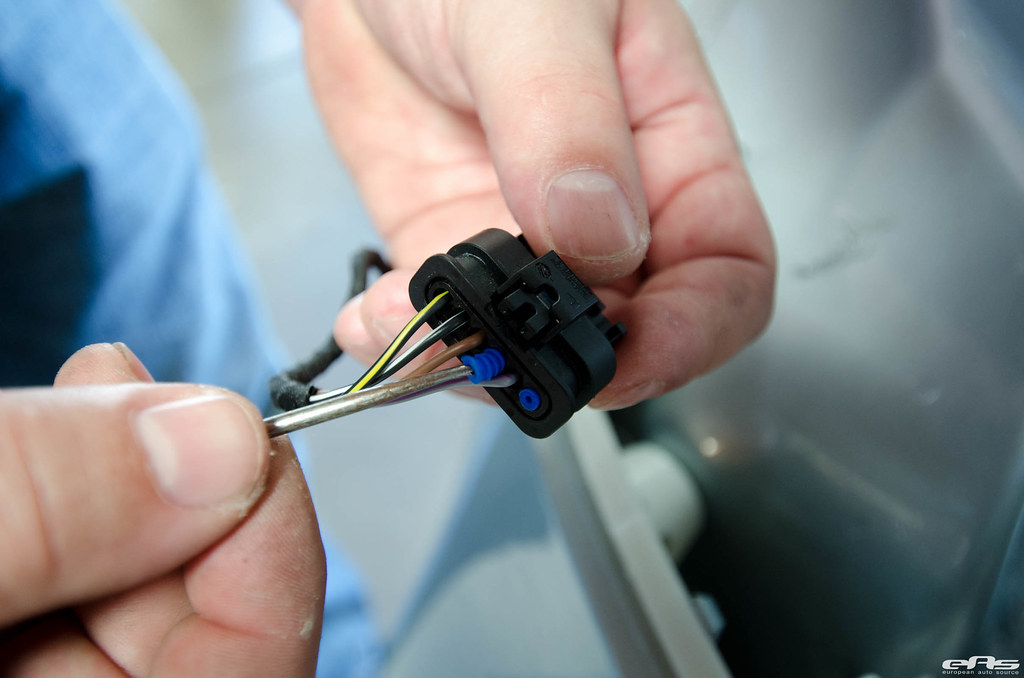 17. Wire positions #1 (Black/Yellow) and #2 (Black/White) need to be swapped. Remove Black/Yellow wire from connector on position #1. This is a (2) step procedure with your pick tool on the retaining barb on the connector, while carefully pulling outward. Repeat same steps for Black/White wire on position #2. 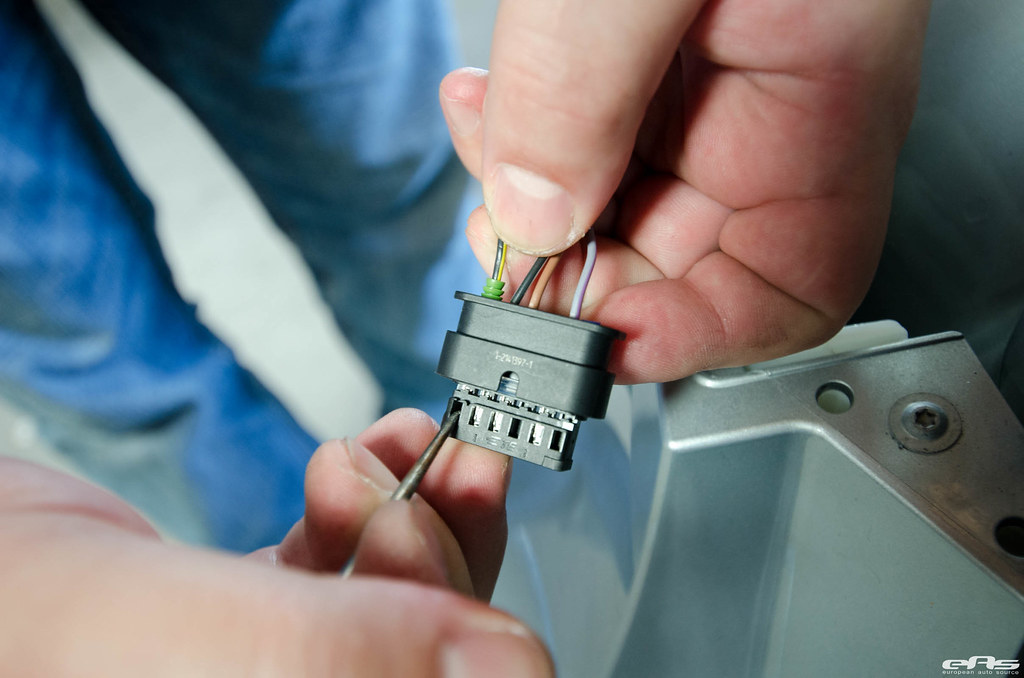 18. Photo of completed wire swap. Note Black/White wire is now in position #1 and Black/Yellow wire is in now in position #2. We've also removed Grey/Violet wire from position #5 and relocated to position #4.  19. Reinsert weatherproof plug in plug position #5. 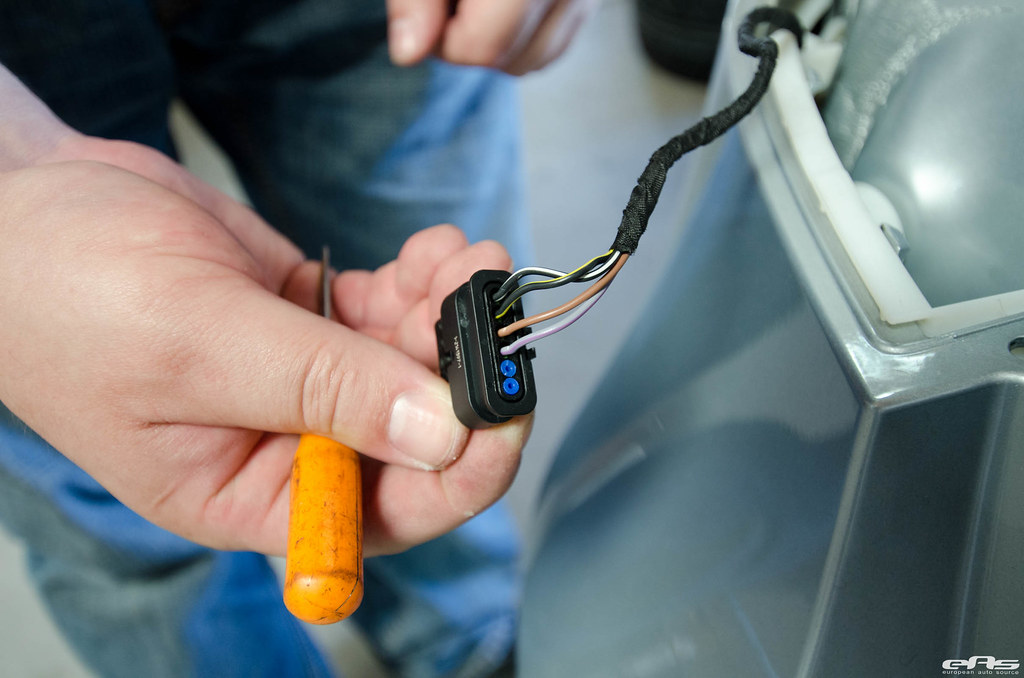 20. Clamp supplied ScotchLock onto Black/White wire (POS1).  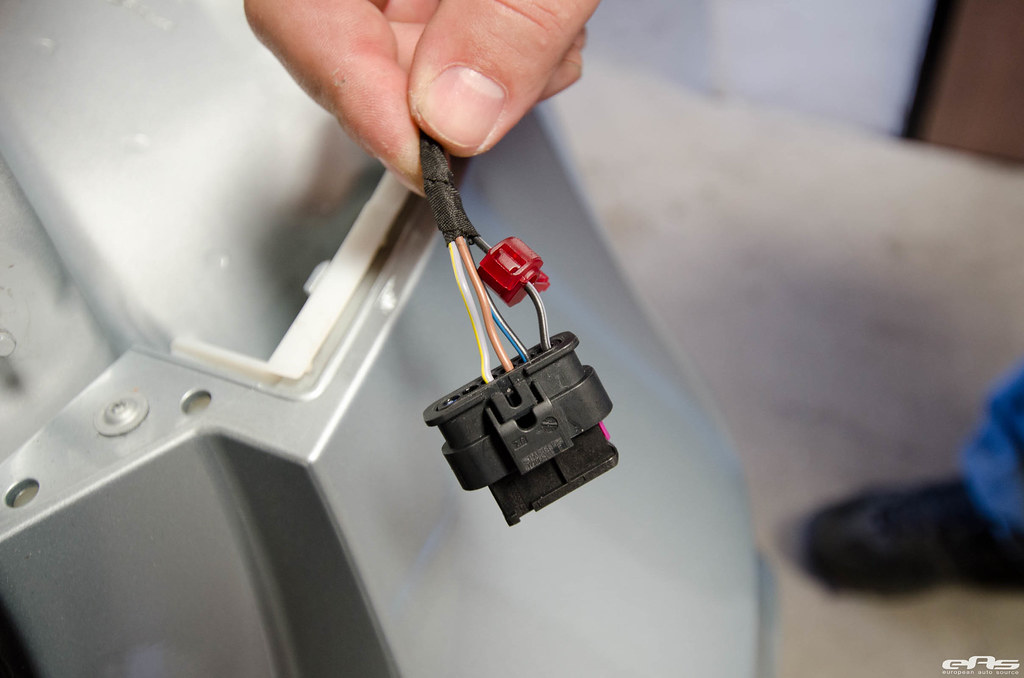 21. Move onto RIGHT side taillight and repeat steps, noting colors are slightly different than left taillight. Overview of steps being performed - RIGHT TAILLIGHT Remove Black/Blue from Position #1 and insert into Position #2 Remove Black/Grey Wire from Position #2 and insert into position #1 Remove Grey/Yellow wire from Position #5 and insert into position #4 ScotchLock clamped onto Black/Grey wire (POS1) 22. Reinstall LCI inner Trunk Lamps, using steps outlined above. Starting from LEFT LCI trunk taillight, insert supplied harness into connector, paying attention to RIGHT and LEFT harness, as they are slightly different. LEFT harness will have a longer BLUE wire hanging from it. 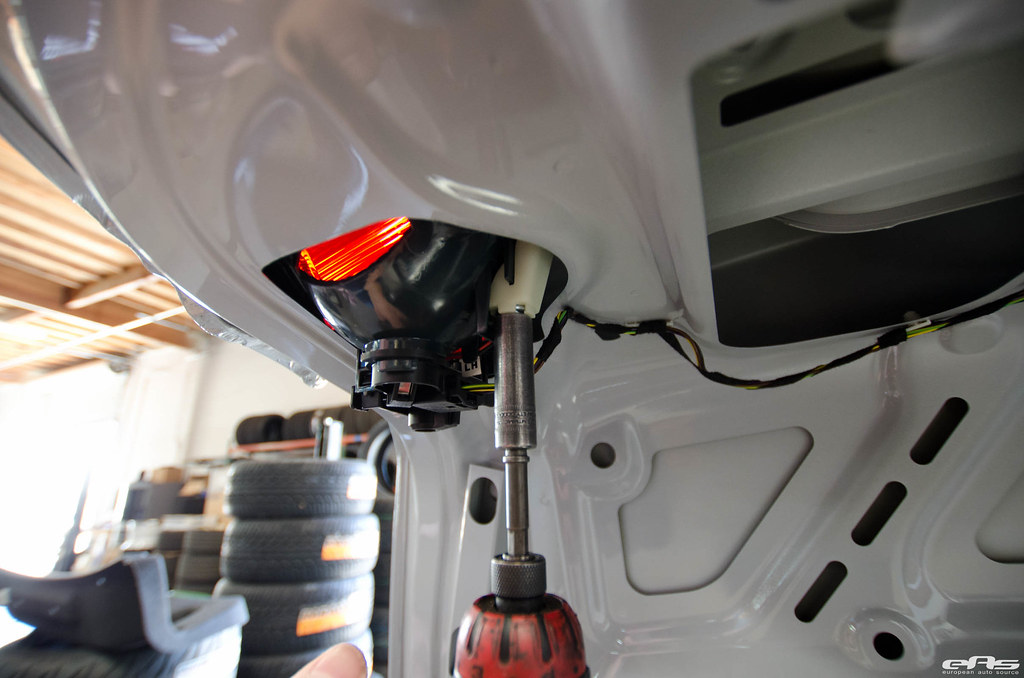 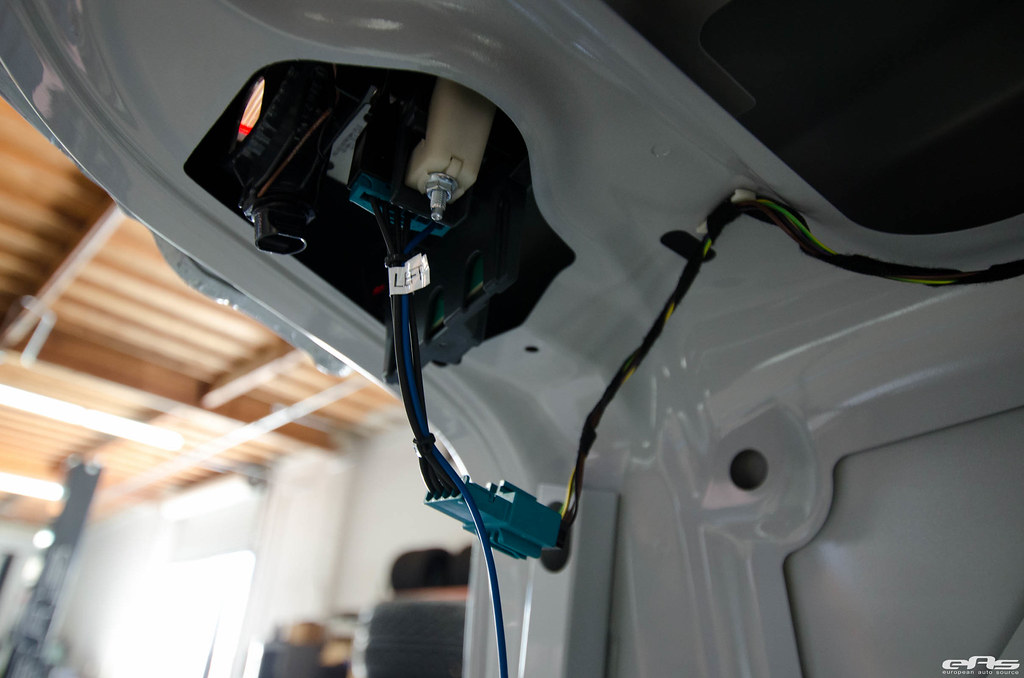 23. Repeat steps for RIGHT side, noting that RIGHT harness has longer ORANGE wire hanging. 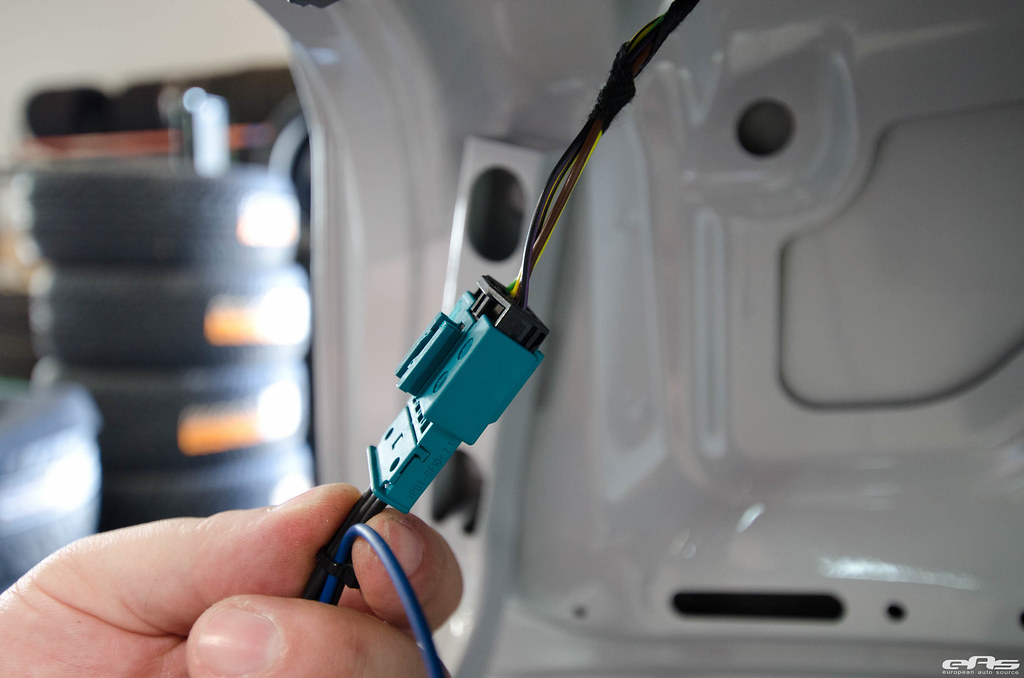 24. Route BLUE wire down trunk bracket. 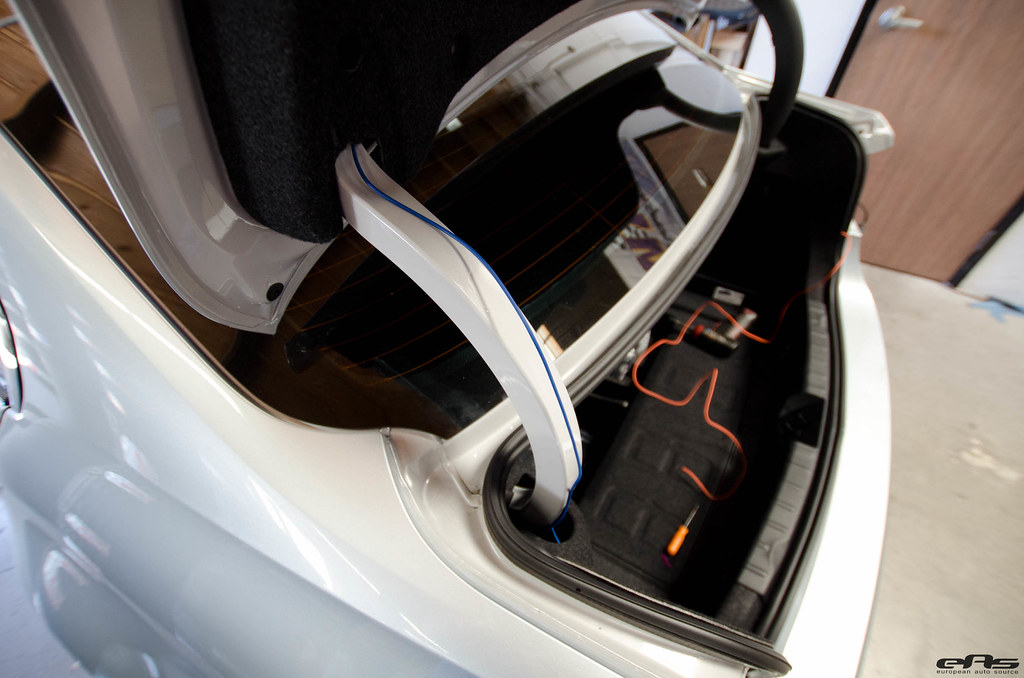 25. Route BLUE wire through trunk liner, near taillight area. 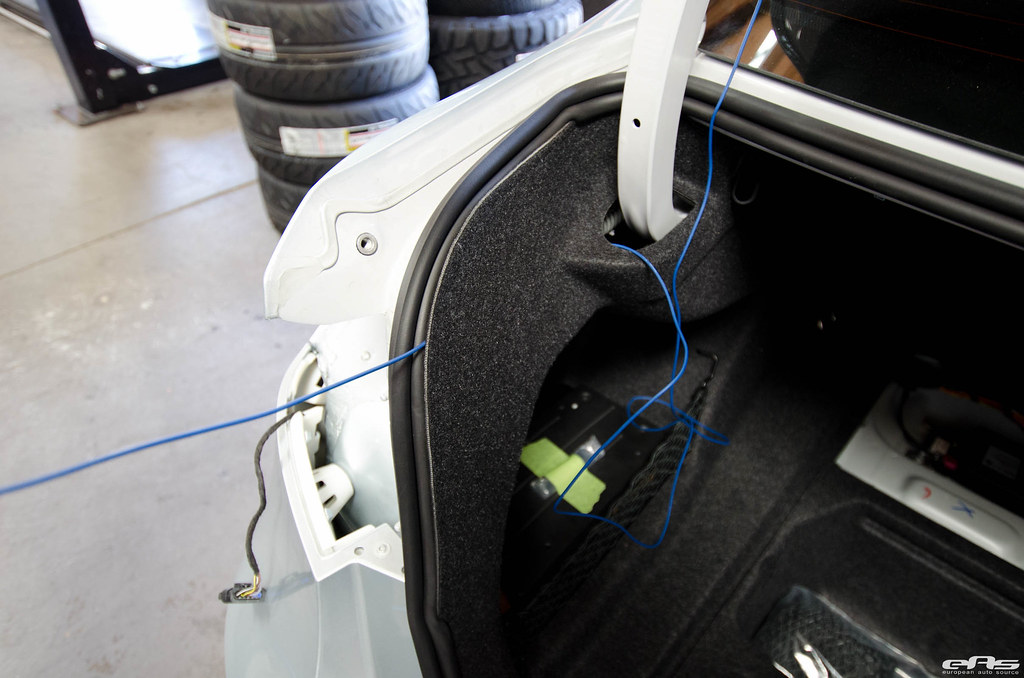 26. Route BLUE wire through locating pin hole behind taillight. 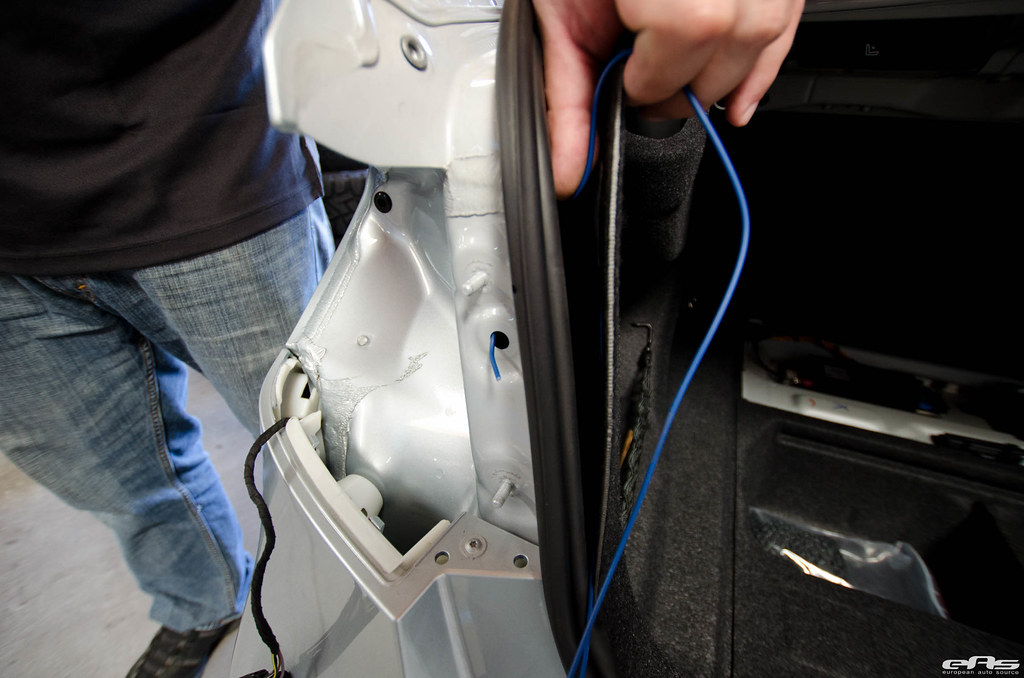 27. Strip BLUE wire and crimp supplied connector onto wire end and connect to Black/White wire on position #1. 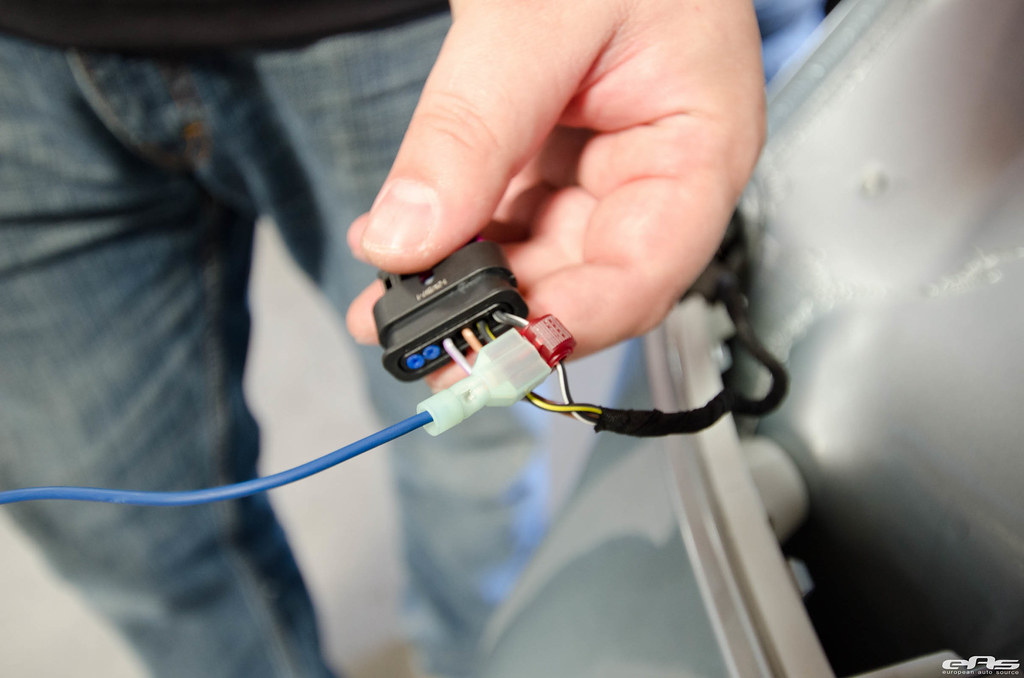 28. Repeat steps on RIGHT side, plugging into Black/Grey wire. 29. Reinstall trunk Liner. Replace LEFT/RIGHT trunk bracket trim pieces, keeping wires neatly tucked underneath. 30. Reinstall Outer Taillights. Close trunk a few times to ensure enough slack is present in wiring and does not catch up on trunk tension springs. 31. Installation complete. Stand back and admire your handywork.
__________________
Tom G. | european auto source (eas)
email: tom@europeanautosource.com · web: https://europeanautosource.com· tel 866.669.0705 · ca: 714.369.8524 x22 GET DAILY UPDATES ON OUR BLOG · FACEBOOK · YOUTUBE · FLICKR · INSTAGRAM |
|
Appreciate
2
BMW BRAD202.50 |
| 10-05-2015, 04:40 PM | #4 |
|
General
8115
Rep 18,813
Posts
Drives: BMW
Join Date: Nov 2005
Location: Anaheim, CA
|
Coding Coding is necessary in order to keep errors from appearing when new taillights are installed. REM Module REM -> BFD_L_IS_LED: aktiv / Werte=01 REM -> BFD_R_IS_LED: aktiv / Werte=01 REM -> FRA_H_L_KALTUEBERWACHUNG: nicht_aktiv / Werte=00 REM -> FRA_H_L_WARMUEBERWACHUNG: nicht_aktiv / Werte=00 REM -> FRA_H_R_KALTUEBERWACHUNG: nicht_aktiv / Werte=00 REM -> FRA_H_R_WARMUEBERWACHUNG: nicht_aktiv / Werte=00 REM -> FRA_H_R_IS_LED: aktiv / Werte=01 REM -> FRA_H_L_IS_LED: aktiv / Werte=01 REM -> NSL_L_KALTUEBERWACHUNG: nicht_aktiv / Werte=00 REM -> NSL_R_KALTUEBERWACHUNG: nicht_aktiv / Werte=00 REM -> NSL_L_WARMUEBERWACHUNG: nicht_aktiv / Werte=00 REM -> NSL_R_WARMUEBERWACHUNG: nicht_aktiv / Werte=00 REM -> RFS_R_KALTUEBERWACHUNG: nicht_aktiv / Werte=00 REM -> RFS_L_KALTUEBERWACHUNG: nicht_aktiv / Werte=00 REM -> RFS_R_WARMUEBERWACHUNG: nicht_aktiv / Werte=00 REM -> RFS_L_WARMUEBERWACHUNG: nicht_aktiv / Werte=00 REM -> RFS_L_IS_LED: aktiv / Werte=01 REM -> RFS_R_IS_LED: aktiv / Werte=01 Install is complete. Please comment if this guide helped you or if any of the steps need a bit more detailed explanation.
__________________
Tom G. | european auto source (eas)
email: tom@europeanautosource.com · web: https://europeanautosource.com· tel 866.669.0705 · ca: 714.369.8524 x22 GET DAILY UPDATES ON OUR BLOG · FACEBOOK · YOUTUBE · FLICKR · INSTAGRAM Last edited by tom @ eas; 11-02-2015 at 11:33 AM.. |
|
Appreciate
5
Tribalpinoy91193.00 sgovind77.50 |
| 10-05-2015, 04:40 PM | #5 |
|
General
8115
Rep 18,813
Posts
Drives: BMW
Join Date: Nov 2005
Location: Anaheim, CA
|
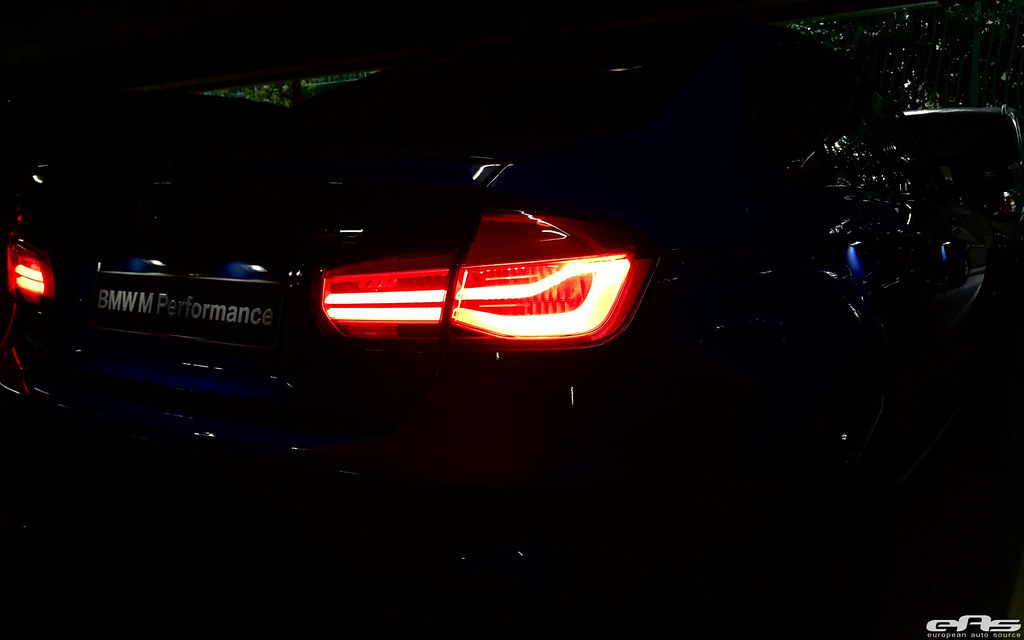
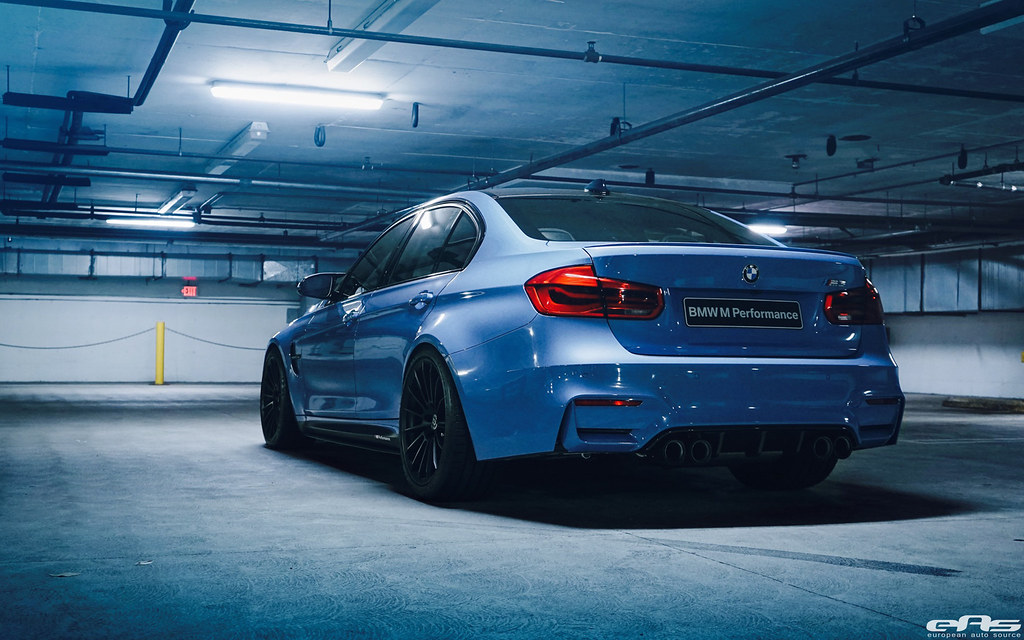
Night shots, M3 LCI Conversion
__________________
Tom G. | european auto source (eas)
email: tom@europeanautosource.com · web: https://europeanautosource.com· tel 866.669.0705 · ca: 714.369.8524 x22 GET DAILY UPDATES ON OUR BLOG · FACEBOOK · YOUTUBE · FLICKR · INSTAGRAM Last edited by tom @ eas; 10-05-2015 at 06:46 PM.. |
|
Appreciate
2
|
| 10-06-2015, 01:18 PM | #6 |
|
the Viking

11
Rep 89
Posts
Drives: '13 F30 M-sport
Join Date: Oct 2011
Location: Norway
|
It says "US version" on your website. Is there a difference between Euro and US on these?
__________________
Estroril F30 M-Sport
|
|
Appreciate
0
|
| 10-06-2015, 01:19 PM | #7 | |
|
General
8115
Rep 18,813
Posts
Drives: BMW
Join Date: Nov 2005
Location: Anaheim, CA
|
Quote:
__________________
Tom G. | european auto source (eas)
email: tom@europeanautosource.com · web: https://europeanautosource.com· tel 866.669.0705 · ca: 714.369.8524 x22 GET DAILY UPDATES ON OUR BLOG · FACEBOOK · YOUTUBE · FLICKR · INSTAGRAM |
|
|
Appreciate
0
|
| 10-14-2015, 02:22 AM | #10 | |
|
Private First Class
 
32
Rep 144
Posts |
Quote:
|
|
|
Appreciate
0
|
| 10-16-2015, 01:29 PM | #11 | |
|
General
8115
Rep 18,813
Posts
Drives: BMW
Join Date: Nov 2005
Location: Anaheim, CA
|
Quote:
__________________
Tom G. | european auto source (eas)
email: tom@europeanautosource.com · web: https://europeanautosource.com· tel 866.669.0705 · ca: 714.369.8524 x22 GET DAILY UPDATES ON OUR BLOG · FACEBOOK · YOUTUBE · FLICKR · INSTAGRAM |
|
|
Appreciate
0
|
| 10-26-2015, 03:33 PM | #13 | |
|
Private First Class
32
Rep 144
Posts |
Quote:
|
|
|
Appreciate
0
|
| 10-26-2015, 03:41 PM | #14 | |
|
General
8115
Rep 18,813
Posts
Drives: BMW
Join Date: Nov 2005
Location: Anaheim, CA
|
Quote:
__________________
Tom G. | european auto source (eas)
email: tom@europeanautosource.com · web: https://europeanautosource.com· tel 866.669.0705 · ca: 714.369.8524 x22 GET DAILY UPDATES ON OUR BLOG · FACEBOOK · YOUTUBE · FLICKR · INSTAGRAM |
|
|
Appreciate
0
|
| 10-27-2015, 05:38 AM | #16 | |
|
Private First Class
32
Rep 144
Posts |
Quote:
The finish look.  |
|
|
Appreciate
0
|
| 10-27-2015, 11:10 AM | #17 | |
|
General
8115
Rep 18,813
Posts
Drives: BMW
Join Date: Nov 2005
Location: Anaheim, CA
|
Quote:
__________________
Tom G. | european auto source (eas)
email: tom@europeanautosource.com · web: https://europeanautosource.com· tel 866.669.0705 · ca: 714.369.8524 x22 GET DAILY UPDATES ON OUR BLOG · FACEBOOK · YOUTUBE · FLICKR · INSTAGRAM |
|
|
Appreciate
1
|
| 10-27-2015, 03:11 PM | #19 | |
|
General
2907
Rep 21,708
Posts |
Quote:
__________________
Kevin S. | european auto source (eas)
email: kevin@europeanautosource.com · web: https://europeanautosource.com· tel 866.669.0705 · ca: 714.369.8524 x31 GET DAILY UPDATES ON OUR BLOG · FACEBOOK · YOUTUBE · FLICKR · INSTAGRAM |
|
|
Appreciate
0
|
| 10-31-2015, 07:36 AM | #20 | |
|
Private First Class
32
Rep 144
Posts |
Quote:
|
|
|
Appreciate
0
|
| 11-02-2015, 11:29 AM | #21 | |
|
General
8115
Rep 18,813
Posts
Drives: BMW
Join Date: Nov 2005
Location: Anaheim, CA
|
Quote:
▀▄ eas | DIY: Rear Foglamp Mod http://f80.bimmerpost.com/forums/sho....php?t=1023817 We have a DIY listed here which overviews the Rear Fog coding steps, but you should already have that enabled?
__________________
Tom G. | european auto source (eas)
email: tom@europeanautosource.com · web: https://europeanautosource.com· tel 866.669.0705 · ca: 714.369.8524 x22 GET DAILY UPDATES ON OUR BLOG · FACEBOOK · YOUTUBE · FLICKR · INSTAGRAM |
|
|
Appreciate
0
|
| 11-03-2015, 01:50 AM | #22 | |
|
Private First Class
32
Rep 144
Posts |
Quote:
I meant maybe if I have rear fog lamp, coding is different. Without coding, I have blinking in 3 place. Now only stop lamp blinking. |
|
|
Appreciate
0
|
Post Reply |
| Bookmarks |
|
|


