BMW 3-Series and 4-Series Forum (F30 / F32) | F30POST
>
DIY: Illuminated LCI AC/radio trim retrofit

| 10-07-2016, 10:03 AM | #507 |
|
Lieutenant
 133
Rep 570
Posts |
Ok parts on order, not even got a bmw yet so you can tell I am committed to getting one
 Decided to buy a crimp tool for £10 so will make the cable myself and have it for future mods Sully |
|
Appreciate
0
|
| 10-10-2016, 02:35 AM | #509 |
|
Colonel
 
505
Rep 2,152
Posts |
so Wednesday i was home from work ill with money burning a hole in my pocket. decided id do the LCI Stereo facia swap
ordered the parts £56 from BMW and made the cable. didnt take long about 20 mins to make  before picture 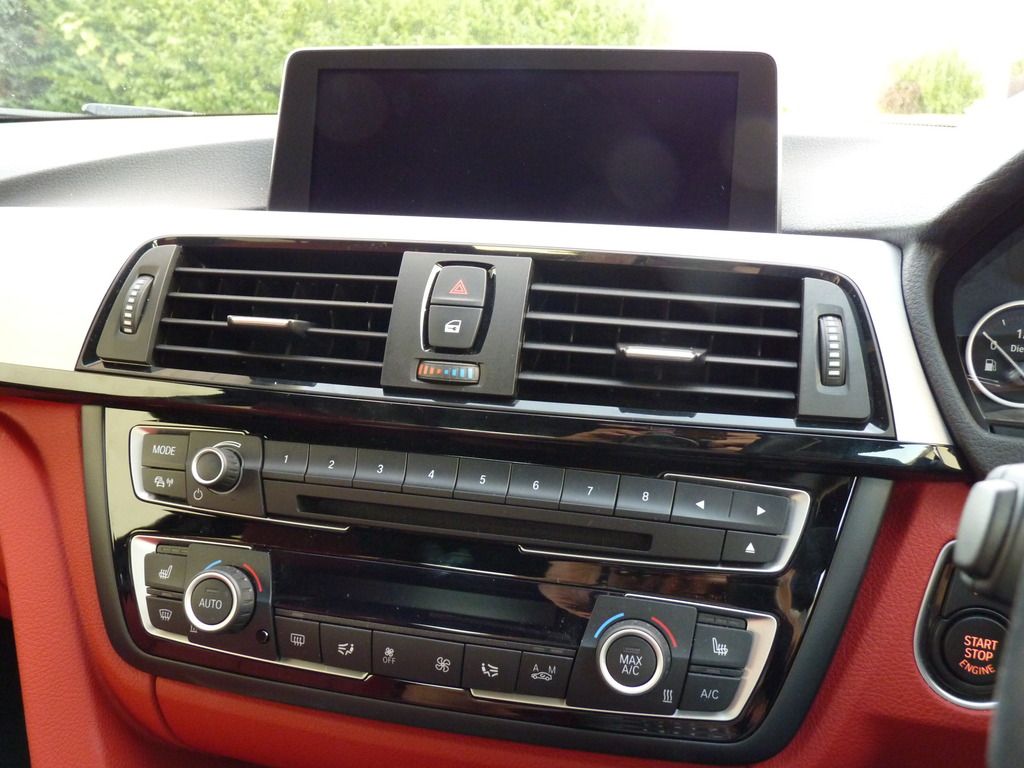 after picture 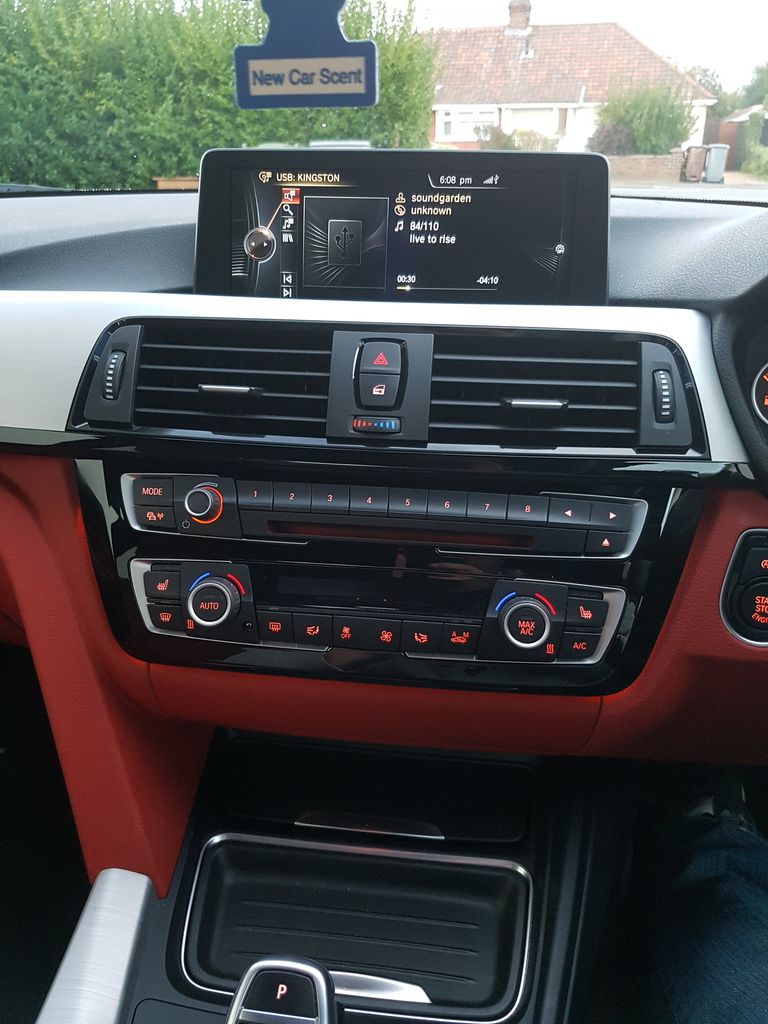 after picture night 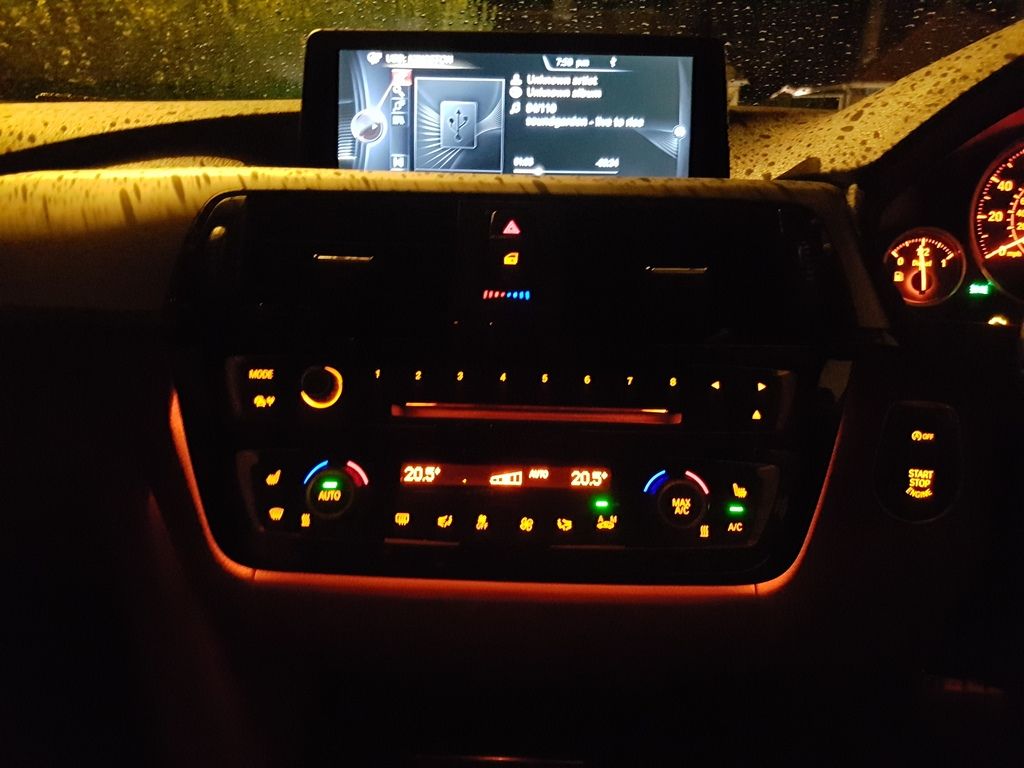 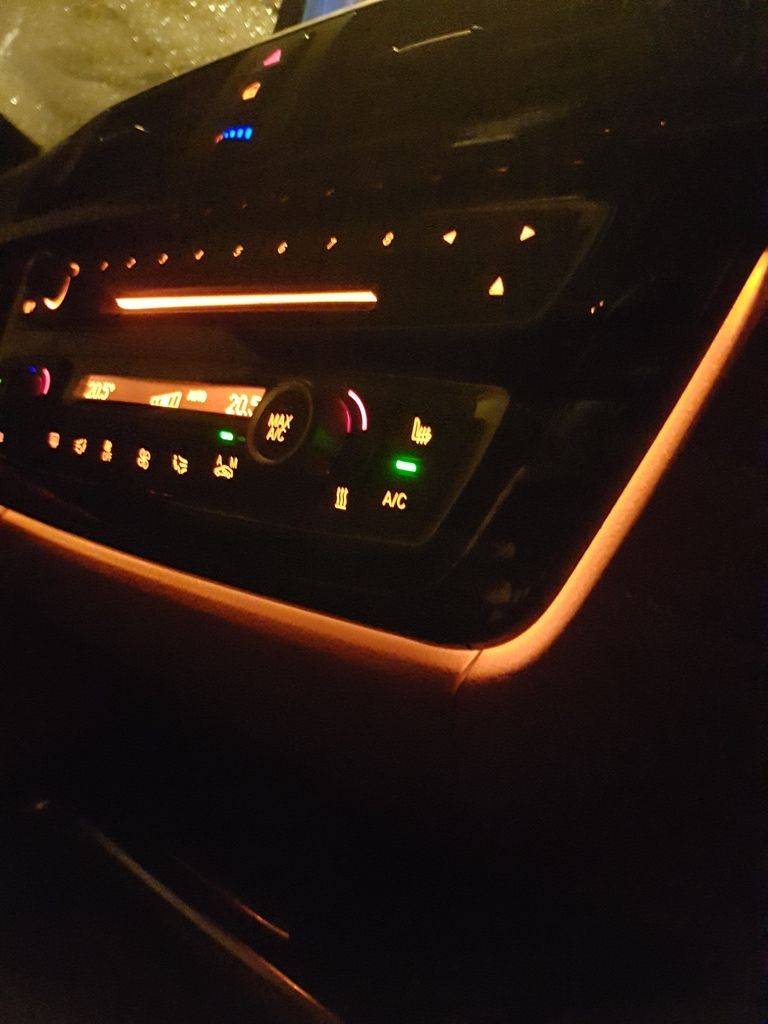  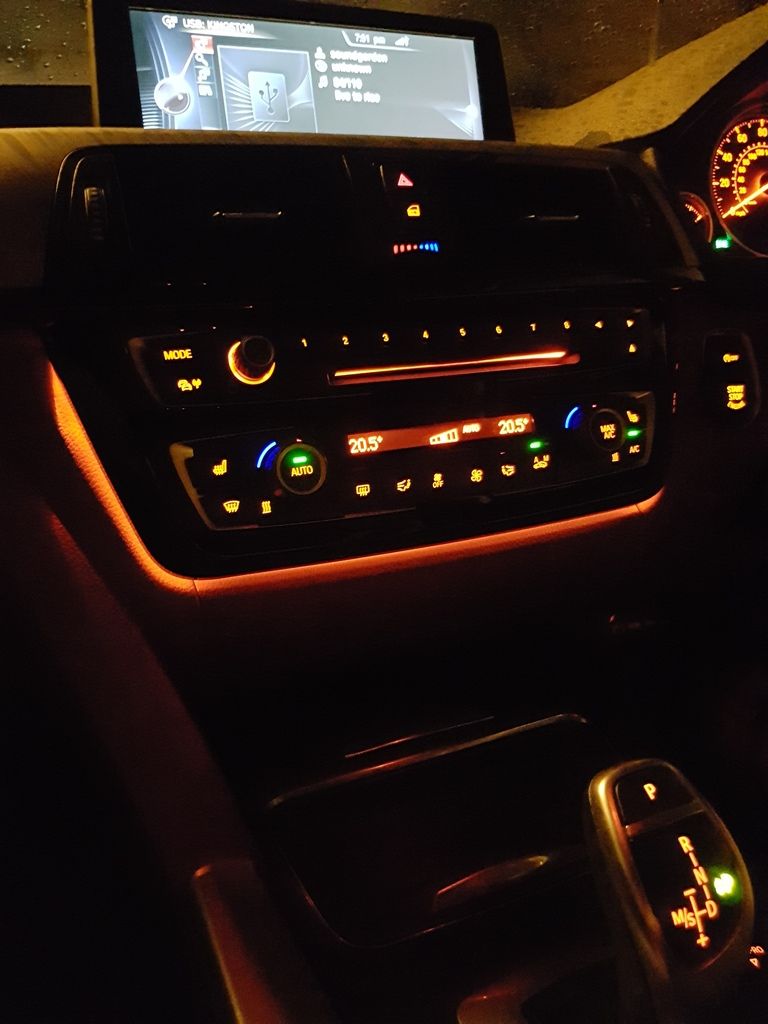
__________________
Current: BMW M4 F83 - Mods : Pedal Covers, LCI Stereo facia Retrofit and Carbon Rear corner covers
Old: F32 435d M Sport - Mods : HR Sport Springs, 20" Veemann V-FS23 in Gun Metal, M Performance Body Kit, Pedal Covers, Eurspec CF Mirror Caps, More-BHP remap 364 BHP 741 NM, M4 Under Chassis Brace, 15mm Rear ARB, 8.8" Screen Retrofit and LCI Stereo facia Retrofit |
|
Appreciate
0
|
| 10-10-2016, 01:52 PM | #511 |
|
Lieutenant
133
Rep 570
Posts |
Parts including bits to make cable for £48 delivered from Harry Fairbairn BMW 01592 657842 got the details off another forum.
If you do order use ref 42120 and it will include trim and bits to make cable Sully |
|
Appreciate
0
|
| 10-14-2016, 01:03 PM | #512 |
|
Brigadier General
 
2524
Rep 3,863
Posts |
i managed to do mine today and it looks very nice
 Thanks to my friend Dante to sorting and sending me Y Cable  Thanks to my friend Evdok for sending email to Dante i have also got rid of phone from armrest and now waiting for mats , it turned into nice small storage for change as i don't like it rattling in cup holder or ashtray drive me crazy  |
| 11-22-2016, 12:40 PM | #514 |
|
New Member

11
Rep 20
Posts |
retro fit ambient lights
Hi Gents
I am a complete newbie to this forum, as I have only just purchased an F30 320d I wanted to show you guys the little retro fit door ambient lighting i've just finished I have also just purchased the LCI centre surround which I will fit shortly.. Hope you like it ?... Let me know your thoughts.... |
|
Appreciate
0
|
| 11-22-2016, 02:31 PM | #515 | |
|
Captain

203
Rep 943
Posts
Drives: 2012 328i Modern Line
Join Date: Apr 2016
Location: NC
|
Quote:
__________________
:wave:
|
|
|
Appreciate
0
|
| 11-22-2016, 05:16 PM | #516 | |
|
New Member
11
Rep 20
Posts |
Quote:
I am currently looking at how the X5 & X6 models optical door strips fit, if they have a similar fitment I will buy those and the purchase the orange,blue & white LEDs . |
|
|
Appreciate
0
|
| 11-25-2016, 05:28 PM | #517 |
|
First Lieutenant
88
Rep 339
Posts |
Does anyone knows if the trim piece p/n: 64119358940 will fit a 2017 M4? I just want to make sure before I order it. Thanks in advance.
-Nick |
|
Appreciate
0
|
| 11-26-2016, 01:46 AM | #518 | |
|
Private First Class
 60
Rep 137
Posts |
Quote:
|
|
|
Appreciate
0
|
| 11-26-2016, 08:08 AM | #519 | |
|
Enthusiast

468
Rep 1,791
Posts
Drives: F87 M2 / F31 330d
Join Date: Nov 2005
Location: Bavaria
iTrader: (0)
Garage List 2004 E46 BMW M3 [0.00]
2017 F87 BMW M2 [10.00] 2013 F31 330d Touring [9.50] 2009 E89 Z4 Sdrive 30i [9.00] 1989 E30 320is 2-door [10.00] 1986 E28 M535i [9.00] |
Quote:
Yes, it fits. But since you don't have the cupholder LED, you have to tap into the footwell LED according to Chews how to, linked in post #2 of this thread.
__________________
2017 F87 ///M2, Long Beach Blue, 6MT
2013 F31 330d Touring, ///M-Sport, Alpine White, Alcantara/Cloth, 19" Style M403, 8AT 2009 E89 Z4 SDrive 30i, Titanium Silver, Coral Red Leather, 19" Style 296, 6MT 1989 E30 320is, ///M-Technik II, S14 Engine, Sterling Silver, Black Leather, 16" BBS RS 003, 5MT 1986 E28 ///M535i, Agate Green, Pine Green Velours, 16" ALPINA, 5MT |
|
|
Appreciate
0
|
| 11-29-2016, 02:06 AM | #520 |
|
Second Lieutenant

89
Rep 258
Posts |
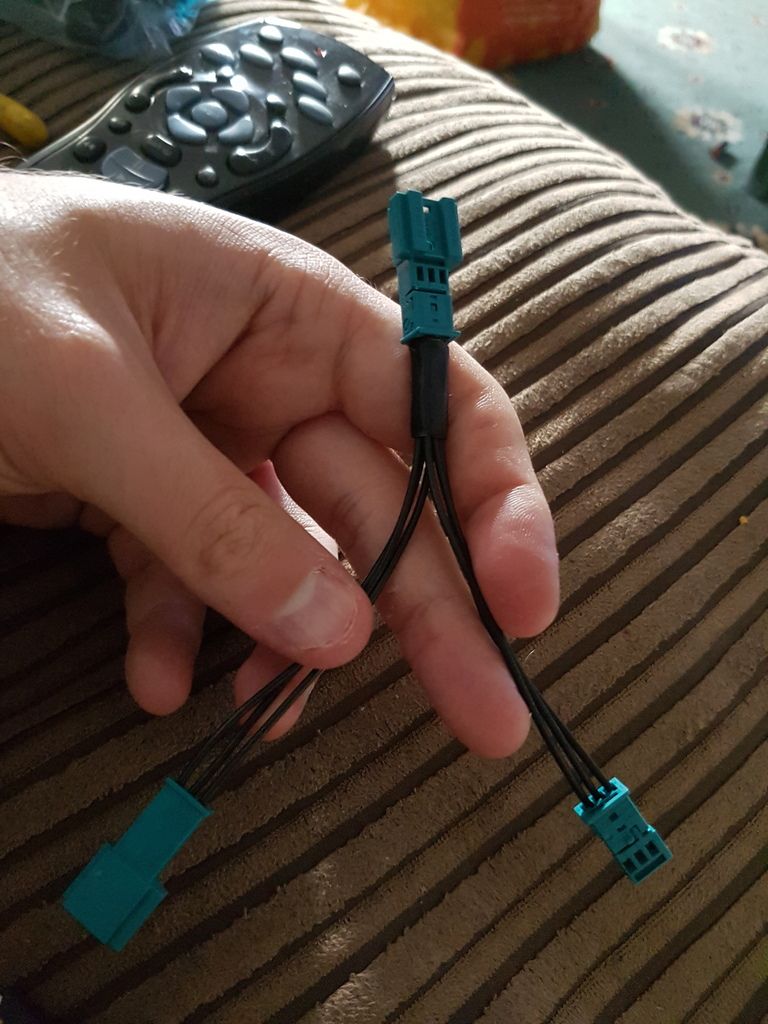
Finally got around to doing mine today. Bought mine as a kit from www . getbmwparts . com, but buy some extra male crimp pins to practice your crimping technique. For those anxious in crimping their own wires/connectors to make the "y" cable, here's a few tips:
1. Get yourself the right crimp tool, borrow it if you have to, and not a cheap Asian crimper with "looser" tolerances. I tried one of my universal crimpers first, and could not find a die that crimps these pins without mashing them or bending them to the point they break!! I bought myself the Engineer PA-09 crimp tool from Amazon, and couldn't have been any happier with it, even though I have hundreds of dollars invested in other crimpers in my tool kit that might marginally work for these pins (I used to do a lot of electronic installations in my career). Yes, it's a two step process with this particular Japanese crimper, but with little effort, you get flawless crimps! Anyone in the greater Toronto area is welcome to drop by and use mine. I used the 1.9mm position for these pins. You might want to use a few extra male pins to get some practice with crimper, pins and the leftover wire before doing your final wire assembly. 2. When twisting two wires into one pin, strip them back 1 cm, twist them together nice and tight, then trim the twisted conductor back to about 7-8 mm so that the bare end of the wire fits completely into the length of the crimp part of the pin. Do not "tin" the bare wires with solder, this is a very bad thing to do if you understand anything about "cold flow". You want as strong a mechanical connection in the crimp pin as possible! 3. Because of the thickness of the wire (two 22 AWG wires), you won't be able to put the insulation part of the wires into the "end" portion of the crimp pin as you would usually with a single wire crimp. Not really a big deal to have uninsulated wire crimped in it's entirety in the pin, but it is really important to trim the bare wire to the exact length of the crimp, so that no bare wire is sticking out of the crimped pin. The insulation of the wire should butt right up to the edge of the rear of the pin. This prevents any inadvertent "shorts" between pins outside of the connector. Yes it will be tight with all the insulated wires being shoved into the connector, which is why it's so important to get the trimmed length right in the pin. And here is the wire as it fits into the pin, note that the trimmed length of the wire fits perfectly into the pin crimp section: First Crimp the "front" part of the pin as shown... It should look like this when the first crimp is done... Then do the second crimp at the "back" end of the pin, should look like this when you're done... You might want to use some needle nose pliers to "bend" the crimped part of the pin so it's smooth and straight, it should look like this when you're ready to insert it into the connector housing... 4. Push the pin all the way into the connector until you hear/feel a small "click" of the locking tang of the pin snapping into place in the connector housing. Because of the thickness of the insulation, it might be a tight squeeze in the connector housing, I found using a small slotted screwdriver helpful in pushing the pins further into the connector housing until I heard/felt the "click" of the pin being secured into place.... After all the pins are put in the right order into the connector housing, then inspect the contacts to make sure there are no stray wire strands that might short out the connections. Trim these using some wire cutters, being careful not to nick any of the other wire strands. Note the loose strand.... And some precision wire cutters to "trim" that loose strand... 5. Make sure to close the locking latch of the connector so that the pins are secured in the housing, use some needle nose pliers for this and listen for the "click" of the latch being secured in the housing. Check again to make sure there is no loose strands of wire shorting out connections in any of the connectors. If you want, take a multimeter or continuity tester to the pins and make sure that pin 1 goes to pin 1, 2 to 2, 3 to 3, and that none short out between these three pins. Hope this helps!
__________________
2017 430ix Gran Coupe
Last edited by Arthurrs; 11-29-2016 at 02:13 AM.. |
|
Appreciate
1
badbread332.50 |
| 11-29-2016, 01:48 PM | #522 | |
|
Enthusiast
468
Rep 1,791
Posts
Drives: F87 M2 / F31 330d
Join Date: Nov 2005
Location: Bavaria
iTrader: (0)
Garage List 2004 E46 BMW M3 [0.00]
2017 F87 BMW M2 [10.00] 2013 F31 330d Touring [9.50] 2009 E89 Z4 Sdrive 30i [9.00] 1989 E30 320is 2-door [10.00] 1986 E28 M535i [9.00] |
Quote:
__________________
2017 F87 ///M2, Long Beach Blue, 6MT
2013 F31 330d Touring, ///M-Sport, Alpine White, Alcantara/Cloth, 19" Style M403, 8AT 2009 E89 Z4 SDrive 30i, Titanium Silver, Coral Red Leather, 19" Style 296, 6MT 1989 E30 320is, ///M-Technik II, S14 Engine, Sterling Silver, Black Leather, 16" BBS RS 003, 5MT 1986 E28 ///M535i, Agate Green, Pine Green Velours, 16" ALPINA, 5MT |
|
|
Appreciate
0
|
| 12-07-2016, 10:46 AM | #524 |
|
Major

450
Rep 1,369
Posts
Drives: F80 M3 6MT
Join Date: Oct 2008
Location: Birmingham, MI
|
Wanted to thank the OP, this was a straight forward mod that is killer when done. Confirming I did this successfully in my '15 F80 M3.
__________________
15 F80 M3 Mineral Grey/Black 6MT
 |
|
Appreciate
1
Dante467.50 |
| 12-07-2016, 01:42 PM | #525 | |
|
Lieutenant Colonel
 722
Rep 1,615
Posts |
Quote:
|
|
|
Appreciate
1
Dante467.50 |
| 12-08-2016, 01:22 PM | #526 |
|
New Member
0
Rep 28
Posts |
I've got all the parts but can anyone help with getting the radio and ac parts out of the old surround??
i assume it has to go backwards out but is there any screws or anything I'm missing its giving me hell lol |
|
Appreciate
0
|
| 12-08-2016, 01:42 PM | #527 | |
|
Enthusiast
468
Rep 1,791
Posts
Drives: F87 M2 / F31 330d
Join Date: Nov 2005
Location: Bavaria
iTrader: (0)
Garage List 2004 E46 BMW M3 [0.00]
2017 F87 BMW M2 [10.00] 2013 F31 330d Touring [9.50] 2009 E89 Z4 Sdrive 30i [9.00] 1989 E30 320is 2-door [10.00] 1986 E28 M535i [9.00] |
Quote:
There are no screws, just clips. Look at the new surround and locate the clips. You have to press against the controls from the front and release the clips from the back with a very thin screwdriver or a credit card. You have to work your way around and always keep the pressure. They will come out at some point! 
__________________
2017 F87 ///M2, Long Beach Blue, 6MT
2013 F31 330d Touring, ///M-Sport, Alpine White, Alcantara/Cloth, 19" Style M403, 8AT 2009 E89 Z4 SDrive 30i, Titanium Silver, Coral Red Leather, 19" Style 296, 6MT 1989 E30 320is, ///M-Technik II, S14 Engine, Sterling Silver, Black Leather, 16" BBS RS 003, 5MT 1986 E28 ///M535i, Agate Green, Pine Green Velours, 16" ALPINA, 5MT |
|
|
Appreciate
0
|
| 12-08-2016, 04:20 PM | #528 | |
|
Captain
203
Rep 943
Posts
Drives: 2012 328i Modern Line
Join Date: Apr 2016
Location: NC
|
Quote:
__________________
:wave:
|
|
|
Appreciate
0
|
Post Reply |
| Bookmarks |
|
|