

BMW 3-Series and 4-Series Forum (F30 / F32) | F30POST
>
DIY: Morimoto Projectors & Custom Angel Eyes Retrofit

| 08-01-2015, 06:39 PM | #289 |
|
Captain
 170
Rep 616
Posts |
Just as I was getting close to finishing its all gone tits up.
 Whilst testing on the bench with everything lit up, rings and HID - one by one the LEDs on the low beam ring starting going out leaving me with this  This part (black bit on the right) was very hot and burnt the wiring attached to it  Does anyone know what it is? Resistor to trick the CANBUS? On the high beam ring, this part is different and doesnt get hot at all  Ive got a spare set of rings with the same part fitted to them, can I use these and replace the part that gets hot and burns out? Im coding the car for LEDs anyway so dont need to use resistors and/or capacitors. Ive had to cut the shroud to fit around the new rings but because Ive got level control the headlamps go through calibration (full up and down movement) on start-up. Do you think the gap Ive left on my shrouds is enough for this to take place without fouling?   Ive also had to cut some notches in the top of the shroud to clear the top of high beam ring  On the cut-off Ive noticed some sort or weird pattern, any ideas what it is?  Any ideas how to remove these scratches on the inside of the lens?  TIA, nearly there.  |
|
Appreciate
0
|
| 08-01-2015, 08:25 PM | #290 | ||||||||
|
Major
 
568
Rep 1,035
Posts |
Quote:
Apparently, the VR (i still don't get it) blew, and who know what kind of voltages were being output from it after that. I'm guessing the output voltage to your LEDs at that point were so wild/high (low voltage wouldn't blow the LEDs), that your LEDs starting popping one by one. Sorry to hear that man... Its not a CANBUS resistor for sure. They are HUGE physically because they need to simulate the normal 55w load your halogen produces, and so they need to dissipate a lot of heat. They look more like these. Quote:
Quote:
Wait... if one of the rings has a VR, and the other doesn't, are they somehow connected together so that the VR affects both? Each ring is supposed to be independent of the other, and yet, one ring is designed different than the other. I'm so confused..  I'm guessing that VR was just a part that went bad. I would contact the seller and get a new one. I'm assuming they warranty their product for at least 30 days :-) Dude you seriously need to get a pair of my rings lol  your rings are like wtf.. your rings are like wtf..Quote:
Quote:
Quote:
Quote:
 Quote:
Great progress man! Don't stop now There's (bi-xenon) light at the end of the tunnel. Good luck! |
||||||||
|
Appreciate
0
|
| 08-02-2015, 06:15 AM | #291 | |||||
|
Captain
170
Rep 616
Posts |
Quote:
   Are they both voltage regulators? Why does one get hot and the other doesn't? If they're both the voltage regulators do you think I can take the one that doesn't get hot and replace the one that does without any problems? All this doesn't bode well for the reliability of the LEDs, imagine if they were all sealed up and back in the car when they blew! Quote:
Quote:
Quote:
https://www.retrofitlab.com/en/xenon...tors-60-1.html They were OK until they got epoxied in, I think it might be this... 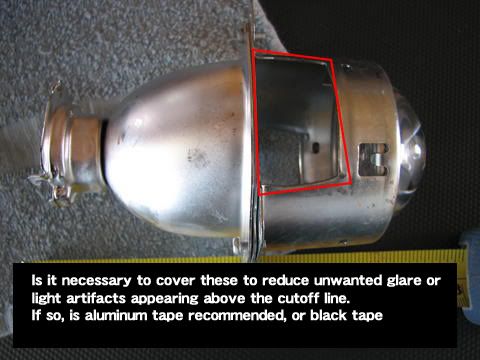 Quote:
 Last edited by a803sgo; 08-02-2015 at 08:30 AM.. |
|||||
|
Appreciate
0
|
| 08-02-2015, 09:01 AM | #292 | |
|
Major
568
Rep 1,035
Posts |
Quote:
It hasn't been that long since i finished my project, i'm surprised i forgot about that little piece. I always wondered what was inside of it. I went back to take a look and it does indeed look like only one of the rings has the VR in it and the other doesn't. I can clearly see it in the outline of the heatshrink as it pushes up against it, while the other one looks like that little circuit board you show in the other pic with the small circular cap/pot component on it. I counted the number of LEDs on the two rings, and the number is different. I'm not surprised they are different number of LEDs due to their sizes being different. I'm guessing due to the differences in the current/voltage needs of the two rings, you will have circuitry differences. But it is a little surprising that the (small) difference in the number of LEDs between the rings would require such a drastic difference in design circuitry. My feeble understanding is that a VR works by regulating the input voltage (can be a wide range) and producing a very steady/constant voltage/current supply to whatever they are powering. In my testing, i noticed that the rings would come on, right around ~8v or so. Since our cars not only have an operational voltage range of 12v-14.4v, but they also pulse the voltage (to reduce wear on halogen bulbs). This would wreak havoc (i.e. flicker) on the LEDs. So the VR takes in something IN that is unsteady, widely varying, and produces something that is steady, stable, and regulated. As far as the heat goes, when a VR works it will produce heat when there is a difference between the input voltage and output voltage. The higher the difference between input and output voltage, the more heat is generated. I'm guessing the difference between the 12v-14.4v input and the needed 8v output to the LEDs will generate a fair amount of heat. And that heat is probably what you are feeling in one of those rings. But why one ring would require the services of a VR and the other doesn't still baffles me. But all that aside, while i'm still a little surprised they couldn't make rings that use the exact same circuitry to power the LEDs, they are there for a reason, and i personally would not switch components (VR for non-VR). But thats just me. What you do with your stuff is up to you IMO, doing the swap would move the operational behavior/characteristics of that ring to a point where the end effect could be disastrous - e.g. earlier burn out, shorter life of LEDs, and in the worst/extreme case, start a fire. I think you just experienced a bad part. And you are lucky that you caught it while you still in the process of making the headlights. Manufacturers (good ones) will do a burn-in period where if there are any parts that are going to go bad due to manuf defects (bad parts with defects), they will blow within the first 24 hours or so. This allows them to eliminate the vast majority of bad product before they get into the hands of their customers. I would just wait for them to send you a new set. A few days wait is worth years of trouble free service down the road. I feel your pain brutha ...  |
|
|
Appreciate
0
|
| 08-20-2015, 07:45 PM | #293 |
|
Colonel

1621
Rep 2,036
Posts |
Squidlyboy,
Any issues with the quads? Outstanding work on what you have done!.......and any prospects of producing these for others????? |
|
Appreciate
0
|
| 08-20-2015, 09:30 PM | #294 | |
|
Major
568
Rep 1,035
Posts |
Quote:
Its a little strange getting used to quads though. Its hard to explain, but when i'm driving around, i can clearly see that the cut-offs are below the drivers heads in front of me, but there is so much freakin' light being thrown out in general, that road signs in front of me sort of reflect / light up everywhere. Its just a very weird and different experience over halogens. The other thing that is taking time to get used to are all the random thumbs up and "dueces" i get from dudes who pass me on the road or from the sidewalk after installing the lights. I get one just about every day. The car looks like a space-ship rolling even during the day. its a head-turner if you are into that sort of thing. I vowed i would never do another set of headlights again, just remembering how much of a royal PITA everything was. Being OCD, you curse the sky over every little mistake. But as time goes on, and the bad memories fade, i'm slowly warming up to the idea of possibly doing another set. But still too soon ") I'd rather help people do their own, than do it for them ... in all honesty I'd rather help people do their own, than do it for them ... in all honesty |
|
|
Appreciate
0
|
| 08-20-2015, 10:08 PM | #295 | |
|
Registered
0
Rep 2
Posts |
Angel Eyes and Headlamp
Quote:
|
|
|
Appreciate
0
|
| 08-23-2015, 10:03 PM | #296 |
|
Registered
0
Rep 2
Posts |
Vote # 1 GP XTREME H8 BMW ANGEL EYES
 GP Xtreme H8 E90 E92 E93 M3 CREE LED Halo Angle Eyes V8 Ultra Bright White Actions speak louder than words, Dead smack daylight tested on a sunny hot 99°f day. . No error codes either . So if they stand out as they do in direct sunlight you can imagine how bright they will be when there is no direct sun |
|
Appreciate
0
|
| 08-24-2015, 04:37 PM | #297 |
|
Captain
170
Rep 616
Posts |
So nearly there with mine, they just need to be sealed but I don't have an oven big enough for them.
Is there another way? Heat gun? Can I use something like Tiger Seal instead? It doesn't need heating. NEARLY! |
|
Appreciate
0
|
| 08-24-2015, 05:24 PM | #298 |
|
Major
568
Rep 1,035
Posts |
Heat gun all the way baby!
I was afraid of the potential of yellowing / drying / aging / cracking the plastic lens, so I tried to keep the lens away from direct/excessive heat. I found I really didn't need that much heat to soften the butyl rubber, as its pretty soft and sticky even at room temp. Just enough heat to allow you to press the lens edge back into the groove. I never heard of the Tiger stuff, so not sure. But the stuff from TRS rocks and I swear you can stretch it to do like a few pairs of headlights. A little bit goes a long way. When you start pulling/stretching it to create a bead line around the lens rim, you end up not really using that much of it Can't wait to see your finished product!! |
|
Appreciate
0
|
| 08-26-2015, 11:16 PM | #300 | |
|
Major
568
Rep 1,035
Posts |
Quote:
Like you, i was afraid of water getting in through the lens, so for the first headlight i really went overboard and laid it on THICK. The downside to that is that when you press the lens back into the groove where the bead of BR is, it kind of pushes out all the excess. Fortunately, it wasn't so much that it got all over the lens. For the other headlight, i pulled back a little bit, and the bead/thread was thinner, so there wasn't a lot of excess - it was just right. Its really hard to do stuff like this right the first time, since it takes a few reps to get a good idea how much is enough, and you don't get good at it on your first try. Just make sure you heat up a large enough section so that you can really press the lens back into the groove/channel easily and the lens edge just sort of sinks into the melted/heated BR. You'll really feel how solid it is when you are done though. You'll just know that its air-tight just by the feel of it. Good luck, and we're all waiting for the pics!!! EDIT: Btw... did you ever get your angel eyes replaced? Last edited by squidlyboy; 08-27-2015 at 12:54 AM.. |
|
|
Appreciate
0
|
| 08-27-2015, 05:57 AM | #301 | |||
|
Captain
170
Rep 616
Posts |
Quote:
I did have all the covers off and unlike Arizona, London is cold and wet so this didn't help! Quote:
Doesn't look very tidy though but no one will ever see it but still not good for my OCD! I've stuck a hairdryer in the holes to dry them out so hopefully they shouldn't fog up again. Quote:
Getting the car back together today so will post pics later, the nut and bolt combo under the headlamps is the worst bit of design I've ever seen!  Did you out all the HID stuff inside the headlamp? |
|||
|
Appreciate
0
|
| 08-27-2015, 08:04 AM | #302 | ||
|
Major
568
Rep 1,035
Posts |
Quote:
this thought went through my mind a million times as I was doing my project Quote:
I swear in the end, all the extra "stuff" that was put in there added like 10lbs to each headlight |
||
|
Appreciate
0
|
| 08-27-2015, 04:15 PM | #303 |
|
Captain
170
Rep 616
Posts |
All done and looking good, here are some pics taken with my phone so sorry about the quality...
   Went mental and did the splitter and grills at the same time, will try and get better pics tomorrow. I think they look superb and very OEM, the cut-off is great BUT they still fog up but only when the HIDS are running. I've got a feeling that because I've put all the HID parts inside the headlamp there's not enough air movement to keep everything ventilated... maybe. I'll keep an eye on it and will move the HID parts out side if things don't improve but all in all very happy with the results and a very rewarding project. Saying that though I don't think I would want to do it again even if someone paid me, way to much hassle but happy to help with advice. |
|
Appreciate
2
CazuaLLUK2221.00 |
| 08-27-2015, 10:09 PM | #304 |
|
Major
568
Rep 1,035
Posts |
Looks great bro!!! Solid work
How about some pics with your projectors on??Just curious... when you tore apart your headlights, did you mangle the black plastic housing so much that there might have been some small holes / openings left behind from all the ripping and tearing you did? When you broke the seal, were there any "white creases" left behind in the black housing due to excessive heat and/or excessive pressure against the black housing? Fogging is almost always due to excessive moisture that gets into the headlights through cracks... nothing to do with air flow. Last edited by squidlyboy; 08-28-2015 at 09:08 AM.. |
|
Appreciate
0
|
| 08-28-2015, 03:26 AM | #305 | |
|
Captain
170
Rep 616
Posts |
Quote:
I'm going to get some more butyl and seal the f**k out of them. Weird how it only happens with the HIDS on?!?! |
|
|
Appreciate
0
|
| 08-28-2015, 09:00 AM | #306 |
|
Major
568
Rep 1,035
Posts |
Condensation occurs on the surface when there are two things present (both must be there):
1) Water getting into the housing (mostly from holes on top of the housing since its harder for water to get in from holes on bottom)As the housing gets hotter and hotter, most of the water will eventually evaporate. Ventilation holes in the bottom of the housing (they will never be on the top or water could get in) only really helps in making the moisture evaporate more rapidly and also helps make the temperature difference rise slower, but if you have 1) and you add 2), there _will_ be fogging/condensation. The bigger problem with water in the housing is it can lead to an electrical short in the headlights, and depending on whether or not you fused your wiring, you could blow the FEM or worse. The solution is to not give water any chance whatsoever to get into the housing in the first place. So...
I was thinking about re-doing that video to open the headlights to talk about the "white creases" - when you see them, you know you need to back off (lower the amount of heat you apply), or not apply as much pressure with the pick tool... or both. Those white creases are the start of a tear in the housing. Any holes left behind will be openings for water to get through. Its more forgiving if the holes on the bottom, but if they are on the top (even sides), water that comes in under the hood will find the holes and slowly seep into the housing, and eventually cause condensation. |
|
Appreciate
0
|
| 08-28-2015, 05:36 PM | #307 | |||
|
Captain
170
Rep 616
Posts |
Quote:
Even though I've also put a couple of bags of silica gel in them to soak up any damp that might be present. Quote:
Quote:
After a bit of Googling this happens a lot even to new headlamps, its also in the manual telling us that its OK so not really sure what to do next apart from add more butyl and super seal the headlamps up. One other thing, now that the headlamps are back in and the bumpers back on I've noticed that there is more gap under the headlamps over by the side of the indicators (turn signals)...  (Not my car) Any ideas? there's no movement in the bumper to close the gap that I can see, the only adjustment I've noticed is the 2 bottom mounts under the headlamps, they're wound all the way out with the lights pushed all the way down at the moment.  |
|||
|
Appreciate
0
|
| 08-28-2015, 05:46 PM | #308 |
|
Major
568
Rep 1,035
Posts |
hmmm... not sure about the gaps
For my lights, I noticed that in order to get rid of the gap where the bumper and fender meet, I had to push the headlights up as high up as they could go. In order to do that I had to push super hard upwards before tightening those bottom 2 Loctite screws where the headlight mounts to the car. Maybe I created some extra gap in mine and didn't even notice. I'll have to take a look tonight when I get a chance. I didn't noticed any increased gap, but maybe I just missed it. |
|
Appreciate
0
|
Post Reply |
| Bookmarks |
| Tags |
| angel eyes, corona, f30, morimoto, projectors |
|
|


