

BMW 3-Series and 4-Series Forum (F30 / F32) | F30POST
>
DIY Front Hidden Dashcam OEM Style and Rear facing Dashcam.

| 03-19-2016, 09:48 AM | #1 |
|
Major
 494
Rep 1,076
Posts |
DIY Front Hidden Dashcam OEM Style and Rear facing Dashcam.
First of all a big shout out and thanks to the e90 forum's
Pawlin http://www.e90post.com/forums/showthread.php?t=1184659 For the inspiration! This is a DIY that only is applicable to those people who don't have high beam assist or the Kafas 2 base as I am unsure of the fitment. I think I am done with this mod as much as I can. NOTE: Somehow on IOS Bimmerpost mobile this thread is not rendering correctly. It renders fine in a browser. First of all the reason for this DIY is because I prefer not having anything attached to my windshield and prefer a clean look. The total cost will vary based on deals and what you might already have in your toolkit. But to give other DIYers an idea Base Cost: Mirror cover base plate: $12 USB Cable 10ft : $8 Mobius Camera: $79 Mobius Super Capacitor: $8 Optional parts Cost: Wifi adaptor SD card: $20 MicroSD toSD Extension: $4.62 Light Pipe: $4.90 Parts Used:
Details of the install:  This is the original mirror cover that i am replacing.  Since it is a tight space any extra plastics can be sheared off and replaced with electrical tape to be safe.   To stabilize the camera within the housing i reused the original packaging that mobius came with and inserted the camera lens through it and packed it all up together with electrical tape. This way the entire unit fits snugly in the housing and you also know where to make the hole in the packaging to make sure that the lens sees out of the housing straight without any movement.  Once this was stabilized I was able to place all the parts in the mirror base housing without any problems. It is a tight fit but very doable. 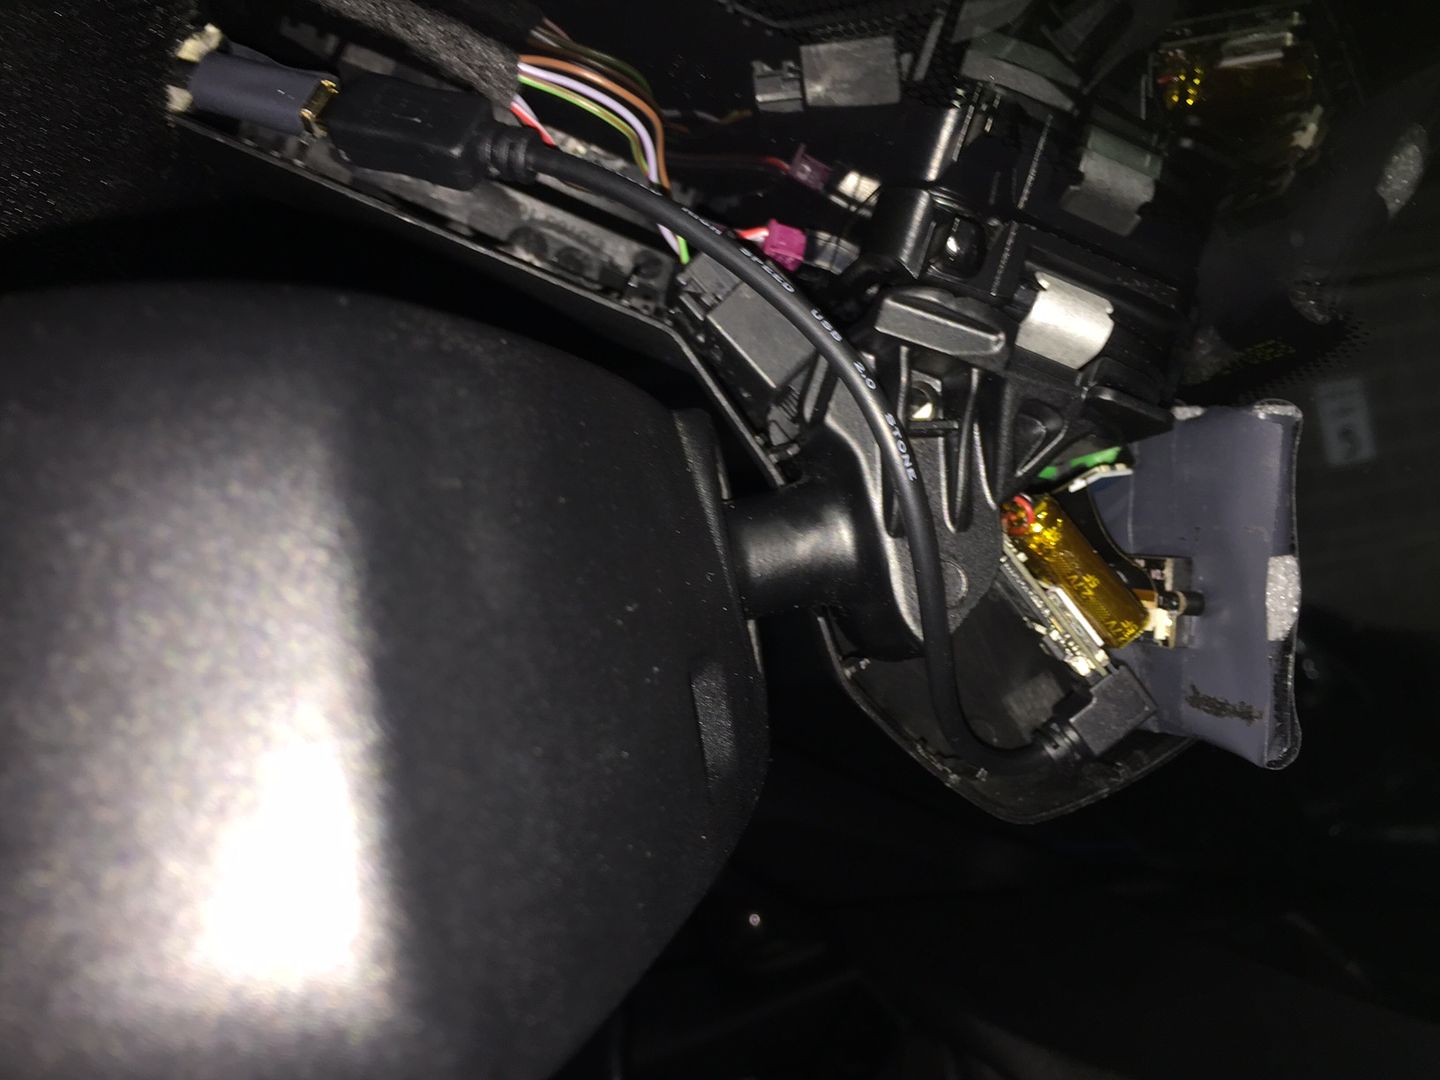 This is an excerpt that i followed to make sure that the mobius camera was set up correctly thanks to Pawlin 1. Setting Up the Camera First you must get your mobius action cam setup. Since this camera is so versatile and basically a mini go pro being used from dash cams to aerial cams on model planes, there is a huge amount of different settings you can do. I would recommend you play and familiarize yourself with this camera first as this is the most complicated part. Understand how this camera will behave will save you a lot of headache later down the line when you scratch your head wondering why it didn't record that idiot running into you. There is a whole forum simply on this camera, the developer of this camera is extremely responsive with questions. Website: https://www.mobius-actioncam.com/ User Manual: https://www.mobius-actioncam.com/wp-...l-23jan15a.pdf The User Manual should cover everything you need to get going from selecting a microsd memory card with the proper class ratings and correct format (Ive provided the one I got above in required materials which works well so far). Once you get it working (as well as firmware on the camera updated), you must configure the camera settings to your liking. Make sure to change the camera's settings to properly support the capacitor. As per the Mobius camera instructions: "When using a Super Capacitor instead of an internal battery, you MUST set the "power-off disconnect" parameter to "immediate" or you will lose your last recording." Just a couple things you can config to give you an idea: -Resolution(720 or 1080p) -Frame rate (30 or 60fps) -Video duration -Recording timeout -Camera ON (power detect, manual button..etc) -Camera record (power detect, motion detection, manual button..etc) -Motion detection sensitivity (3 settings, from a bird to a car going by) -LED indicator flicker -Automatic overwrite -Time & date stamp Setting up the camera is all explained in the User manual but here it is for those of you too lazy to go look (I feel you). 1. Disconnect the camera from the PC and turn it off. 2. Press and Hold Down the Mode button. DO NOT RELEASE the button until step 4. 3. Press and Hold Down the Power button until the RED LED blinks 3 times and the camera turns off. This will take about 5 seconds. During the process, the blue and yellow LEDs may blink. 4. Release the Mode and Power buttons. You will see a SYSCFG.TXT generated in the camera. You can then manually edit the text file yourself or there are apps on the site you can launch the file with to make things a bit easier to configure. Everything is pretty self explanatory. To put the settings on the camera, you simply repeat the steps above after youve modified and saved the same file. For those of you in hotter climates such as myself in California, the battery included in the camera doesnt stand a chance and will ballon during the summer. The solution to that is replacing the battery with a super capacitor so your videos will finish recording and get saved if power is cut. Remember since this camera will be enclosed in the rear view mirror assembly cover and the only access will be through the usb cable that you connect to the power. 2. Disassembling the camera Nothing to it, take out the four screws and separate the body of the camera to pull out the circuit board and lens connected to it. That is all you need from the camera - you can put the cover, metal heatsink, and rubber buttons aside. I decided not to have the lightpipe drilled yet. Perhaps another day. I continued my project for a rear facing dashcam as well. Since I have an F31 I could not mount it on the glass. I bought another Mobius with a 20cm 26PIN Lens Extension Cable for 1080P HD Mobius ActionCam and a capacitor. An extra BMW Lighter 12v Socket Part Number 61346973037 for about $2.99 was needed for the power source. I never use the socket in the back and i did not want the power and usb cable to be exposed. 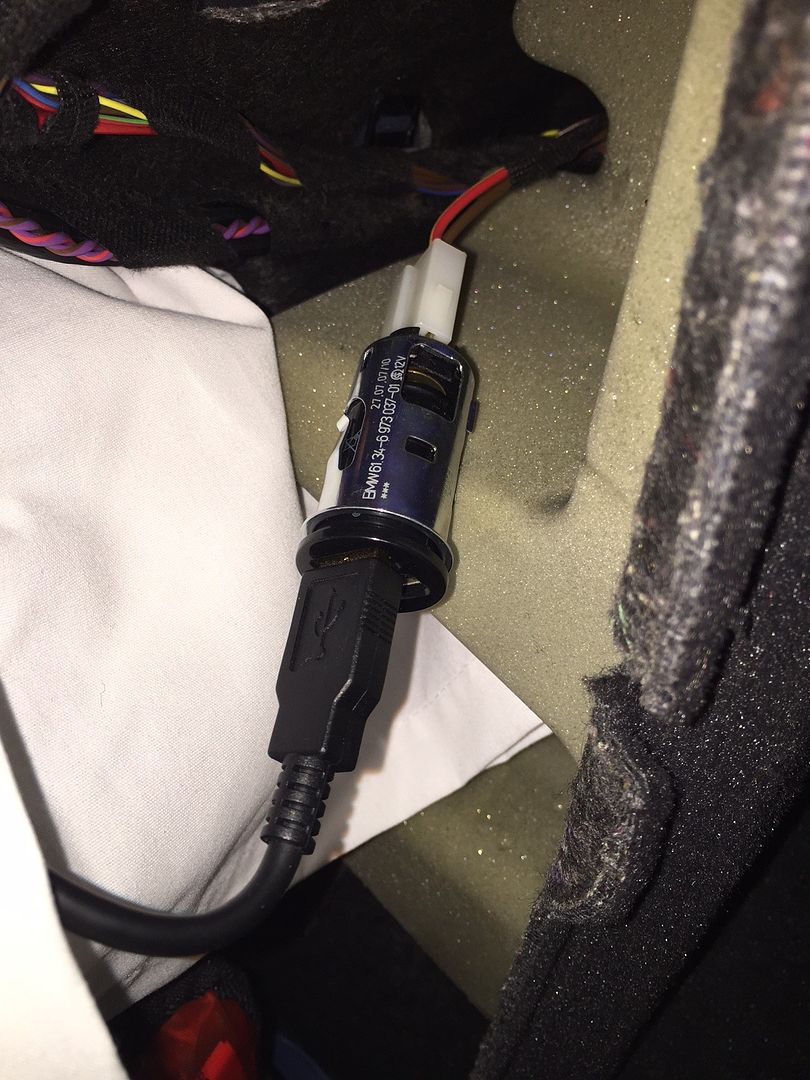 And here it is tucked away on the left side where the medical kit is. 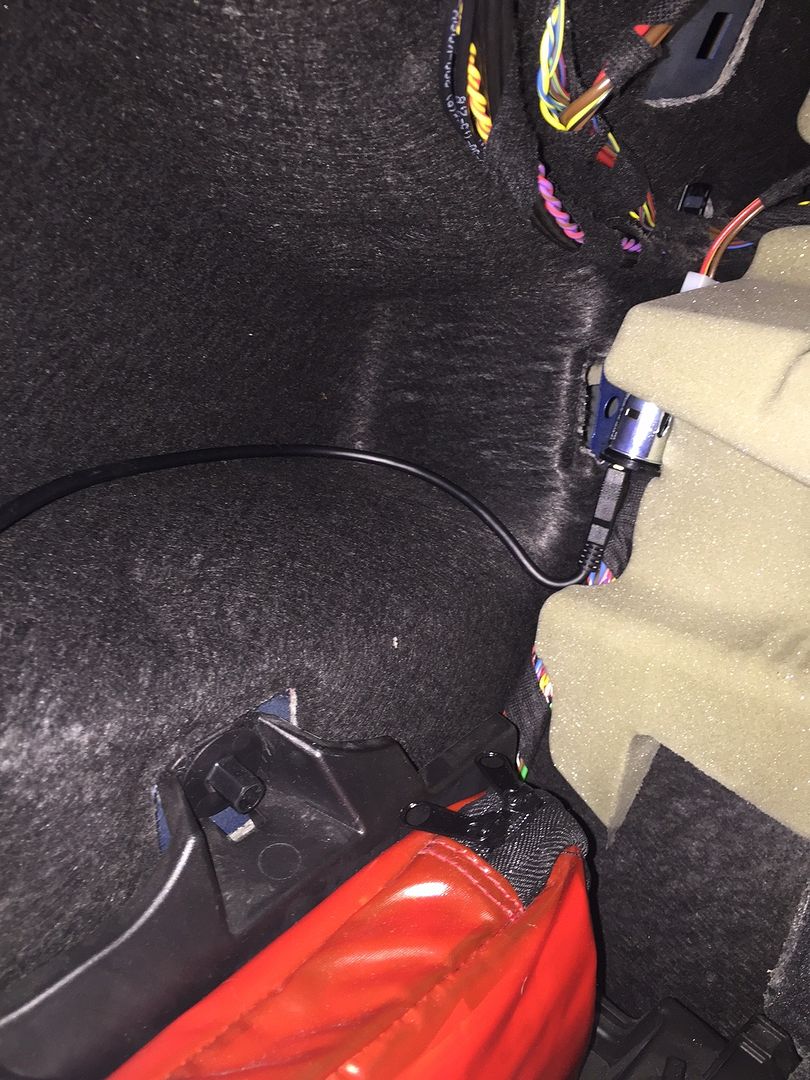 I was able to run cable through the runner lining and place the mobius between the headliner. I didnt want to open up the D pillar as that would mean taking off the C pillar as well. Seemed like a lot of work.So not too happy with this but still very out of sight when tucked away. 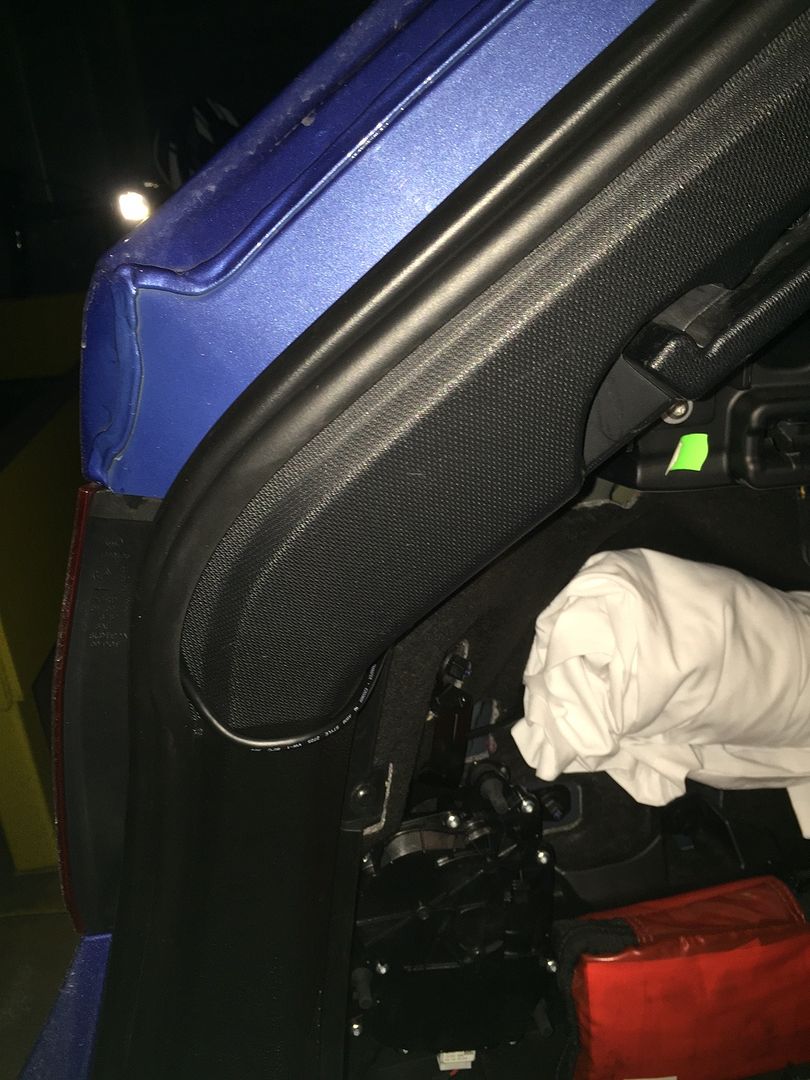 And here is the rearward facing dashcam end result.  After watching the footage there is no shaking whatsoever and the view out the back is great!  Last edited by Gabreigns; 04-08-2016 at 01:37 PM.. |
| 03-25-2016, 06:24 PM | #5 | |
|
Major
494
Rep 1,076
Posts |
Quote:
Also added it here. Base Cost: = $107 Mirror cover base plate: $30 USB Cable 10ft : $8 Mobius Camera: $79 Mobius Super Capacitor: $8 Optional parts Cost: Wifi adaptor SD card: $20 MicroSD toSD Extension: $4.62 Light Pipe: $4.90 Base costs plus optional parts about $140. Rounding it up. |
|
|
Appreciate
1
|
| 03-25-2016, 08:24 PM | #6 |
|
Second Lieutenant
 
89
Rep 258
Posts |
Love this! I'm very tempted to do this for my car as well!!
 Any suggestions for hiding an equally "covert" rear camera?
__________________
2017 430ix Gran Coupe
|
|
Appreciate
0
|
| 03-25-2016, 09:03 PM | #7 |
|
Major General
 
180
Rep 5,822
Posts |
Gabreigns, thanks for the price list and parts list. And don't sweat it. If it were me, I would be stoked and post my work first too to share with fellow members.
|
|
Appreciate
0
|
| 03-26-2016, 07:05 AM | #8 | |
|
Major
494
Rep 1,076
Posts |
Quote:
I have an F31 so it will be a pain as I have a separate glass area opening and a tailgate area opening. I know I can put it on the headliner facing rearward but then it won't be "covert" when opened. Not to mention things bumping into it while loading or unloading. So need to figure out how to discretely wire through the rear rubber concertina and not damage anything in the process. |
|
|
Appreciate
1
|
| 03-26-2016, 12:46 PM | #9 |
|
Second Lieutenant
89
Rep 258
Posts |
Hi Gabreigns,
Just wondering how hot the Mobius camera gets with it installed in the mirror cover baseplate? Do you think any added ventilation holes would be helpful? Arthur
__________________
2017 430ix Gran Coupe
|
|
Appreciate
0
|
| 03-26-2016, 07:53 PM | #10 | |
|
Major
494
Rep 1,076
Posts |
Quote:
But if there is something I haven't noticed only time will tell. |
|
|
Appreciate
0
|
| 03-29-2016, 06:57 AM | #13 |
|
Colonel

1579
Rep 2,406
Posts
Drives: E30 M3 Cecotto, F85, G05, G07,
Join Date: Mar 2006
Location: Outside Atlanta
|
Great idea! Well done.
__________________
 |
|
Appreciate
1
|
| 03-29-2016, 07:27 AM | #14 |
|
Private
 21
Rep 92
Posts |
Hi Gabreigns,
one additional question. You wrote that the camera has a motion detection record feature. Is that Feature only available when the power supply is on or is it also availiable when the vehicle is parked? Thx & BR Roland |
|
Appreciate
0
|
| 03-29-2016, 10:13 AM | #15 | |
|
Major
494
Rep 1,076
Posts |
Quote:
The motion detection feature is on when the vehicle is parked provided it has constant power. I tried out this feature when i had the mobius on battery power instead of capacitor power and it worked great. It actually captured a second before the object moved in to sight. You can hardwire the mobius to the car if you want the feature. or plug it into an external portable powerbank to keep it running for a few good hours. As per dashcamtalk.com some people have run it on powerbanks for as much as 12 hours. |
|
|
Appreciate
2
|
| 03-29-2016, 11:42 AM | #17 | |
|
Private
21
Rep 92
Posts |
Quote:
Greetings Radair |
|
|
Appreciate
1
|
| 03-29-2016, 11:44 AM | #18 | |
|
Enlisted Member
 35
Rep 38
Posts |
Quote:
|
|
|
Appreciate
0
|
| 04-04-2016, 10:31 AM | #19 | |
|
Major
494
Rep 1,076
Posts |
Quote:
|
|
|
Appreciate
0
|
| 06-11-2019, 11:35 PM | #21 |
|
Private
23
Rep 66
Posts |
I just did this on my 2018 F30 using similar parts. I also made a lens cover using some plastic and window tint film to fill in the rectangle cut-out. I'm sure this decreased low light sensitivity somewhat but it was barely perceptable. I used some automotive foam tape to mount the lens cover on one half of the housing so it can still be separated. It seems sturdy enough and the camera is completely hidden from view except in very direct sunlight.
Thanks to everyone for coming up with this solution! |
|
Appreciate
1
Gabreigns493.50 |
Post Reply |
| Bookmarks |
| Thread Tools | Search this Thread |
|
|


 Prepare thy inbox for my PMs!


