BMW 3-Series and 4-Series Forum (F30 / F32) | F30POST
>
DIY: F30 Heated Steering Wheel Retrofit

| 02-27-2016, 11:46 PM | #1 |
|
Major
 1140
Rep 1,136
Posts |
DIY: F30 Heated Steering Wheel Retrofit
Since I was replacing the Steering Column Switch Cluster on my car for another project I was working on, and I had to get the Steering Wheel Electronics Module, I decided I might as well go ahead and retrofit the Heated Wheel as well, since I was able to find a heated wheel with the internal electronics for around the same price as simply buying the Electronics Module and Connecting Line on its own.
Total cost for this ended up being around $600 USD, not factoring the extra money recovered from selling the original Steering Column Switch Cluster and M-Sport Wheel. Depending on what options your car already has, you may not need to replace the Steering Column Switch Cluster. Patience and waiting for finding good deals on the auction sites makes it much more reasonable than buying parts new. I was able to justify the cost for this as I needed most of the parts for other projects as well. DISCLAIMER: As with all DIY projects, undertake this at your own risk. I am not responsible for anything that happens to you or your car! This retrofit will require you to remove your airbag and your steering wheel, so if you are not comfortable with doing this, please find someone who is willing to assist you with that part of the retrofit. With that said, on to the write-up! Pre-Requisites: None. This can be added to any model/trim level. However, to determine if you will need to replace the Steering Column Switch Cluster, if your car has any of the Driving Assistant options, such as Lane Change Warning or Lane Departure Warning, then you should not need to replace it. The only cars that will require replacing it are cars that do not have any of those options, then there is a good chance you will need to replace it. Also, this retrofit does require coding, so you will need to have E-Sys and be familiar with modifying your FA and VO Coding. Parts List: (Note: Part #s may vary per vehicle. Parts listed below are for a US F30 sedan. Check RealOEM or ETK to confirm correct Part #s for your vehicle) The parts I am listing are for M-Sport steering wheels. This retrofit can be done on Non M-Sport models, you would just need to locate the correct Non M-Sport part #s, or use it as an opportunity to swap to the M-Sport wheel  - Steering Column Switch Cluster There are 7 different versions of this part available based on the other options your car has. List of part numbers can be found here - Heated Steering Wheel M-Sport 32307848339 - Heated Steering Switch 61319201736 (Note: If you buy this used, make sure it includes the wiring harness with it, as it uses an uncommon small connector that would be difficult to source on its own) - Trim Panel, Steering Column, Bottom 61319219551 - Bushing/Socket Contact Qty. 3 61130005197 - Double Leaf Spring Contact Qty. 1 61130007437 For the below parts, if you purchase the Steering Wheel used, you can check to see if it already includes these parts before you buy them separately, as it is usually cheaper to find one that includes them - Steering Wheel Electronics Module M-Sport - 61317848641 - Connecting Line, Steering Wheel There are several different versions of this part available based on the other options your car has. List of part numbers can be found here 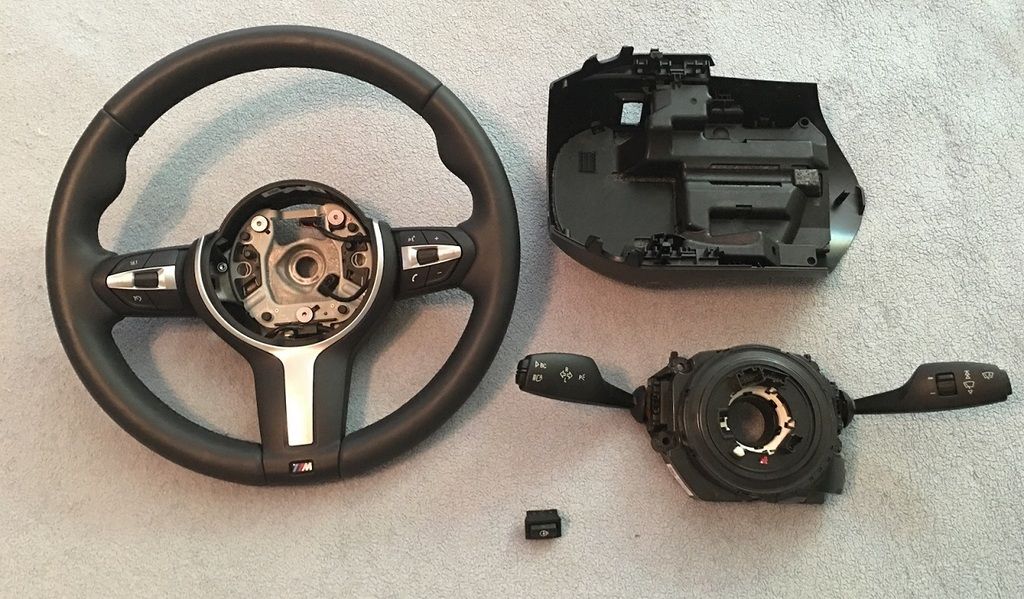 Tools Required: - Socket Set with Extender and 16mm(Deep set if possible), 10mm, and 6mm sockets - Flat thin Screwdriver for removing the airbag module - Wire Stripper - Wire connectors/solder depending on your preference - 2 different colors of 18 gauge wire (alternatively, you can use different color electrical tape/labels to identify wires) - Standard black electrical tape Prep Work: - Disconnect Negative Terminal from Battery Make sure all doors are unlocked, and trunk is open first - Remove Driver and Passenger Side under dash trim panel - Remove the Passenger side trim piece that covers the FEM - Remove the door seals/trim along the Passenger side of the car Remove the Steering Column Trim: - Move the steering wheel to the bottom, extended position - Starting at the back top of the trim(towards the dash, right below the instrument cluster), pull up to release the top trim and move towards the front of the wheel - Once the top is loose, move it up. It is not necessary to completely remove it - On the sides of the column, you should now be able to see the two tabs that hold the bottom trim to the column. Push outwards(away from the column) to release those tabs and pull down to remove the trim - Disconnect the 2-pin wire from the Aerial Transponder, and then set the bottom trim panel off to the side Removing the old Steering Wheel: Quite a few posts I read had comments that it was difficult to remove the airbag from its securing brackets. Once you receive your new Steering Wheel, you can look at how it works and practice pushing the brackets in with the screwdriver before you attempt it on the actual airbag. - Using the screwdriver, insert it into one side of the steering wheel and press inward to release that side of the airbag module. Repeat on the other side, and when the airbag comes loose, disconnect the airbag from the Steering Column Switch Cluster - With the airbag removed, you can see the large 16mm bolt that holds the Steering Wheel in place. Use the 16mm socket to remove the bolt. 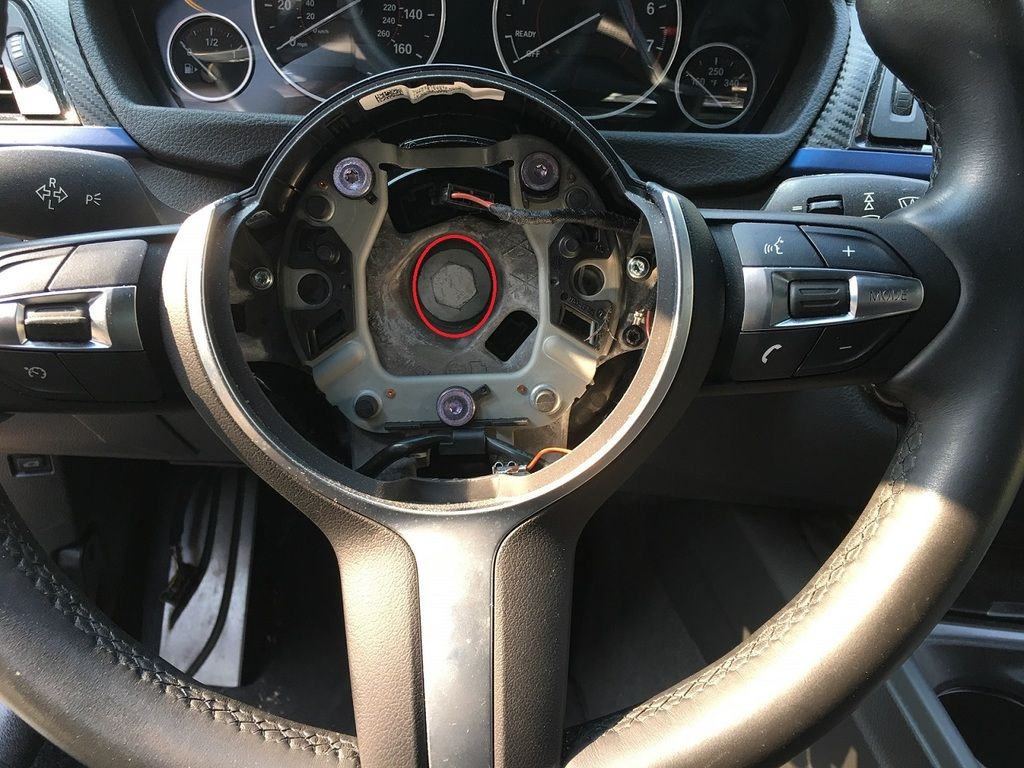 Replacing the Steering Column Switch Cluster: If you need to replace your Steering Column Switch Cluster, follow the below steps. Otherwise, skip down to Installing the New Wheel - Remove the 4 6mm bolts from the old cluster as shown below, then remove the wiring connectors and slide the cluster off of the steering column. 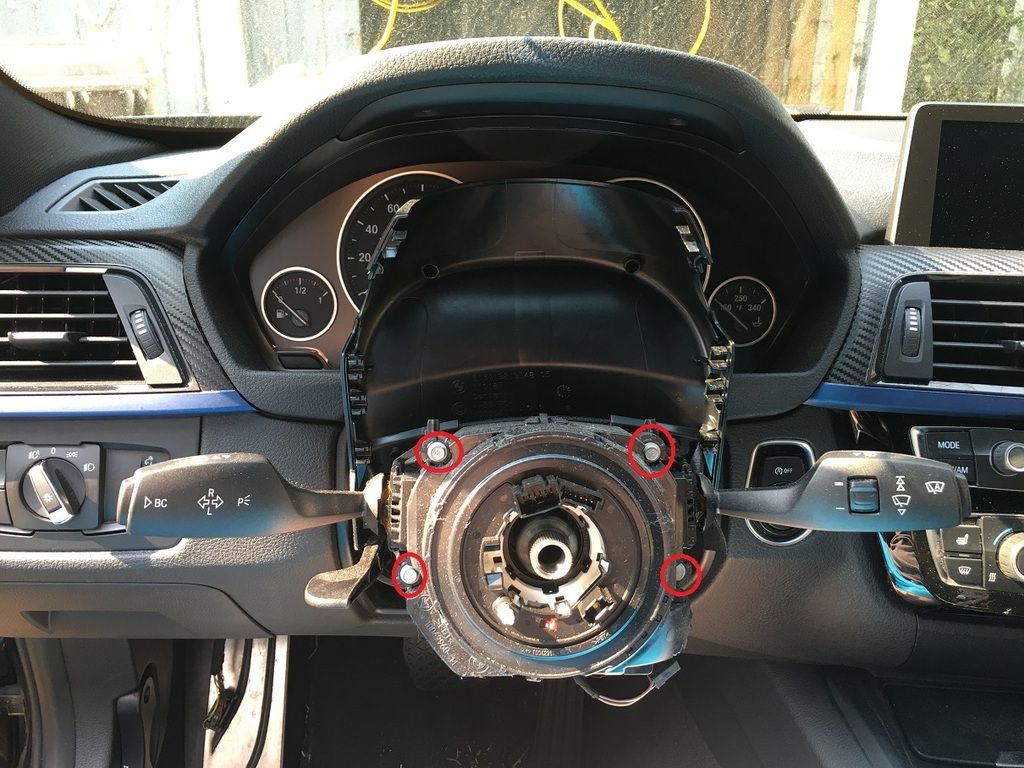 - If you are replacing the cluster, you will need to check to see if you have the Power and Ground wires needed for the Electronics Module. Using the picture below as reference, check to see if you have wires in Pin 9(Power) and Pin 11(Ground) of the black 12-pin connector 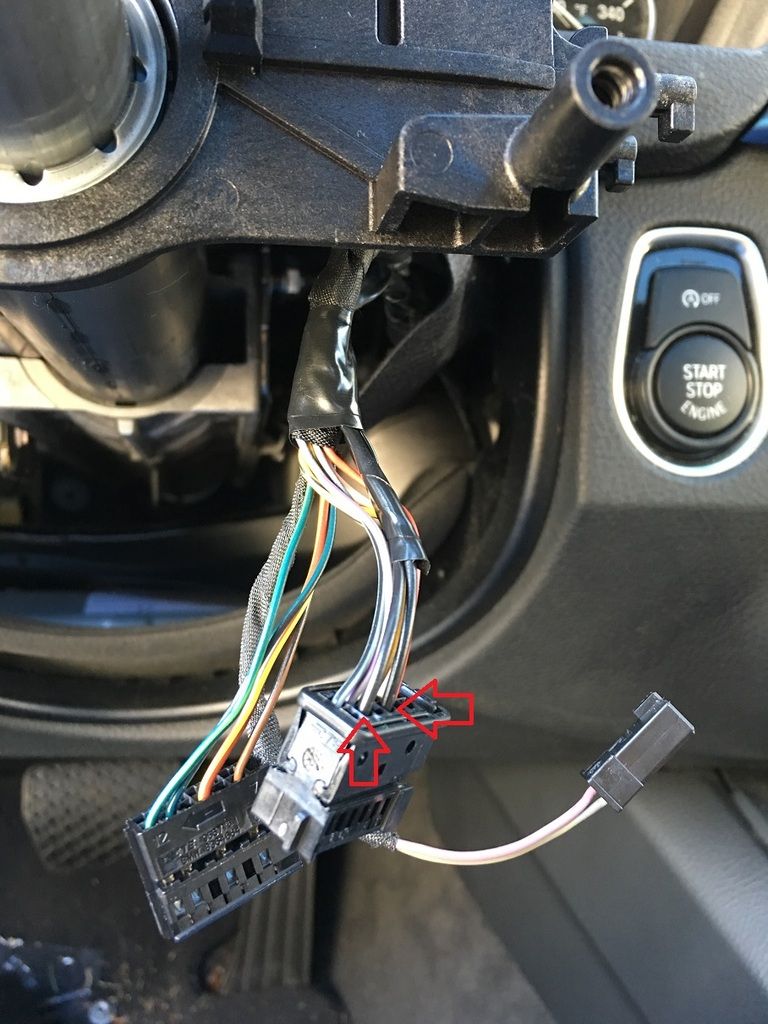 If you have the wires already, you can attach the new Switch Cluster. You will not need to follow the wiring steps below. Adding the wiring(if not already present): - You will need to add two wires to the Steering Column Switch Cluster connector, one which runs to the FEM and one which needs to run to the Rear Power Distribution(Fuse) box in the trunk - Start by taking 2 strands of the 18 gauge wiring and wrapping around 4 feet of it together with the electrical tape - Run that harness through behind/below the radio from the Passenger side to the Driver Side - Using 2 of the Socket Contacts, attach them to the 2 18 gauge wires. Make sure you are able to identify which is Power and which is Ground. I used Red and Black respectively. - After you have attached the socket contacts, connect the Red(Power) wire to Pin Slot #9 and the Black(Ground) wire to Pin Slot #11 of the black 12-pin Steering Column connector - Returning to the Passenger Side of the car, take the other end of the Black(Ground) wire and run it to the FEM - Attach the remaining Socket Contact to the Black(Ground) wire, and then connect it to FEM Connector A173*7B, Pin Slot #10 - Run the remaining wire along the Passenger side of the car to the rear Fuse Box - Using a 10mm socket, remove the hex nut holding the Fuse Box in place - Connect the Double Leaf Spring Contact to the end of the Red(Power) wire - The power wire requires a 10 Amp fuse socket that runs on the KL_15 circuit(Hot during Run). The wiring diagram for the Switch Cluster shows that this wire is supposed to run to the Front Fuse Box in the engine bay, but I did not want to deal with punching a hole in the firewall for one wire, which is why I chose to check the rear Fuse Box - In my car, Fuse F144(10A) was not occupied and is on the KL_15 circuit. In the event that your F144 is occupied, check the next fuse, F143, which is for the convertible top. This should be vacant, unless your car is a convertible. You would just need to replace the 5 Amp fuse with a 10 Amp fuse. - Once you have identified which spot you will use, insert the Power wire into the correct spot and ensure the fuse is in place - Return the Fuse Box to its correct position, and replace the 10mm Hex Nut to secure it into place - If you have not already, you can now return to the Drivers Side of the car and install the new Switch Cluster Installing the new wheel: - Simply slide the new Steering Wheel into place. It is grooved with one large tab at the bottom, so you cannot install it incorrectly - Once the new wheel is in place, reattach the 16mm bolt to secure the wheel in place - Connect the 2 wire connectors in the steering wheel to their appropriate spots on the Switch Cluster - Reconnect the airbag, then push it into place. You will be able to feel it click back into place and it will be secure Replacing the Steering Column Trim: - Insert the Heated Steering Switch into the open panel on the new bottom steering column trim piece - Remove the Aerial Transponder from the old bottom trim piece and insert it into the same place on the new trim piece - Connect the harness from the Heated Steering Switch to the back side of the Steering Column Switch Cluster, and also reconnect the Aerial Transponder wire harness - At this point, you can push the trim piece back into place At this point, all connections are completed and everything physically should be in place, now on to the coding! Vehicle Coding: - Reconnect the Negative Battery Terminal to restore power to the car - Connect to the car via E-Sys. After connecting, the first step will be to add Option 248 to your FA. Follow the steps in the E-Sys learning guides if you are unfamiliar with how to complete this step - Now all that is left is to VO Code the updated FA to the car. Activate the FA. At a minimum, you will need to code the KOMBI, HU_CIC/NBT, and FEM modules. Personally, whenever I complete a retrofit, I code the new FA to all modules in the car in the event that there is something related to the new retrofit in that module that may have been missed. How you code is up to you, but by coding them all, it avoids the risk of missing something OPTIONAL: Depending on your current software level/build date, your car may or may not display the Heated Steering Wheel Activated icon on the instrument cluster. If it does not, you can choose to attempt to flash/update your KOMBI and FEM to enable this display. Steps on how to do this can be found in the forums. Testing/Reassembly of the car: Once you have completed all coding, turn the car off then back on. Once the car starts, turn on the Heated Steering Wheel by pressing the switch. Within about 30 seconds, you should be able to feel the Steering Wheel warming up. Once you are satisfied that it works, you can replace any remaining trim pieces in the car, and you are all done! Congrats! You now have a Heated Steering Wheel for those cold days in your F30! |
| 10-23-2017, 02:29 PM | #3 | |
|
New Member
3
Rep 17
Posts |
Quote:
Look here. You're welcome  |
|
|
Appreciate
0
|
| 11-06-2017, 07:37 AM | #5 |
|
Captain
 172
Rep 740
Posts |
If anyone's interest, I have a Steering Column Switch Cluster available for sale!
__________________
Did my post help? Click "Appreciate!"
FOR SALE! Sport line Steering wheel with heated, paddle shifter, vibration motor, no airbag | EDM Bi-Xenon adaptive headlights (SOLD) | surround view retrofit kit (sold) | KAFAS2 camera and ECU | FLA camera(sold) | 6WB cluster (SOLD) |
|
Appreciate
0
|
| 11-14-2017, 07:03 PM | #6 | |
|
Enlisted Member
 
3
Rep 47
Posts |
Quote:
|
|
|
Appreciate
0
|
| 11-20-2017, 08:31 AM | #7 | |
|
Captain
172
Rep 740
Posts |
Quote:
__________________
Did my post help? Click "Appreciate!"
FOR SALE! Sport line Steering wheel with heated, paddle shifter, vibration motor, no airbag | EDM Bi-Xenon adaptive headlights (SOLD) | surround view retrofit kit (sold) | KAFAS2 camera and ECU | FLA camera(sold) | 6WB cluster (SOLD) |
|
|
Appreciate
0
|
| 12-27-2017, 02:20 PM | #10 |
|
New Member
0
Rep 9
Posts |
Hi there,
I want to change my normal wheel to m-sport wheel. I thought that will be better to buy heated version with paddles (currently I don't have paddles) and do both retrofits one by one. I'm not sure when I should buy Steering Wheel Electronics Module, it's needed only for heating function or I should buy it even if I change only wheel without any coding? I read that to change wheel I only need wheel, for paddles I only need wire and coding. I have assist functions, so I don't need change steering switch cluster as you wrote. So I need this part only for heating yes? Last edited by andrevus; 12-27-2017 at 02:30 PM.. |
|
Appreciate
0
|
| 02-05-2018, 08:17 PM | #11 | |
|
Enlisted Member
3
Rep 47
Posts |
Quote:
I now have everything to complete this retrofit. I have however a doubt about the wiring from the switch cluster to the FEM. The diagram https://www.newtis.info/tisv2/a/en/f...odule/Fpg8HKMD does not seems to match! Both A83*1B and A83*2B connectors have a pin 9 for power! I will go per your instructions but wanted to let you know. Thanks for all your DIYs, Alain |
|
|
Appreciate
0
|
| 02-06-2018, 02:17 AM | #13 | |
|
Private
 
41
Rep 72
Posts |
Quote:
|
|
|
Appreciate
0
|
| 02-06-2018, 09:08 AM | #14 | |
|
Second Lieutenant

35
Rep 276
Posts |
Quote:
|
|
|
Appreciate
0
|
| 02-06-2018, 12:53 PM | #15 | |
|
Private

13
Rep 67
Posts |
Quote:
|
|
|
Appreciate
0
|
| 02-07-2018, 03:54 AM | #19 | |
|
Second Lieutenant
35
Rep 276
Posts |
Quote:
|
|
|
Appreciate
0
|
| 02-18-2018, 02:34 PM | #20 | |
|
Enlisted Member
3
Rep 47
Posts |
Quote:
I have just finished this retrofit. Works like a charm. I didn't need to flash the KOMBI. Just make sure to connect the ground and power on connector A83*1B. Thanks to Roxxor |
|
|
Appreciate
0
|
| 02-18-2018, 02:37 PM | #21 | |
|
Enlisted Member
3
Rep 47
Posts |
Quote:
|
|
|
Appreciate
0
|
| 02-19-2018, 04:17 AM | #22 |
|
Coding ECU's remotely
445
Rep 1,172
Posts |
Can the photos be re-linked using a different host please?
__________________
Author of Car Connector - remote ICOM & ENET tool - Built in VPN for easy coding and remote diagnostics
Car Connector on YouTube |
|
Appreciate
0
|
Post Reply |
| Bookmarks |
|
|