

BMW 3-Series and 4-Series Forum (F30 / F32) | F30POST
>
DIY: F30 328i M Performance Exhaust (MPE)

| 01-12-2017, 01:36 AM | #1 |
|
Private First Class
 98
Rep 196
Posts |
DIY: F30 328i M Performance Exhaust (MPE)
Replacing your stock exhaust with the BMW M Performance Exhaust is not hard to do. I took if very slow and careful, and it still only took 2 hours, start to finish. This could be done in as little as 30 minutes.
Tools: Pipe cutter from Autozone (rent) 17MM socket Small flatheat screwdriver Adjustable groove-lock pliers Car ramps  Step 1: Raise the rear end with ramps (preferrably) or jack stands.  Step 2: Ensure that you have the correct parts before cutting! 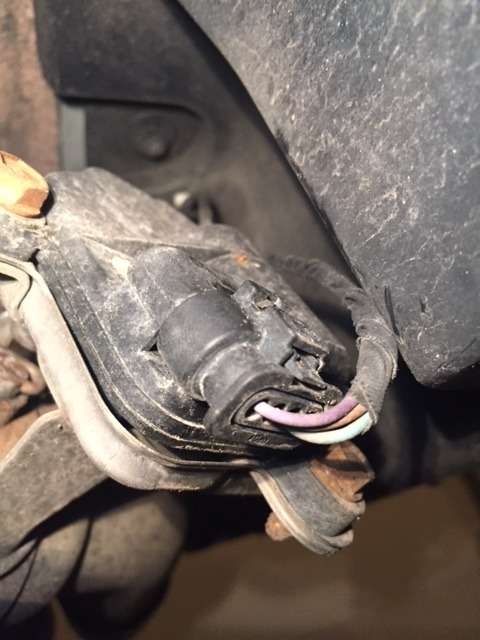 Step 3: Locate the valve connection release, just above the tailpipes. Gently push in on the tab with a small screwdriver while slowly pulling down on the connector. Don't pull by the wires!  Step 4: Once off, tuck the connector above. 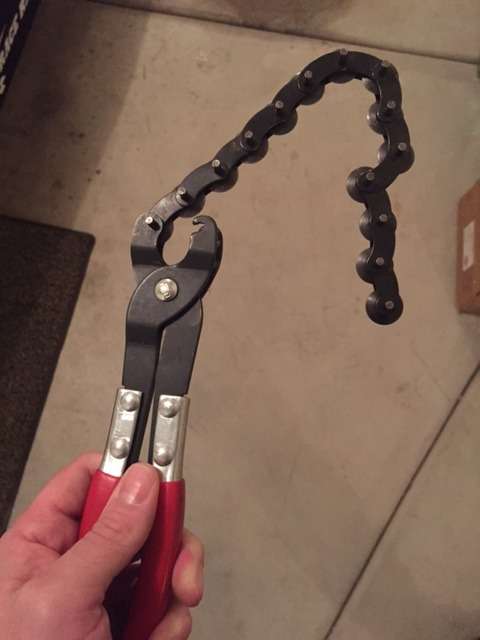 Step 5: Grab the pipe cutter you rented / purchased. 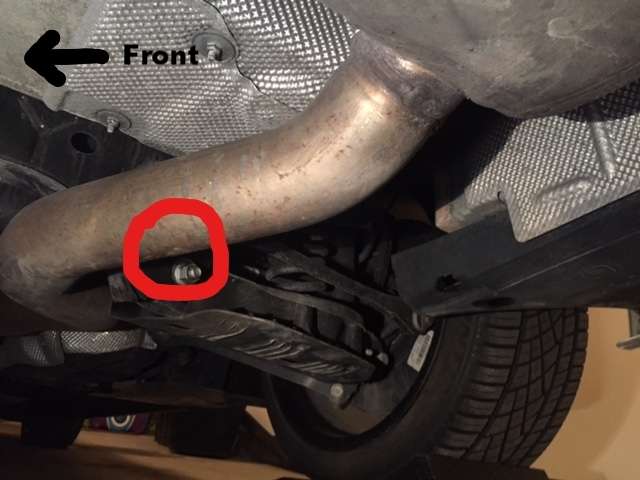 Step 6: Locate the factory dimple on the exhaust pipe just behind the rear axle. (red circle) 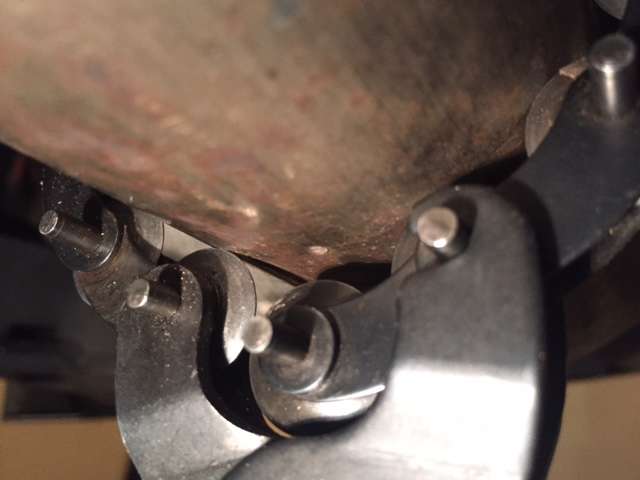 Step 7: Line up the pipe cutter with the dimple and slowly turn back and forth until the pipe is cut in half.  Note: Be sure the pipe cutter is 90 degrees to the pipe and not angled.  Step 8: Once the pipe is cut, support the exhaust with a jack or jack stand and remove the hanger bolts as seen in step 4. The old exhaust can be moved out of the way. Transfer the rubber hangers and brackets to the new exhaust and re-install the hanger bolts.  Step 9: Slide the clamp onto the exhaust pipe.  Step 10: Install the new muffler onto the hangers, position the tail pipes with your foot while tightening the clamp to hold the desired tail pipe position. 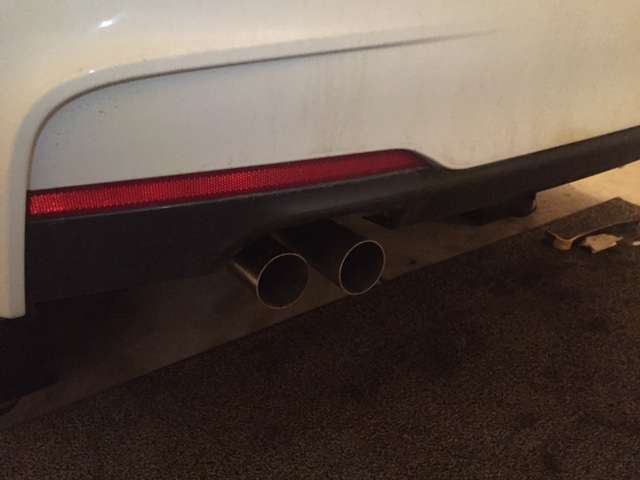 Step 11: Install the exhaust tips. (Not installed in picture) I'll post some exhaust sounds next week. It's only been 1 day, so I don't have a strong opinion so far other than positive. The tone is a good deal louder than stock from outside the car, and just audible without being annoying from the inside. It has a "blurp" when upshifting and should develop a crackle on down shifts after a few hundred miles. So far, so good.
__________________
2019 F87 M2C - DCT / 10mm spacers w 246/265 / RW lip / Suvneer skirts / PSM spoiler / BMW diffuser / 3M gloss black
Last edited by CPT Smuggs; 07-29-2017 at 03:27 AM.. Reason: Photobucket goodness |
| 01-12-2017, 02:13 AM | #3 | |
|
Private First Class
98
Rep 196
Posts |
Quote:
__________________
2019 F87 M2C - DCT / 10mm spacers w 246/265 / RW lip / Suvneer skirts / PSM spoiler / BMW diffuser / 3M gloss black
|
|
|
Appreciate
0
|
| 02-08-2017, 12:13 PM | #4 | |
|
First Lieutenant
 
244
Rep 374
Posts
Drives: 2017 540i
Join Date: Jun 2012
Location: Charlotte, NC
|
Quote:
__________________
2017 540i :: 2006 M3 :: 2012 328i Sport Line (sold)
|
|
|
Appreciate
0
|
| 02-08-2017, 06:04 PM | #5 | |
|
Private First Class
98
Rep 196
Posts |
Quote:
So far I have a few hundred miles on the exhaust and it has a huge thumbs up from me. I love it! Purely cosmetic (no noticeable performance gains), but it brings a smile to my face every time I press the start button. Would definitely do it all over again.
__________________
2019 F87 M2C - DCT / 10mm spacers w 246/265 / RW lip / Suvneer skirts / PSM spoiler / BMW diffuser / 3M gloss black
|
|
|
Appreciate
0
|
| 02-08-2017, 08:32 PM | #6 |
|
Private First Class
98
Rep 196
Posts |
Exhaust Audio Clips
Stock and MPE exhaust audit clips are linked below. These were recorded using a high quality external mic attached to a Canon 60D camera on the same day from the same distance before and after exhaust installation. Audio levels have not been adjusted. Recorded in Sport mode.
Unfortunately my in cabin comparison clips did not work out. I can say that the stock exhaust is almost inaudible in the car, while the MPE is just audible without being droning. Stock has an almost hollow sound. MPE has a deeper gurgle at idle is much more pronounced under load. Maybe this summer I will get some mic attachments and record the nice blow-off heard under wide-open throttle shifts. Note: The MPE audio is much louder due to the louder exhaust, be warned if you're wearing headphones! Stock Exhaust MPE Exhaust
__________________
2019 F87 M2C - DCT / 10mm spacers w 246/265 / RW lip / Suvneer skirts / PSM spoiler / BMW diffuser / 3M gloss black
|
| 02-09-2017, 08:46 AM | #7 |
|
First Lieutenant
244
Rep 374
Posts
Drives: 2017 540i
Join Date: Jun 2012
Location: Charlotte, NC
|
Good comparison and excellent quality sound clips. Thanks for sharing.
__________________
2017 540i :: 2006 M3 :: 2012 328i Sport Line (sold)
|
|
Appreciate
1
CPT Smuggs98.00 |
| 07-27-2017, 08:43 PM | #8 | |
|
Enlisted Member
 
11
Rep 46
Posts |
Quote:
|
|
|
Appreciate
0
|
| 07-29-2017, 03:23 AM | #9 | |
|
Private First Class
98
Rep 196
Posts |
Quote:
Original images should be working again.
__________________
2019 F87 M2C - DCT / 10mm spacers w 246/265 / RW lip / Suvneer skirts / PSM spoiler / BMW diffuser / 3M gloss black
|
|
|
Appreciate
1
moorty10.50 |
| 07-30-2017, 10:27 AM | #10 |
|
Enlisted Member
12
Rep 31
Posts |
Really debating getting this exhaust for my 328i. How does it sound WOT ? Was thing either this or the Active AutoWerke signature exhaust but I don't wanna risk a warranty issue since the car is pretty new.
|
|
Appreciate
0
|
| 07-30-2017, 08:28 PM | #11 | |
|
Private First Class
98
Rep 196
Posts |
Quote:
This video has some pretty good clips with WOT.
__________________
2019 F87 M2C - DCT / 10mm spacers w 246/265 / RW lip / Suvneer skirts / PSM spoiler / BMW diffuser / 3M gloss black
|
|
|
Appreciate
1
thatBimmerBloke872.50 |
| 08-14-2017, 02:32 PM | #12 |
|
Private First Class
99
Rep 191
Posts
Drives: 2013 328i xDrive
Join Date: Aug 2016
Location: Philly area
|
Great thread and well put together set of instructions. Just installed my MPE today and it went flawlessly. Rented exhaust cutter from Autozone. Total rental cost = FREE...gotta love that

__________________
'13 328i xDrive│Jet Black│BMS JB Stage 1│MPE│18" 400M & Conti DWS 06│DelVal BMW CCA #533245
|
|
Appreciate
1
telrod840.00 |
| 10-18-2017, 06:17 AM | #13 |
|
First Lieutenant
244
Rep 374
Posts
Drives: 2017 540i
Join Date: Jun 2012
Location: Charlotte, NC
|
Performed the installation yesterday using this DIY and wanted to provide some additional thoughts. I would rate the overall difficulty as low (similar to installing an intake but one could argue that is more time consuming in some aspects).
Tailpipe cut: The part that was the most time consuming and perhaps the most scary/frustrating step was making the cut into the pipe. I rented the tool from Autozone by paying $50 as "deposit" and then being refunded the money upon return. I would recommend that you inspect the tailpipe cutter they provide to ensure it is sharp and capable of doing the job. Most of the little cutting wheels were okay but a few in the middle were less sharp and created an issue when making the cut. The top portion of the pipe was not cut completely, so I finished the cut with a small hand pipe saw. Also, lubricate the cutting wheels to make it easier and when gripping the tool you do not have the squeeze it as hard as possible, more like a moderate squeeze to let the cutting wheels do the work. Exhaust hangers: I found it much easier to remove the entire hanger bracket using a 13mm socket. This way you remove the old exhaust, place it on the ground, remove the hangers, and re-install the hangers on the new exhaust before installing. An easy method for removing the exhaust hangers from the old exhaust once detatched from the car is to spray some lubricant on the rubber then use pliars (I used a slip joint) with one side on the rubber (inner) and one side on the metal hanger tip (coming off the exhuast). Muffler shops have a special tool called a hanger removal tool that is used to quickly pop them on and off so I figured out what was the most similar type tool in my garage. Alignment: It took me three attempts to get the exhaust aligned to where I wanted it. YOU DO NOT NEED TO BEND THE EXHAUST TO INSTALL CORRECTLY. The exhaust clamp used to join the new part to the existing exhaust pipe is what allows you to make fine adjustments. Once inserted into the clamp, grab the new exhaust end and the existing exhuast pipe and pull them together. When you make the final tightening on the clamp this is where the exhaust will stay, so as the OP stated, using your foot (I used my knee) to place exhaust tips where you want and then fully tighten the clamp. Tips: I ended up painting my tips gloss black to match the rest of the gloss black components on my car. I have no chrome and wanted to avoid any chrome additions. I used VHT spay paint (the engine enamel which requires you to bake the parts at 200 deg for an hour) and I am happy with the results. The little M logo is not as visible as before but honestly with all the whoring out of the M logo these days, and my car not being an M Sport or M car, I didn't really care if you could see it or not. Initial opinion on the modification: I am very happy with this exhaust and I know it gets better after the 1k miles break-in. When I completed the install and was ready to start the engine to hear the sound, I brought my wife out (who is a car person) to listen and we both approved. It is a subtle yet satisfying sound and out of all the sound clips and videos I watched, none do it any justice. You can't hear it from inside the cabin unless WOT but even then it is still subtle. To quote Bueller "It is so choice. If you have the means, I highly recommend picking one up."
__________________
2017 540i :: 2006 M3 :: 2012 328i Sport Line (sold)
|
|
Appreciate
0
|
| 10-18-2017, 11:02 AM | #14 |
|
New Member
0
Rep 5
Posts |
Great instructions.
I am thinking of doing this myself to my 428i. It's the base model with stock exhaust and n20 engine. I have a couple of questions for you guys, if you could help me out. I took a look the other day at my exhaust and I could not locate the factory dimple, is there another way to know where to cut? Are there major differences between 328i and 428i exhaust swap to MPE? Is the MPE exhaust same for 328i and 428i? Where did you buy your MPE? What was the cost for it and also shipping? Thank You. |
|
Appreciate
0
|
| 10-18-2017, 11:33 AM | #15 | |
|
First Lieutenant
244
Rep 374
Posts
Drives: 2017 540i
Join Date: Jun 2012
Location: Charlotte, NC
|
Quote:
Also, I purchased mine from eBay from a seller that is a dealership (seller username sunmotorsbmwparts) for $780 with free shipping. I PM'd you a link.
__________________
2017 540i :: 2006 M3 :: 2012 328i Sport Line (sold)
|
|
|
Appreciate
0
|
| 10-18-2017, 04:49 PM | #16 |
|
Brigadier General
 
2589
Rep 3,026
Posts |
For what it's worth my 328 factory pipe had the dimple as well. At first it was hard to point out.
Bought mine off our classified section and picked up a clamp at my local dealer for an arm and a leg.
__________________
2016 BMW F80 ZCP
Instagram : 7IM3LESS https://instagram.com/7im3less?igshid=YmMyMTA2M2Y= |
|
Appreciate
0
|
| 06-17-2018, 02:21 PM | #18 | |
|
Major
 
516
Rep 1,170
Posts |
Quote:
|
|
|
Appreciate
0
|
| 06-18-2018, 10:13 AM | #19 | |
|
Captain
518
Rep 891
Posts |
Quote:
__________________
328i RWD | MW on CRed Slick Top | 6MT | BM3 | MPE | GPlus FMIC | CSF Radiator | Millway Street Camber Plates & Monoballs | KW V2 6k/18k Swift Springs | F80 LCA/TS | SPL Bump Steer Kit | APEX SM-10 | R-S4 | DS2500 | RBF600 | SS Lines | Past: E36 328is & E38 740i |
|
|
Appreciate
0
|
| 06-18-2018, 05:49 PM | #20 | |
|
Major
516
Rep 1,170
Posts |
Quote:
|
|
|
Appreciate
0
|
| 06-18-2018, 11:02 PM | #21 | |
|
Private

104
Rep 91
Posts |
Quote:
That was very helpful. Thanks
__________________
2017 430i|Mineral Grey/Coral Red|M Sports Package|Premium|Tech|Lighting|Red Dachshund
|
|
|
Appreciate
0
|
| 04-22-2019, 08:03 PM | #22 | ||
|
Second Lieutenant
59
Rep 231
Posts |
Quote:
Quote:
Hello, Thanks for sharing this. I have 435. replaced mine but I'm hearing whistle when it reach 5 or 6 Rpm, I'm not sure if that's normal or not? I don't know if it was the same before I changed the muffler. What do you think, please advice? |
||
|
Appreciate
0
|
Post Reply |
| Bookmarks |
| Tags |
| f30 mpe performance exhaust |
|
|


