So I was doing a little recon of the trunk fuse box in preparation for installing a few aftermarket electronic accessories. Prior to the recon, I searched the net for info on the best fuses to tap for constant and switched 12V - and I found some decent info with most using the "add-a-fuse" method. Then I stumbled across a professional install where an unused fuse spot was used without an add-a-fuse or splicing into existing wiring. After a little more investigating I found out just how ridiculously easy it is to tap into power in the trunk fuse box the way the factory does it - very clean, no wire taps or add-a-fuse (and I was surprised my searches did not find much on this OEM method). Below is what I found out and should be applicable to hardwiring any aftermarket accessory.
So why do this instead of just using the very popular add-a-fuse method? Well for me, my OCD prefers an installation looking as OEM as possible - even the wiring. And fortunately, the rear fuse box makes it very easy to access the bottom of the fuse box and the individual terminals (easier than any other fuse box I have worked with in previous cars).
Note: While this should be applicable to most F8X/F3X cars, there may be some differences based on installed options in different vehicles. However, once you take a look at your fuse box as I did below, it should become obvious how much flexibility you have to work with in the fuse box in your car. And of course, be sure to disconnect the negative terminal on the battery before you start messing around with the fuse box.
This first pic is the rear fuse box. The yellow circle in the upper left are the fuses in question that have power going to them, but are not actually connected to any equipment in the car. Those three fuses, and the other three fuses that make up the group of six, are all on with ignition, and off when the ignition is off (these fuses do not stay on for ~10 min after the ignition is turned off). From top to bottom, these are fuses 143 thru 148 (143-145 are unused in my car even though there is a fuse installed in these spots).

The next pic is the bottom side of the fuse box. Each of the fuse groups you see from the top are connected to the colored sockets you see here. The brown socket in the lower left is the one I will be working with, which houses the fuses I mentioned above.

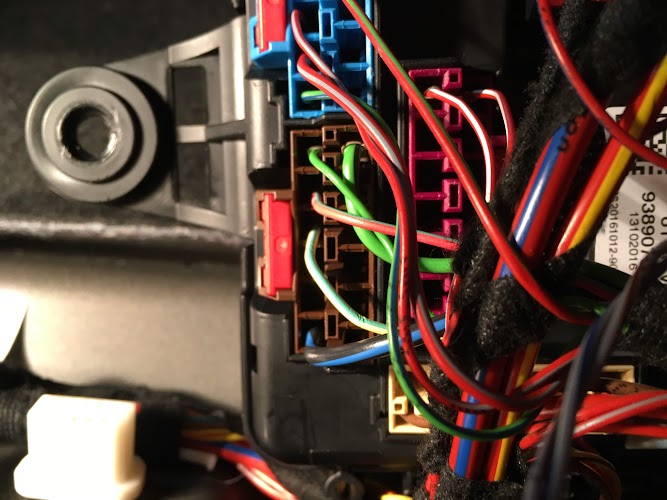
Here is a pic with a closeup of the brown socket removed. To remove the socket, you need to remove a red plastic "pin" which will release the socket (seen in the pic above). I removed this red plastic pin with a simple pick tool. You will notice that only three of the sockets have wires in them from the factory.

After doing some parts research on RealOEM, I found the terminal plugs that are used inside the fuse box. It was difficult to know for sure that the ones I found would work, but I decided to take a chance since they were not that expensive. Part Number 61130007438 is the part number I chose. This is the one that has ~9 in of wire already crimped - I chose this one because it was more convenient. I say not that expensive, but they are not that cheap either for what they are. Expect to pay $2.50 - $4.00 each for these little puppies. I bought mine from FCP Euro.

The terminal pin slides in and snaps into the socket. The pic below shows the new terminal pin with wire (blue/black wire) inserted, and the socket installed back in the bottom of the fuse box.
This last pic is the fuse box re-installed, with the new wire (blue/black) routed under the fuse box and then around to the back of the fuse box temporarily. I routed the new wire via the same path as the bulk of the other wring under the fuse box. Since I did not want a "live" wire just sitting there until I install my accessory, I removed the fuse and put it in one of the spare fuse holder spots - it is the brown 5A fuse in the upper right.

The beauty of this setup is that when I install my accessory, I will use a fuse that is the proper size for the accessory. I left the other two spots in that bank of six fuses open for now, but plan to use them for some other aftermarket accessories in the near future - each with their own circuit and appropriately sized fuse.
The last thing I did during my fuse box recon mission was to find out which fuses were a true constant 12V with the ignition off AND the car is "asleep" (i.e. the ~10 min after the ignition is off when most of the circuits finally shutdown). You will need to refer to your fuse box diagram located in the trunk fuse box. Here is what I found (you should also double check with a voltmeter or circuit tester before you actually use a circuit):
The following fuses are constant 12V: 100, 103, 104, 106-109, 112-114, 116, 117, 120, 123, 149, 150, 160, & 161
The following fuses are on AND off with ignition: 143-148, & 154 (143 is the one where I added the OEM terminal above)
The remaining fuses are on with ignition and then remain on for ~10 min after the ignition is turned off, and then turn off.
Other things I noticed while poking around:
1. Fuses 109, 112 & 125 are blank, meaning that there is no fuse installed in the spot, but a fuse could go there. There are other spots that don't have fuses, but these spots can't have a fuse installed since there is no terminal connection to the power bus inside the fuse box.
2. Fuses 112-117, and 136-142, do not have sockets installed. Presumably these are for special option equipment. In theory, you could purchase the applicable sockets and the corresponding terminal plugs to use these fuse locations to power other accessories.
Hopefully you will find this info helpful. Especially for those with OCD like me who like to have clean, OEM-like installs - even with the stuff that is not actually seen when your accessory is installed

.