BMW 3-Series and 4-Series Forum (F30 / F32) | F30POST
>
BMW F30/F31 Xenon retrofit

| 12-06-2013, 05:59 PM | #68 |
|
Private First Class
 
37
Rep 115
Posts |
I've had a look at your thread, that's unlucky about the wires. That's good work on the levellers.
I bought the larger one individually and had to crimp it and all that, sorta didn't work out too good. The smaller one I bought looks incorrect but it seems to work. I can provide the part numbers in the morning. (61130008998 - like I said it's not quite right but does the job). As for the process: It would be easier with the front end on stands. Pay attention to the way the headlights sit before you go ahead. Right now i have added them into the vo. I don't know if I have to do anything else as my car is too new for the 49.3 e-sys data but I reckon the software I just downloaded will be okay. All I have to do is change the pins over on the fem as it started snowing and was getting dark. currently the xenon lights flicker mad, but hopefully swapping the pins will sort this out. Other than that I can report the angel eyes, eyebrow, indicators work okay plug and play. 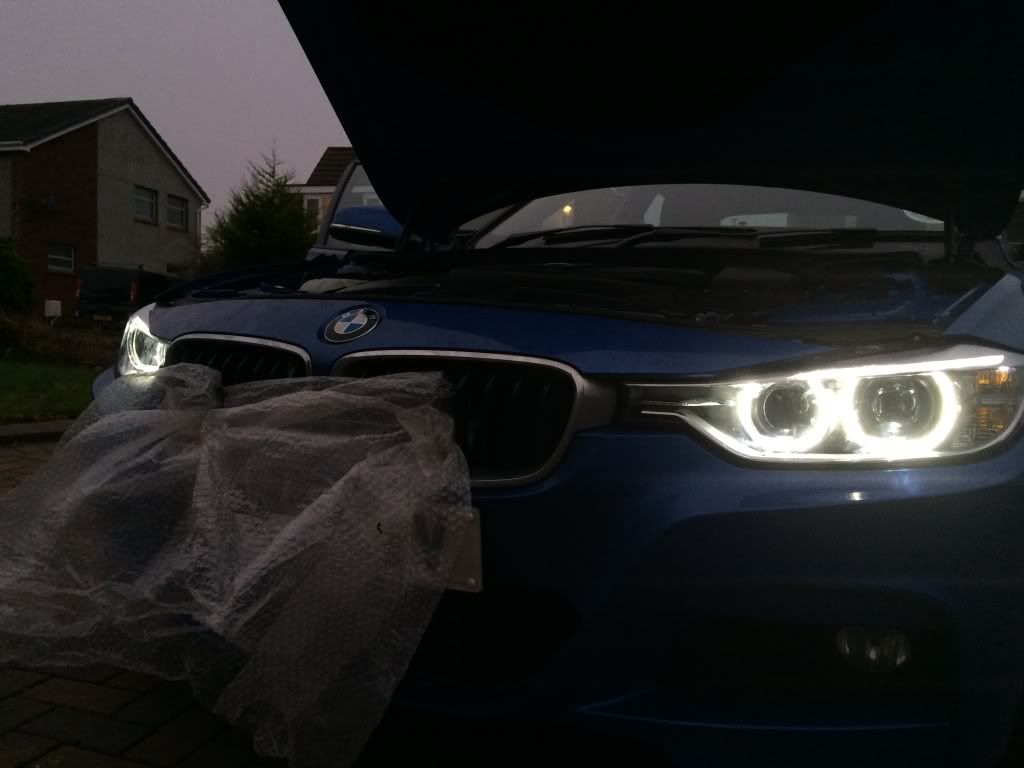 Last edited by aloo6; 12-06-2013 at 06:06 PM.. |
|
Appreciate
0
|
| 12-07-2013, 02:39 AM | #69 |
|
Enlisted Member
 1
Rep 41
Posts |
Check this
I managed this upgrade ages back but somehow was not able to post pics.Here are the first photos of first full working Xenon upgrade
First Photo with DRL on Second with Parking Lights on Third with Xenon & Angel Eyes |
|
Appreciate
0
|
| 12-07-2013, 04:56 AM | #70 |
|
Private First Class
37
Rep 115
Posts |
next problem:
the pin swap fro the FEM module, the first 2 are totally different pins. Halogen are bigger spades and the xenon require smaller. |
|
Appreciate
0
|
| 12-07-2013, 09:00 AM | #71 | |
|
First Lieutenant
 
60
Rep 378
Posts |
Quote:
luvbird, did you do the wiring yourself? If so what did you use to add in the ground wires to the harness and what did you do to move the FEM module wires since they are different sizes as aloo6 mentioned...??? |
|
|
Appreciate
0
|
| 12-07-2013, 12:55 PM | #72 |
|
First Lieutenant
60
Rep 378
Posts |
In other news, I received my wiring harnesses for the autolevelers today! One of them straight off a front sensor with correct wire colors and everything. The other is the same harness, which fits perfectly still, but had six wires in it. Not sure what it is off, but I am curious as to why the sensors have six pins but only use three... maybe someone with them factory can take a peak at theirs to confirm it actually only uses three... Either way, I took out the three extra pins and hopefully can use them for the ICM module side of things... who knows. Here is the pic:
 |
|
Appreciate
0
|
| 12-07-2013, 03:40 PM | #73 | |
|
Private First Class
37
Rep 115
Posts |
Quote:
My set up is going to have to be removed tomorrow unfortunatly. The xenons work brilliantly on the battery voltage but as soon as I start the engine the voltage goes up and the xenons flicker, strangely when I put load on the engine the xenons work, totally baffled. As I use the car for work I need this sorted out by Sunday night and it's not looking good, so going to have to remove the xenons till later. |
|
|
Appreciate
0
|
| 12-07-2013, 07:47 PM | #74 | |
|
First Lieutenant
60
Rep 378
Posts |
Quote:
|
|
|
Appreciate
0
|
| 12-07-2013, 11:25 PM | #75 | |
|
Enlisted Member
1
Rep 41
Posts |
Quote:
yes i did the wiring myself. For ground i spliced wire going to pin 2 on the headlight connector and added two new grounds to it and made them sit in pin 4 and pin 7 on the headlight connector. yes aloo6 is right in regards to mentioning that there are different sizes of connectors on the fem module and they cannot be moved as it is. Let me tell you what I did: 1.On the Headlight Connector On the Headlight connector we need to work with only 1-8 pins and pin 9-12 has no use on the xenon headlight hence they can be used as backup wires in case one fails in the future or if you want to downgrade to halogens in the future they will need to be used again. Pin 1,2(need to be spliced to add 2 new grounds),3,5,8 sit in the original place as they were in Halogen connector. As i said above Pin 2 needs to be spliced to add 2 new grounds to sit in pin 4 and pin 7.Make sure you use thick enough wire for ground(to be precise 0.75 guage thick atleast) otherwise it will create flickering issues.Make sure you add new grounds by splicing Pin 2 wire and not create new grounds by connecting them to the chassis.Connecting ground to the chassis can cause flickering issues too. So now we have Pin 1,2,3,4,5,7,8 sitting nicely in the connector.So whats wrong with pin 6,why it cannot sit in the original place on the headlight connector and just move wires on the fem module.It has a reason as aloo6 mentioned its connector size on the fem Module is different with the one on the original place and the new place where it needs to be moved. So what i did here was i removed this pin 6 wire both from the headlight connector and fem module and as i said pin 9-12 have no use on xenon headlight and can be used if any wire fails i used pin 9 wire to sit in pin 6 on the headlight connector and moved it to the new designated location on the fem module. Thats all what needs to be done on the Headlight Connector Side. 2. On FEM Module Wires coming from Pin 1,3,5 of Headlight Light connector are good to go as it is. Pin 2,4,7 of Headlight Connector are grounds which are connected to ground already and we need not worry about them. So Pin 1,2,3,4,5,7 are done already without moving a single wire on fem. Left is Pin 6 (where i have made pin 9 wire sit) and Pin 8 of Headlight connector for both left and right headlights. a) Left Headlight 1.Pin 6 wire of Headlight connector will move from pin 50 (in case you are using Pin 9 wire to act as pin 6 wire on the headlight connector as i did otherwise pin location will be different and you can ask me) on connector A173*4B to pin 53 in connector A173*3B. 2.Pin 8 wire of Headlight connector will move from Pin 49 on connector A173*4B to pin 53 in connector A173*4B. b)Right Headlight 1.Pin 6 wire of Headlight connector will move from pin 38 (in case you are using Pin 9 wire to act as pin 6 wire on the headlight connector as i did otherwise pin location will be different and you can ask me) on connector A173*4B to pin 41 in connector A173*3B. 2.Pin 8 wire of Headlight connector will move from Pin 37 on connector A173*4B to pin 54 in connector A173*4B. Thats all we need to do on the FEM module. Coding wise I changed VO and disabled Automatic Levellers(I didnt install the levellers so i needed to disable them to stop the system throwing errors so you need to do the same in case you dont go with levellers as well) I hope I explained everything you guys needed.In case you dont get anything get back to me. |
|
|
Appreciate
0
|
| 12-08-2013, 08:13 PM | #76 |
|
First Lieutenant
60
Rep 378
Posts |
luvbirds22: thank you for that. That will definitely help aloo6 out, however for us in the U.S. we do not have as many wires you (we are missing 8-11). I was already planning moving my #12 wire to the #8 spot to make up for this. I am not sure what the FEM wires look like yet, but if I need to I could move the #6 to #8 and put the #12 to #6 as an alternative. Otherwise I am just going make an adapter to use at the FEM or something.
|
|
Appreciate
0
|
| 12-09-2013, 03:27 AM | #77 |
|
Private First Class
37
Rep 115
Posts |
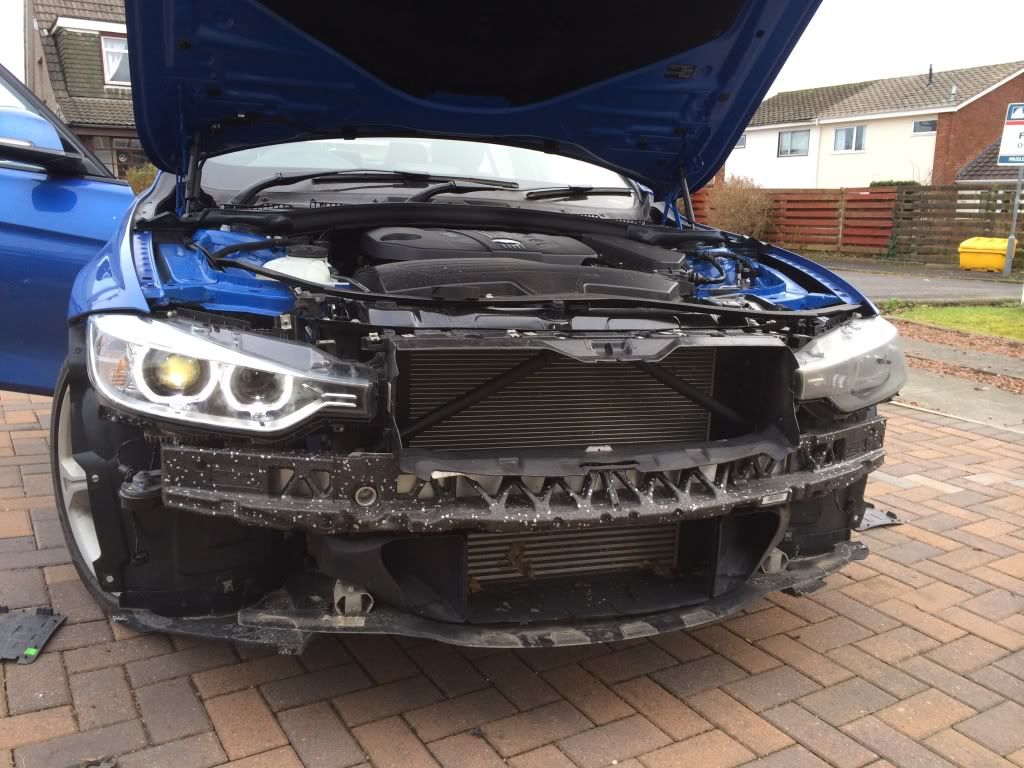
Done some more messing about before i removed the lights.
When the engine is under load(Heated seats, AC, Servo steering being used, windows up/down) they work so i am confident its a voltage issue and the ballasts inability to handle it with engine running. so for my last attempt i am going to fit a new ballast and see how that works. if it doesnt im scraping the idea. Kapkanimd: it might be wothwhile for you to check your xenons iluminate before you have a problem like me and have to rip it out. If you full lock or remove your wheel you should be able to plug them in. Last edited by aloo6; 12-09-2013 at 04:14 AM.. |
|
Appreciate
0
|
| 12-09-2013, 12:38 PM | #79 | |
|
Private First Class
37
Rep 115
Posts |
Quote:
Besides, the headlamp in both xenon and halogen is powered by the same pins and grounds off the same existing earth, shouldn't even need coding to light it up. |
|
|
Appreciate
0
|
| 12-17-2013, 08:34 PM | #80 |
|
First Lieutenant
60
Rep 378
Posts |
aloo6: any update? get to work on it anymore?
I hope to complete the retrofit this week. I am still struggling to find the right connector pins for the headlight, but am working on in now. Otherwise, I installed the two auto levelers today just to make it less to do in one day. I think I want all the wiring complete before I install headlights to help narrow down any problems. Here are pics of the autolevelers installed (*verified installed correctly*). I of course will post a full DIY once everything is completed, these are just teaser photos. Front:  Rear:  Last edited by kapkanimd; 12-17-2013 at 08:42 PM.. |
|
Appreciate
0
|
| 12-19-2013, 11:29 AM | #81 |
|
New Member
0
Rep 7
Posts |
Great photos kapkanimd, thanks for the upload. I'm watching both you and aloo6 intently because I am trying to do the same to my F11 5er. I have all the hardware except autoleveller wiring harness/connector. There is only one person I can find that has successfully completed a xenon retrofit on a 5 series to date and he has gone off the grid and not answering any questions in regards to his conversion.
There does seem to be more attempts made by 3series owners, so am trying to gleen as much information from your guys and then work out the differences to the 5er. Poor weather and young children putting me off starting until spring 2014, but looking to build on my understanding prior to embarking. Just out of curiosity, the three wires from your autolevellers, do they wire into the black junction box in photo one? Is this box already installed on the car, where do the wires go? Thanks again for the good work to date, intrigued to see how things progress, i'm sure successfully. |
|
Appreciate
0
|
| 12-19-2013, 01:44 PM | #82 | |
|
First Lieutenant
60
Rep 378
Posts |
Quote:
As for me, I ordered up pretty much every wire connector listed on realOEM in the hopes that one of them are correct for the headlight harness. Hopefully they will be here tomorrow and I can complete the retrofit this weekend. |
|
|
Appreciate
0
|
| 12-19-2013, 02:52 PM | #83 | |
|
New Member
0
Rep 7
Posts |
Quote:
 |
|
|
Appreciate
0
|
| 12-19-2013, 05:50 PM | #84 | |
|
First Lieutenant
60
Rep 378
Posts |
Quote:
|
|
|
Appreciate
0
|
| 12-24-2013, 08:56 PM | #85 |
|
First Lieutenant
60
Rep 378
Posts |
Some progress. ..
  Still have to finish wiring for autolevelers and get the coding correct.. I am also having the flickering issues and I'm certain it has to do with coding. It doesn't flicker until engine turns on for like 30sec. |
|
Appreciate
0
|
| 12-24-2013, 11:08 PM | #86 |
|
First Lieutenant
60
Rep 378
Posts |
Thanks to shawnsheridan who has helped me out even on Christmas Eve... There is no more flickering!!!!!
The headlights work fine and I took it for the first test drive a few minutes ago! I am still getting a few malfunction errors, but I have still not run the wires for the autolevelers and hopefully that will make the difference. I will certainly report my findings, but for now I am at least happy to report the retrofit is near completion, just have to work out the fine details. aloo6: I am almost certain now that your problem is likely related to a coding issue. Here is the coding that I have done so far that has eliminated the flickering!! First add 522 to your VO, and then write the VO to the Car as explained here: http://www.bimmerfest.com/forums/att...6&d=1338725691 Then VO Code FEM_BODY: Connect => Read FA (VO) => Activate FA (VO) => Read SVT (VCM) => Right-Click on FEM_BODY (the ECU itself not the underlying CAFD) => Select CODE. Then go back and FDL Code C_BLC_ENA = F030disable (it is under FEM_BODY, but I forgot what folder, I just used the search feature at the time and put in "C_BLC_ENA and it took me right to the folder) I will report back any updates as they come and I will hopefully have the autolevelers all wired up by Thursday! Here is some more retrofit porn from after my test drive (sorry hard to get a good pic from my phone):  Last edited by kapkanimd; 01-02-2014 at 07:30 PM.. |
|
Appreciate
0
|
| 12-26-2013, 12:53 PM | #87 |
|
Private First Class
37
Rep 115
Posts |
That's great mate. Well done to you and Shawn.
Will need to give it another go. Still trying to sort out the headlamp washers, but I'm having problems finding drawings. |
|
Appreciate
0
|
Post Reply |
| Bookmarks |
|
|