

BMW 3-Series and 4-Series Forum (F30 / F32) | F30POST
>
BimmerTech F30 Power Trunk Retrofit

| 02-17-2017, 06:31 AM | #265 |
|
Enlisted Member
 
20
Rep 38
Posts |
Just retrofitted on my F32. Absolutely not PLUG and PLAY...alot of modification but still not working probably.
BimmerTech please confirm: can I use oem bmw switch? Because I check your switch is not OEM. |
|
Appreciate
0
|
| 02-17-2017, 08:11 AM | #266 | |
|
Enlisted Member

4
Rep 39
Posts |
Quote:
|
|
|
Appreciate
0
|
| 02-17-2017, 08:37 AM | #267 | |
|
Banned
271
Rep 832
Posts |
Quote:
|
|
|
Appreciate
0
|
| 02-17-2017, 11:39 AM | #268 |
|
Private
 15
Rep 66
Posts |
Install completed
this is of the trunk in action, a few points i'd like to let some of your guys know when I installed this. 1) First impression of the box and layout is very professional and the wiring harness seems high quality. 2) installation was harder than i expected because of only having a video to go by, so rewinding each part to see what was being installed was difficult, i recommend bimmertech to make a step by step pdf. 3) Some things that the video did not address was that the ground wire for one of the wiring harnesses was not long enough so i grounded it on the battery tie down. the 'quick' release plastic hold downs for the trunk trim are not quick at all and spun freely in the socket so i recommend holding the outer part of the plastic part with a pick or flat head screw driver while unscrewing the center. Something else not mentioned in the video is the orientation of the rear small threaded piece you put on the rear ball flange, i had to figure it out, and this took about 20 minutes. 4)I dropped the smaller threaded piece of metal into the void where nothing returns, BUT i was able to get it with a magnet, which i am quite fortunate for, this took about 30 minutes but this piece is necessary to make the rear ball flange stable. 5)as stated before when i started my car, the trunk did not close automatically when the button was pressed, i made sure the electronic locked was working by pressure the trunk button and audibly hearing the actuator run, then i gently closed the trunk until the latch pulled the trunk closed, then everything started working perfectly. 6) there needs to be a plastic template with directions on how to orient this on the trunk trim, the piece of paper gave me a good idea but did not state where to install the switch, on my part i did mess up the trunk trim when installing the button, putting the switch too high in the trim, so it hit the trunk. So in the video you do see a space where the trim should have been. Use a dermal tool so cut out the space needed for the button, it makes it so much easier. So far I really like this kit, it may not be as easy to install as stated and this kit definitely needs to address some of the steps not listed that some of us experienced, as well as needing a PDF, but i'm so far happy with my purchase, i will update if there are any problems. |
|
Appreciate
0
|
| 02-17-2017, 01:15 PM | #269 | |
|
Captain
 418
Rep 884
Posts |
Quote:
Try putting the trunk lid up all the way and holding the open/close button for 5 seconds (until it flashes) to set the travel; and see if it corrects this |
|
|
Appreciate
0
|
| 02-18-2017, 09:17 PM | #270 |
|
Second Lieutenant

92
Rep 267
Posts |
Just installed my retrofit kit today. Got most of it done with exception of a few things that need to be tidied up and the liner put back in the trunk.
I'll post some tips on installation when I get a chance in the coming days, as others mentioned earlier, the pushbutton switch needs to be carefully located, I ended up having to tweak it's location to get it to fit properly without obstruction from behind. Unfortunately I am left with a gap where the switch was, I'll see if I can cover it with the leftover piece that I cut out. One issue, the trunk opens and closes fine, with exception of the trunk lid not latching and locking properly. I managed to get the trunk to latch with a firm push on the lid, but this is not optimal. How do I get it to latch automatically? Is there some adjustment I need to make? I did try holding down the trunk lid button for 5 seconds until it flashes, but that didn't see to cure it.
__________________
2017 430ix Gran Coupe
|
|
Appreciate
0
|
| 02-19-2017, 11:08 AM | #272 |
|
New Member
3
Rep 14
Posts |
Inop power trunk unit
I installed mine over the weekend. The motor unit only turns about 1/4 to half turn and returns. I had to disconnect. The rest of the electric seem to work.
Email tech support. I also had to modify many the rear motor mount and adjust for the ground install as one wire was too short. |
|
Appreciate
0
|
| 02-19-2017, 11:47 AM | #273 |
|
Second Lieutenant
92
Rep 267
Posts |
I tried adjusting the trunk stops, that didn't improve anything.
A few observations: 1. The lid "bounces" at the beginning of the opening stage, so obviously something under tension. 2. The latch mechnism doesn't completely open up, necessitating using the manual release to fully open it. 3. When closing, at the point where it stops closing automatically, I have to put a bit of pressure on top of the lid for the latch to fully engage. Looks like I'll take things apart in the lid to see if I did something wrong, particularly with the placement of the latch. Thank goodness it's just as nice today as it was yesterday...
__________________
2017 430ix Gran Coupe
|
|
Appreciate
0
|
| 02-19-2017, 11:53 AM | #275 | |
|
Private

11
Rep 55
Posts |
Quote:
|
|
|
Appreciate
0
|
| 02-19-2017, 04:43 PM | #276 |
|
Second Lieutenant
92
Rep 267
Posts |
OK, removed and then reinstalled the latch mechanism, it is working correctly now, seems like the release cable was pinched somewhere, so now it's unlocking and locking as it should.
I'm still having troubles with the trunk lid closing completely. Seems like the last 1/2" of travel meets some resistance that requires me to push on the lid to close it completely and for the latch mechanism to grab hold of the striker hook on the bottom. I remounted the rear ball joint clip, just in case that wasn't mounted properly, did a much better job the second time. I also checked to make sure the motorized arm was attached well to the ball joint. I'm wondering if the car insulation near the hinge point of the lid may be obstructing the motorized arm from extending fully? Here's a video of the problem: https://www.dropbox.com/s/tux9gx9cvv..._3816.m4v?dl=0
__________________
2017 430ix Gran Coupe
|
|
Appreciate
0
|
| 02-19-2017, 06:56 PM | #277 | |
|
New Member

4
Rep 23
Posts |
Quote:
__________________
Previous: E30, E34, E39, E46, E91, & F30 320d
Current: F30 330i |
|
|
Appreciate
0
|
| 02-20-2017, 02:00 AM | #279 |
|
Second Lieutenant
92
Rep 267
Posts |
Though it seems like the dangling switch might obstruct the closing of the trunk, I had actually tucked it further up the lid, it's completely clear of any obstructions. I verified it from looking inside the trunk from the rear (open) seat in the car. Looking from within the trunk while the mechanism was closing the lid, it seemed that the motor mechanism certainly was trying to push the trunk lid further closed, but meeting some mechanical resistance. Got a tech support request in to the Bimmertech folk, hopefully they can give me some guidance.
Despite the lid not closing completely, I really like this retrofit! I haul quite a bit of stuff in this trunk for work, it will come in handy.
__________________
2017 430ix Gran Coupe
|
|
Appreciate
0
|
| 02-20-2017, 08:03 AM | #281 | |
|
Private
11
Rep 55
Posts |
Quote:
 |
|
|
Appreciate
0
|
| 02-20-2017, 08:54 PM | #282 | |
|
Second Lieutenant
92
Rep 267
Posts |
Quote:
I'm suspecting that the sound insulation on the interior of the fender right by the arm may be obstructing the motorized arm, there is a drainage tube from the sunroof that is directly behind the insulation that is adding about a 1cm "bulge" to the insulation, right beside the end of the motorized arm. I'll do some more experiments hopefully Wednesday, when the weather is nice again, and hopefully have received further direction from the support people at Bimmertech.
__________________
2017 430ix Gran Coupe
|
|
|
Appreciate
0
|
| 02-20-2017, 11:39 PM | #283 |
|
Second Lieutenant
92
Rep 267
Posts |
A few tips for making the installation a bit easier....
As others have observed here, before making the cutout for the trunk switch, make sure to check the clearance space behind where you are cutting into the trunk lid trim panel, I would advise locating the switch closer to latch, and as close the the bottom ledge as possible without the bezel of the switch sticking out. A dremel with a plastic cutting disc made easy work of starting the cuts needed for the switch, then I finished cutting the rectangular hole with a knife. It is important that you get the width right, because the clips that hold the switch in place are on the sides. While the video showed the right side trunk trim panel remaining partially in place, I decided to remove it completely while installing the components, made life a lot easier! When you remove the right tension spring, the lid has a tendency of falling onto your head when working to install the bracket on the hinge arm. After the first "wallop" on my head, I got an extendable snow brush to prop open the lid. A camera monopod would work just as well for those here who don't know what snow is!!  I also covered the battery with a rubberized cover, not only to protect the battery and prevent the negative terminal from moving onto the battery post, but also prevent fasteners from falling into the void beside the battery. I stuffed the void where the rear bracket is attached with some blue shop towels. Makes life a bit easier for mounting the bracket without the void eating up your parts!! The small metal plate that goes behind this rear bracket assembly seems a bit cumbersome for all but the most nimble of fingers to position and hold in place until you can get the side screw started into it. I wish it was longer, or at least the "skinny" tab not bent 90 degrees. Nevertheless, having the bent tab worked in my favour. I used a magnetic pickup tool to hold it in place while getting the screw threaded into it. Worked brilliantly!! If you're taking your time installing this, repeating different parts of the install video to figure out what you need to do, count on about 4-6 hours of work. If you're mechanically inclined, it should be relatively easy, but it still needs careful thought and execution. Given my challenges in getting the trunk to latch closed, I recommend that you "test" this kit before putting any interior trunk trim back into place. I ended up having to take my lid trim off a second time. Some of the plastic fasteners that hold the trim in place were showing a bit of wear and tear. I'm having to replace one or two "mangled" ones. I also found that the ground wire coming from the control box, if mounted to the inside fender beside the battery was a bit too short for my liking, in fact the control box had to be mounted directly under the battery bracket in order for the cable to reach. Before mounting the box, I recommend that you attach the ground wires to the grounding point so that you can see how much slack you don't have. I'll be adding about 6" of additional wire to this cable so that I can secure it to an existing cable loom without any tension on it. The other ground wire had sufficient slack to it.
__________________
2017 430ix Gran Coupe
Last edited by Arthurrs; 02-20-2017 at 11:44 PM.. |
|
Appreciate
0
|
| 02-21-2017, 02:46 AM | #284 |
|
Enlisted Member
20
Rep 38
Posts |
|
|
Appreciate
2
Maciej@BimmerTech29.00 Nelson@BimmerTech271.00 |
| 02-21-2017, 02:53 AM | #285 |
|
Enlisted Member
20
Rep 38
Posts |
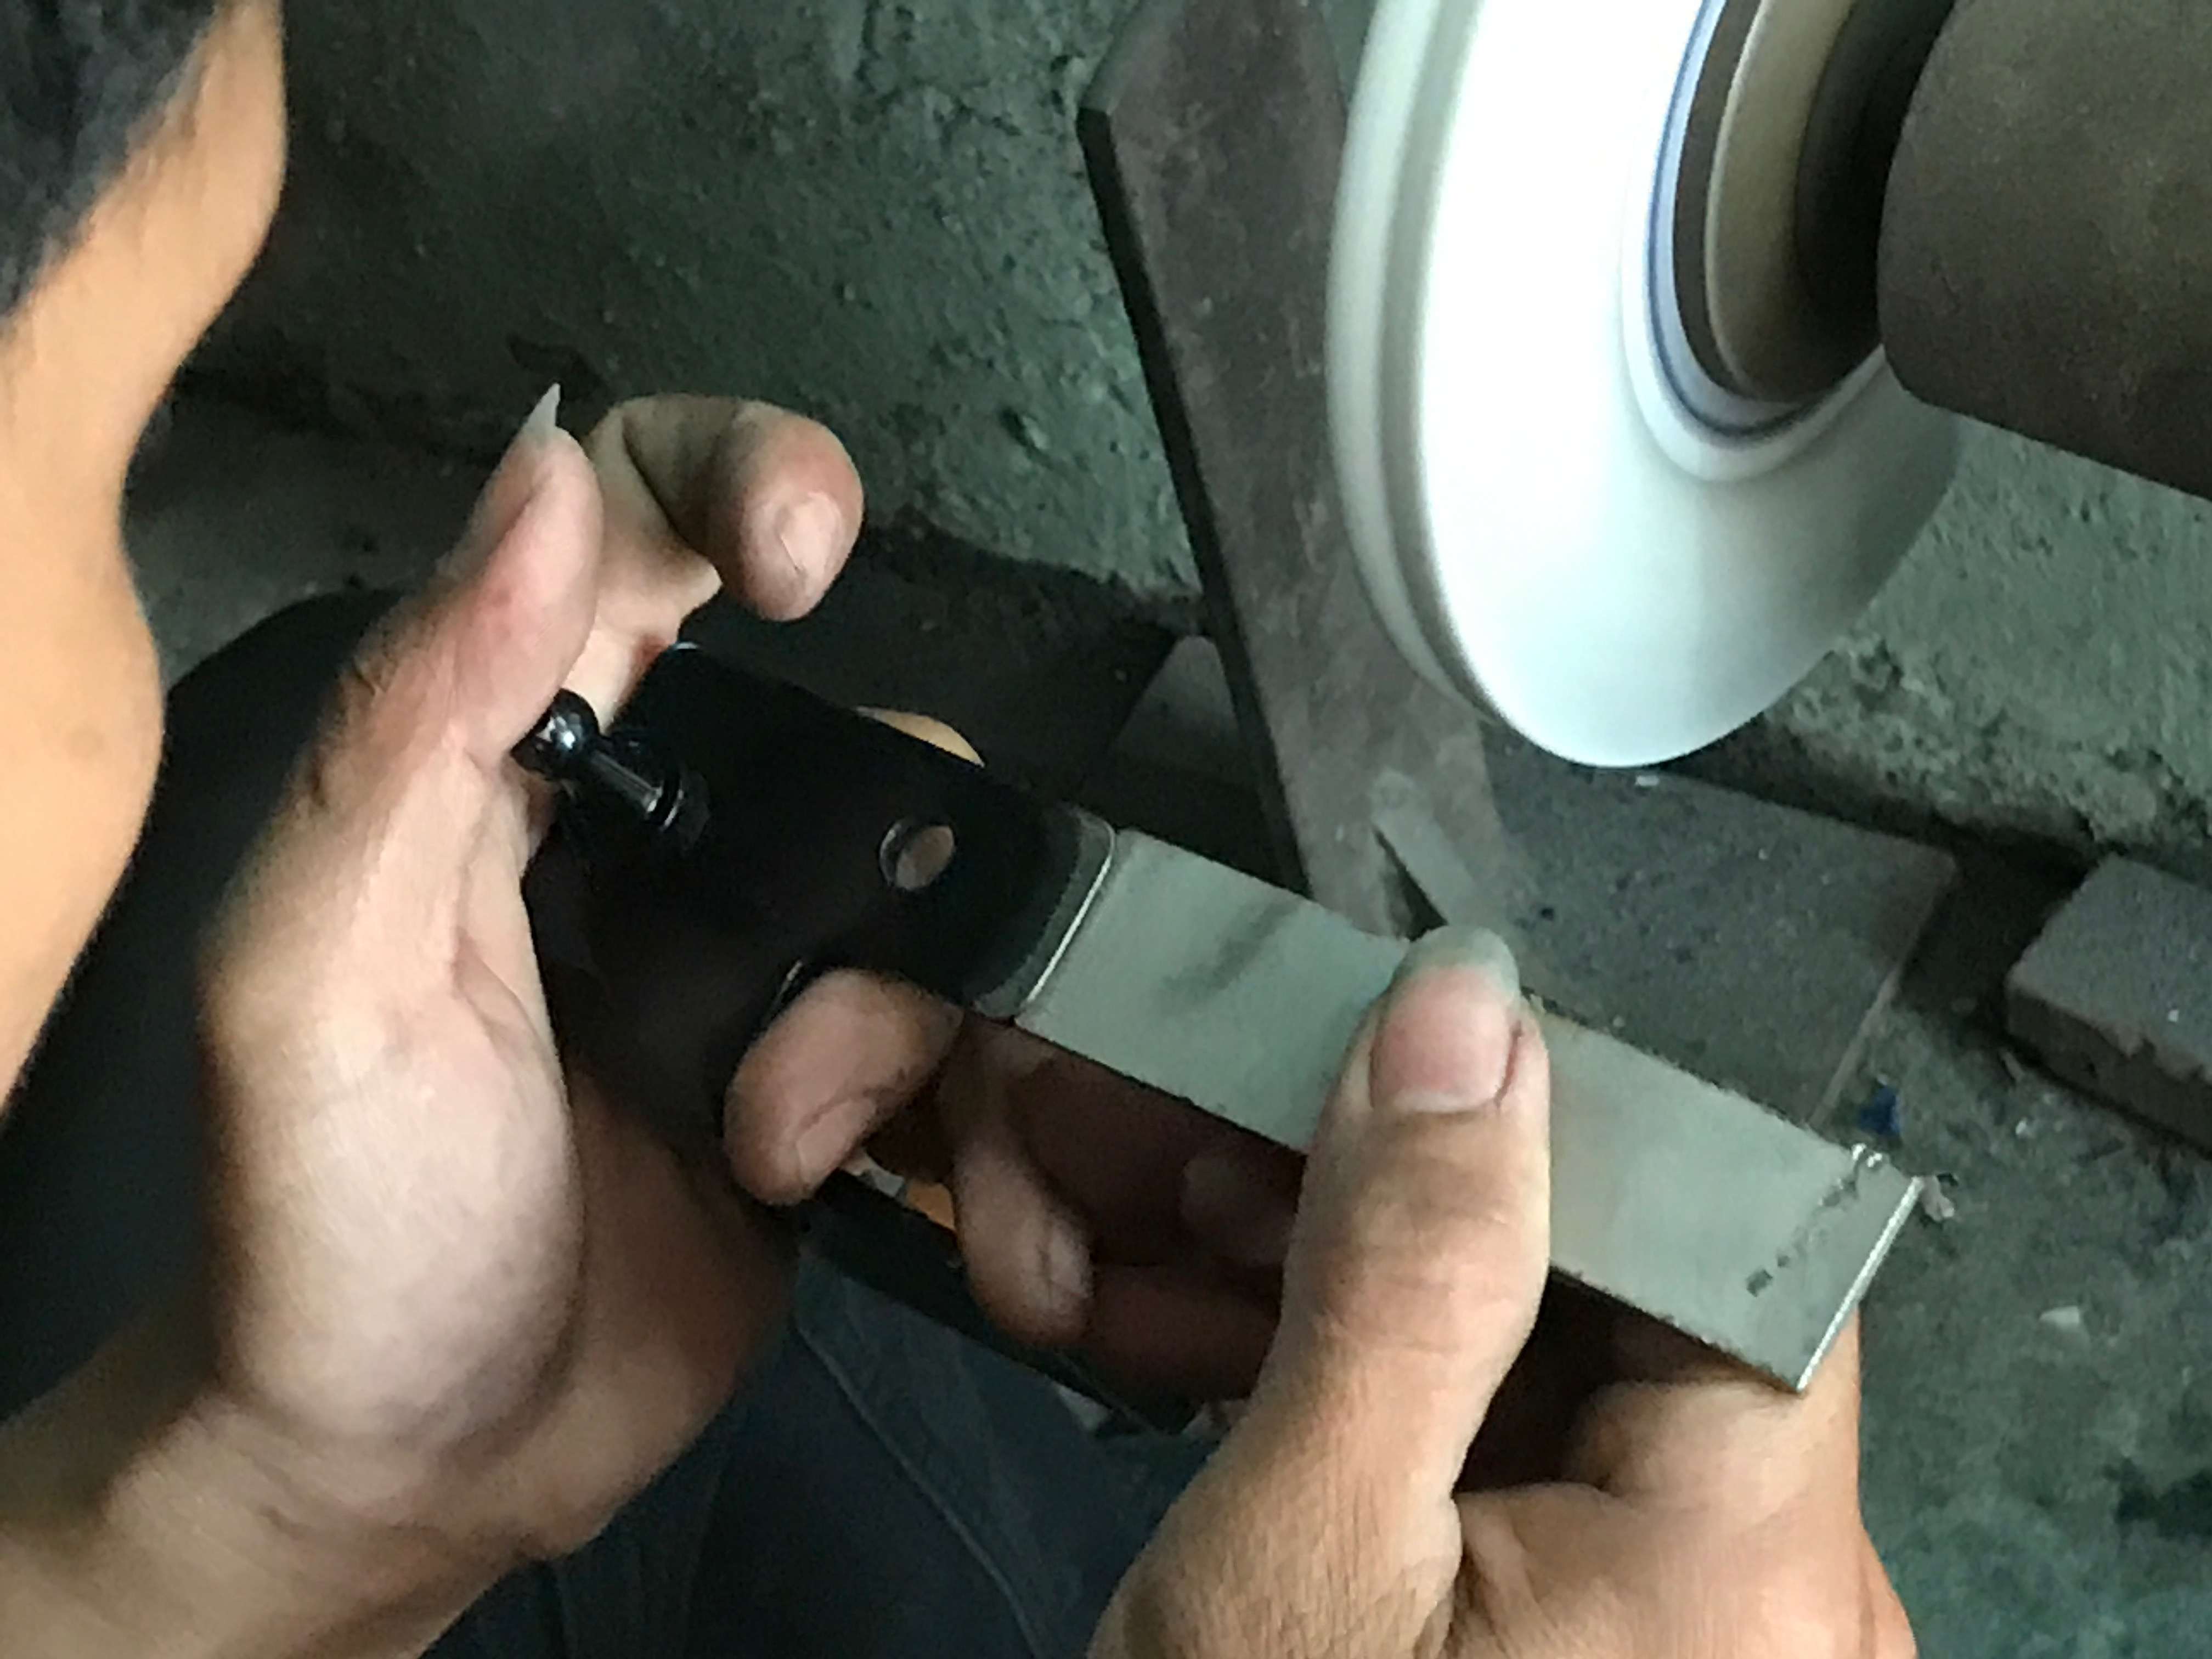
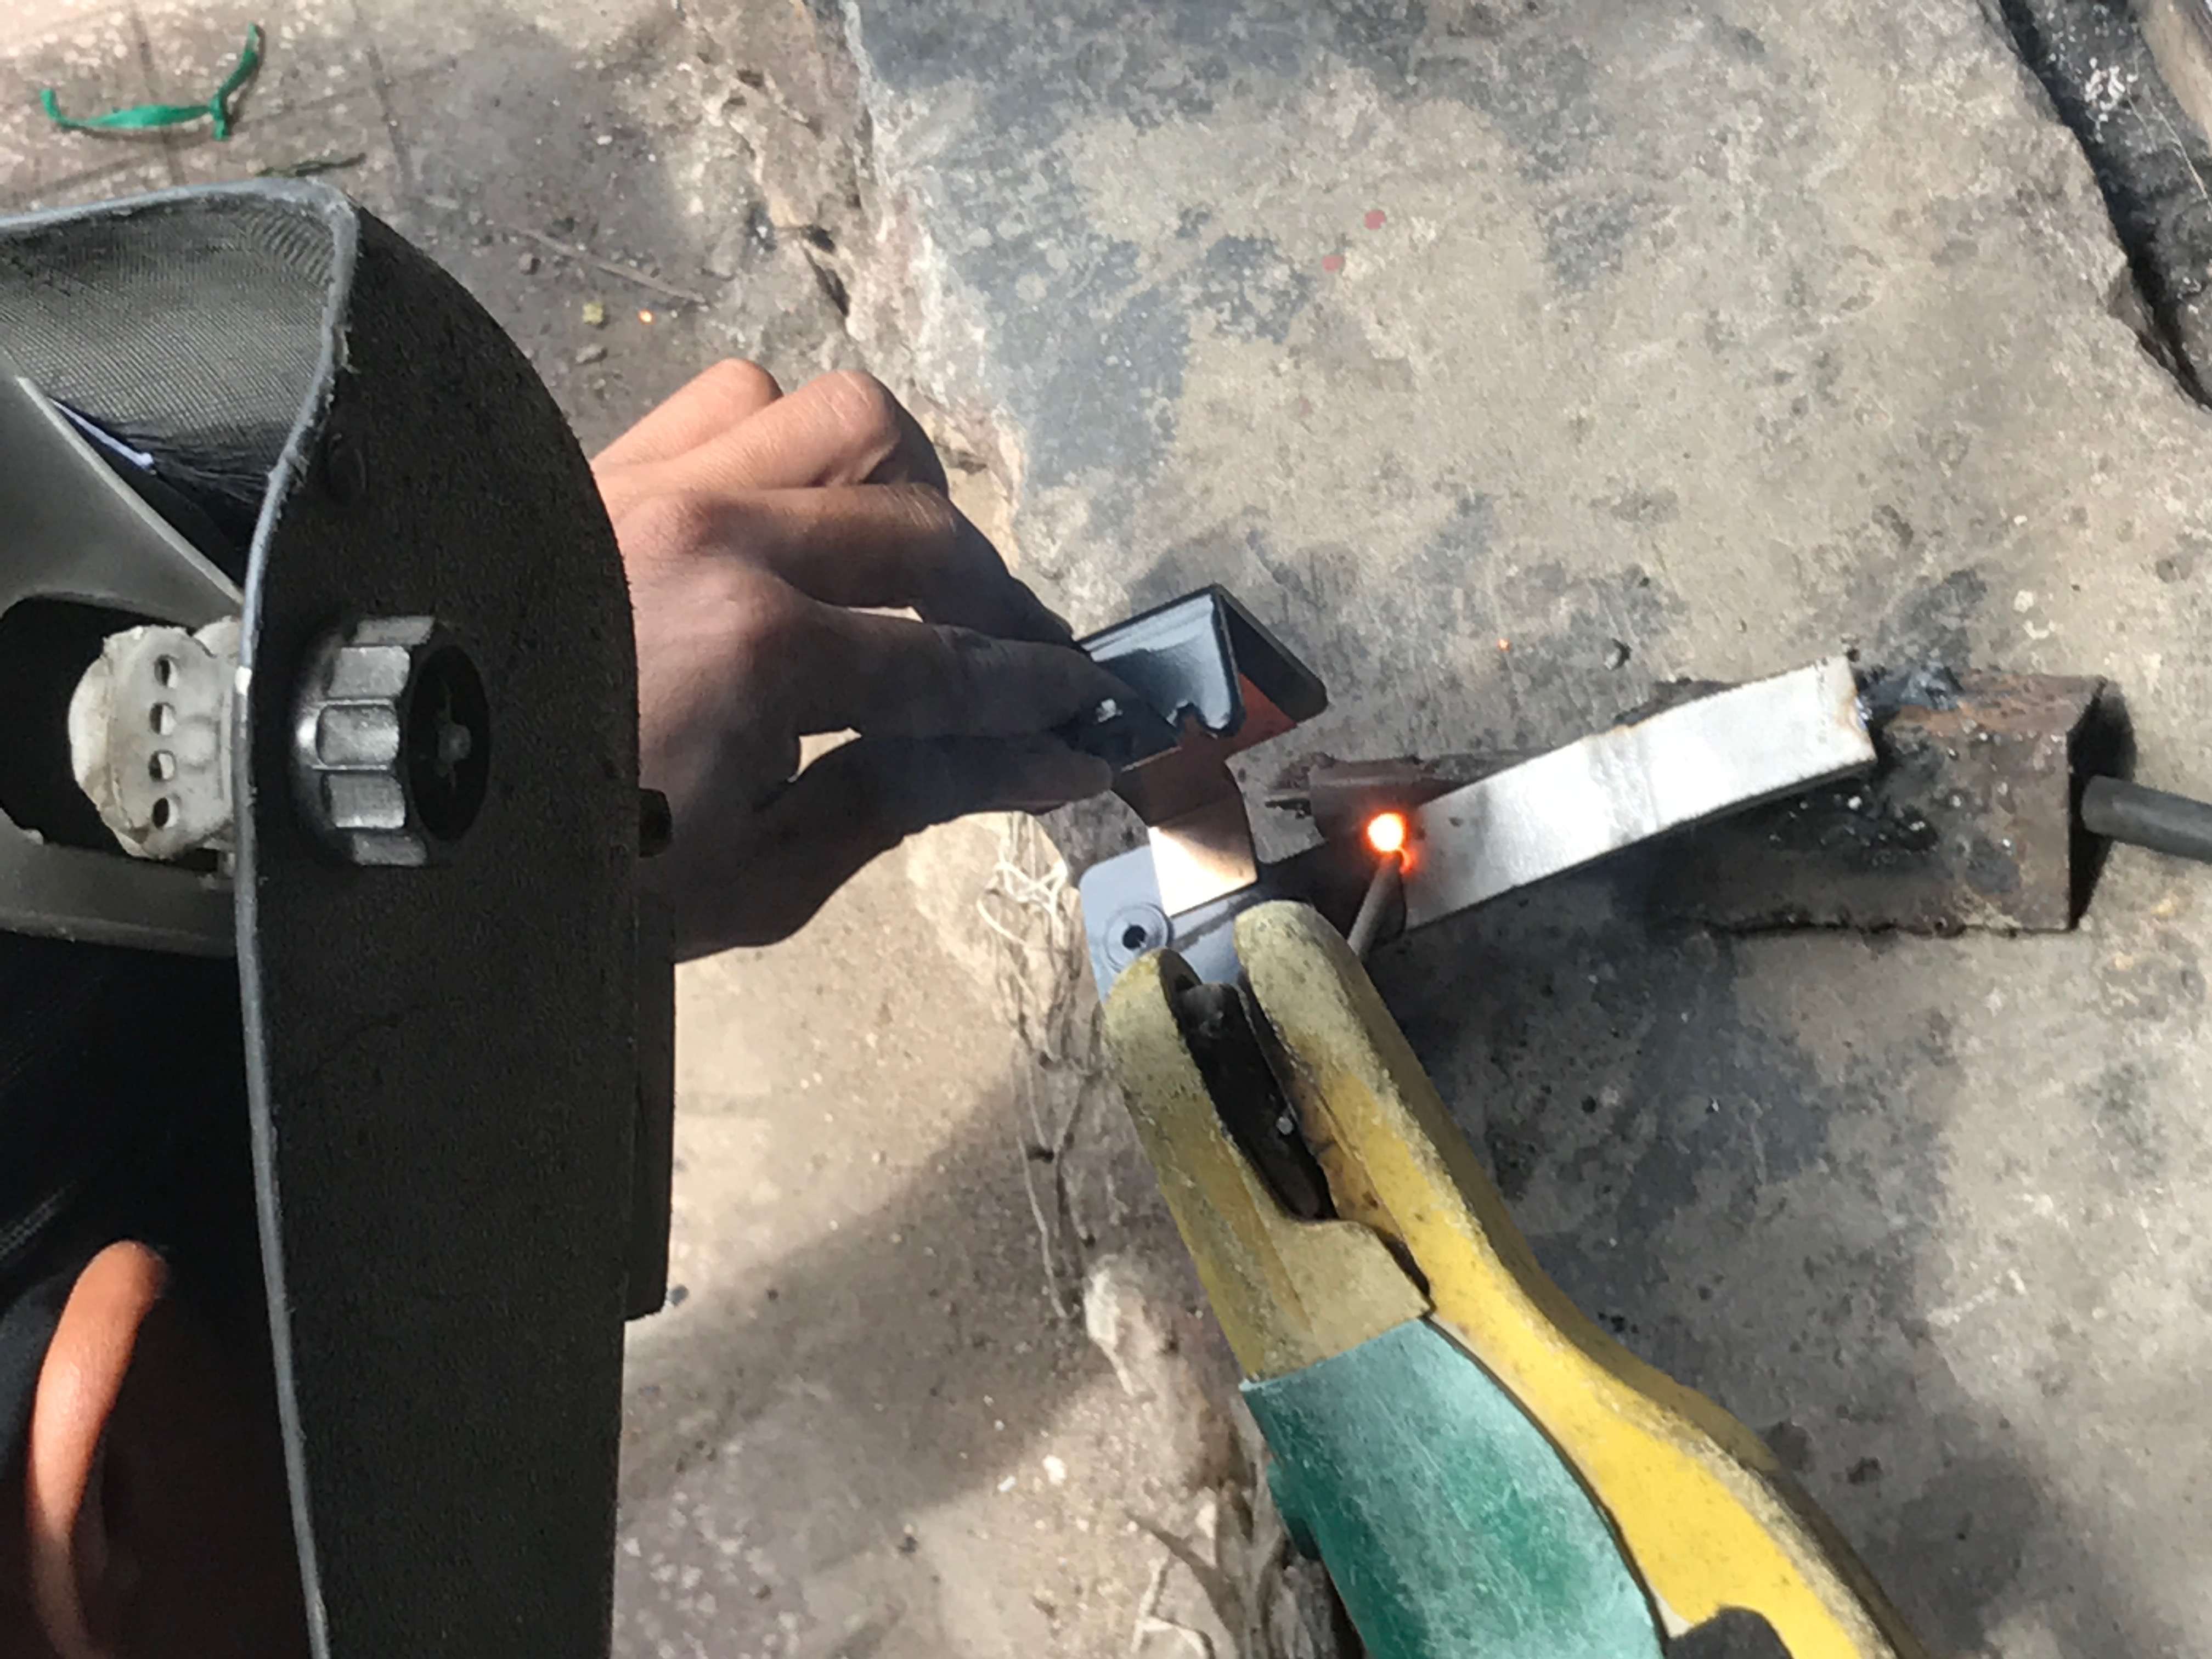
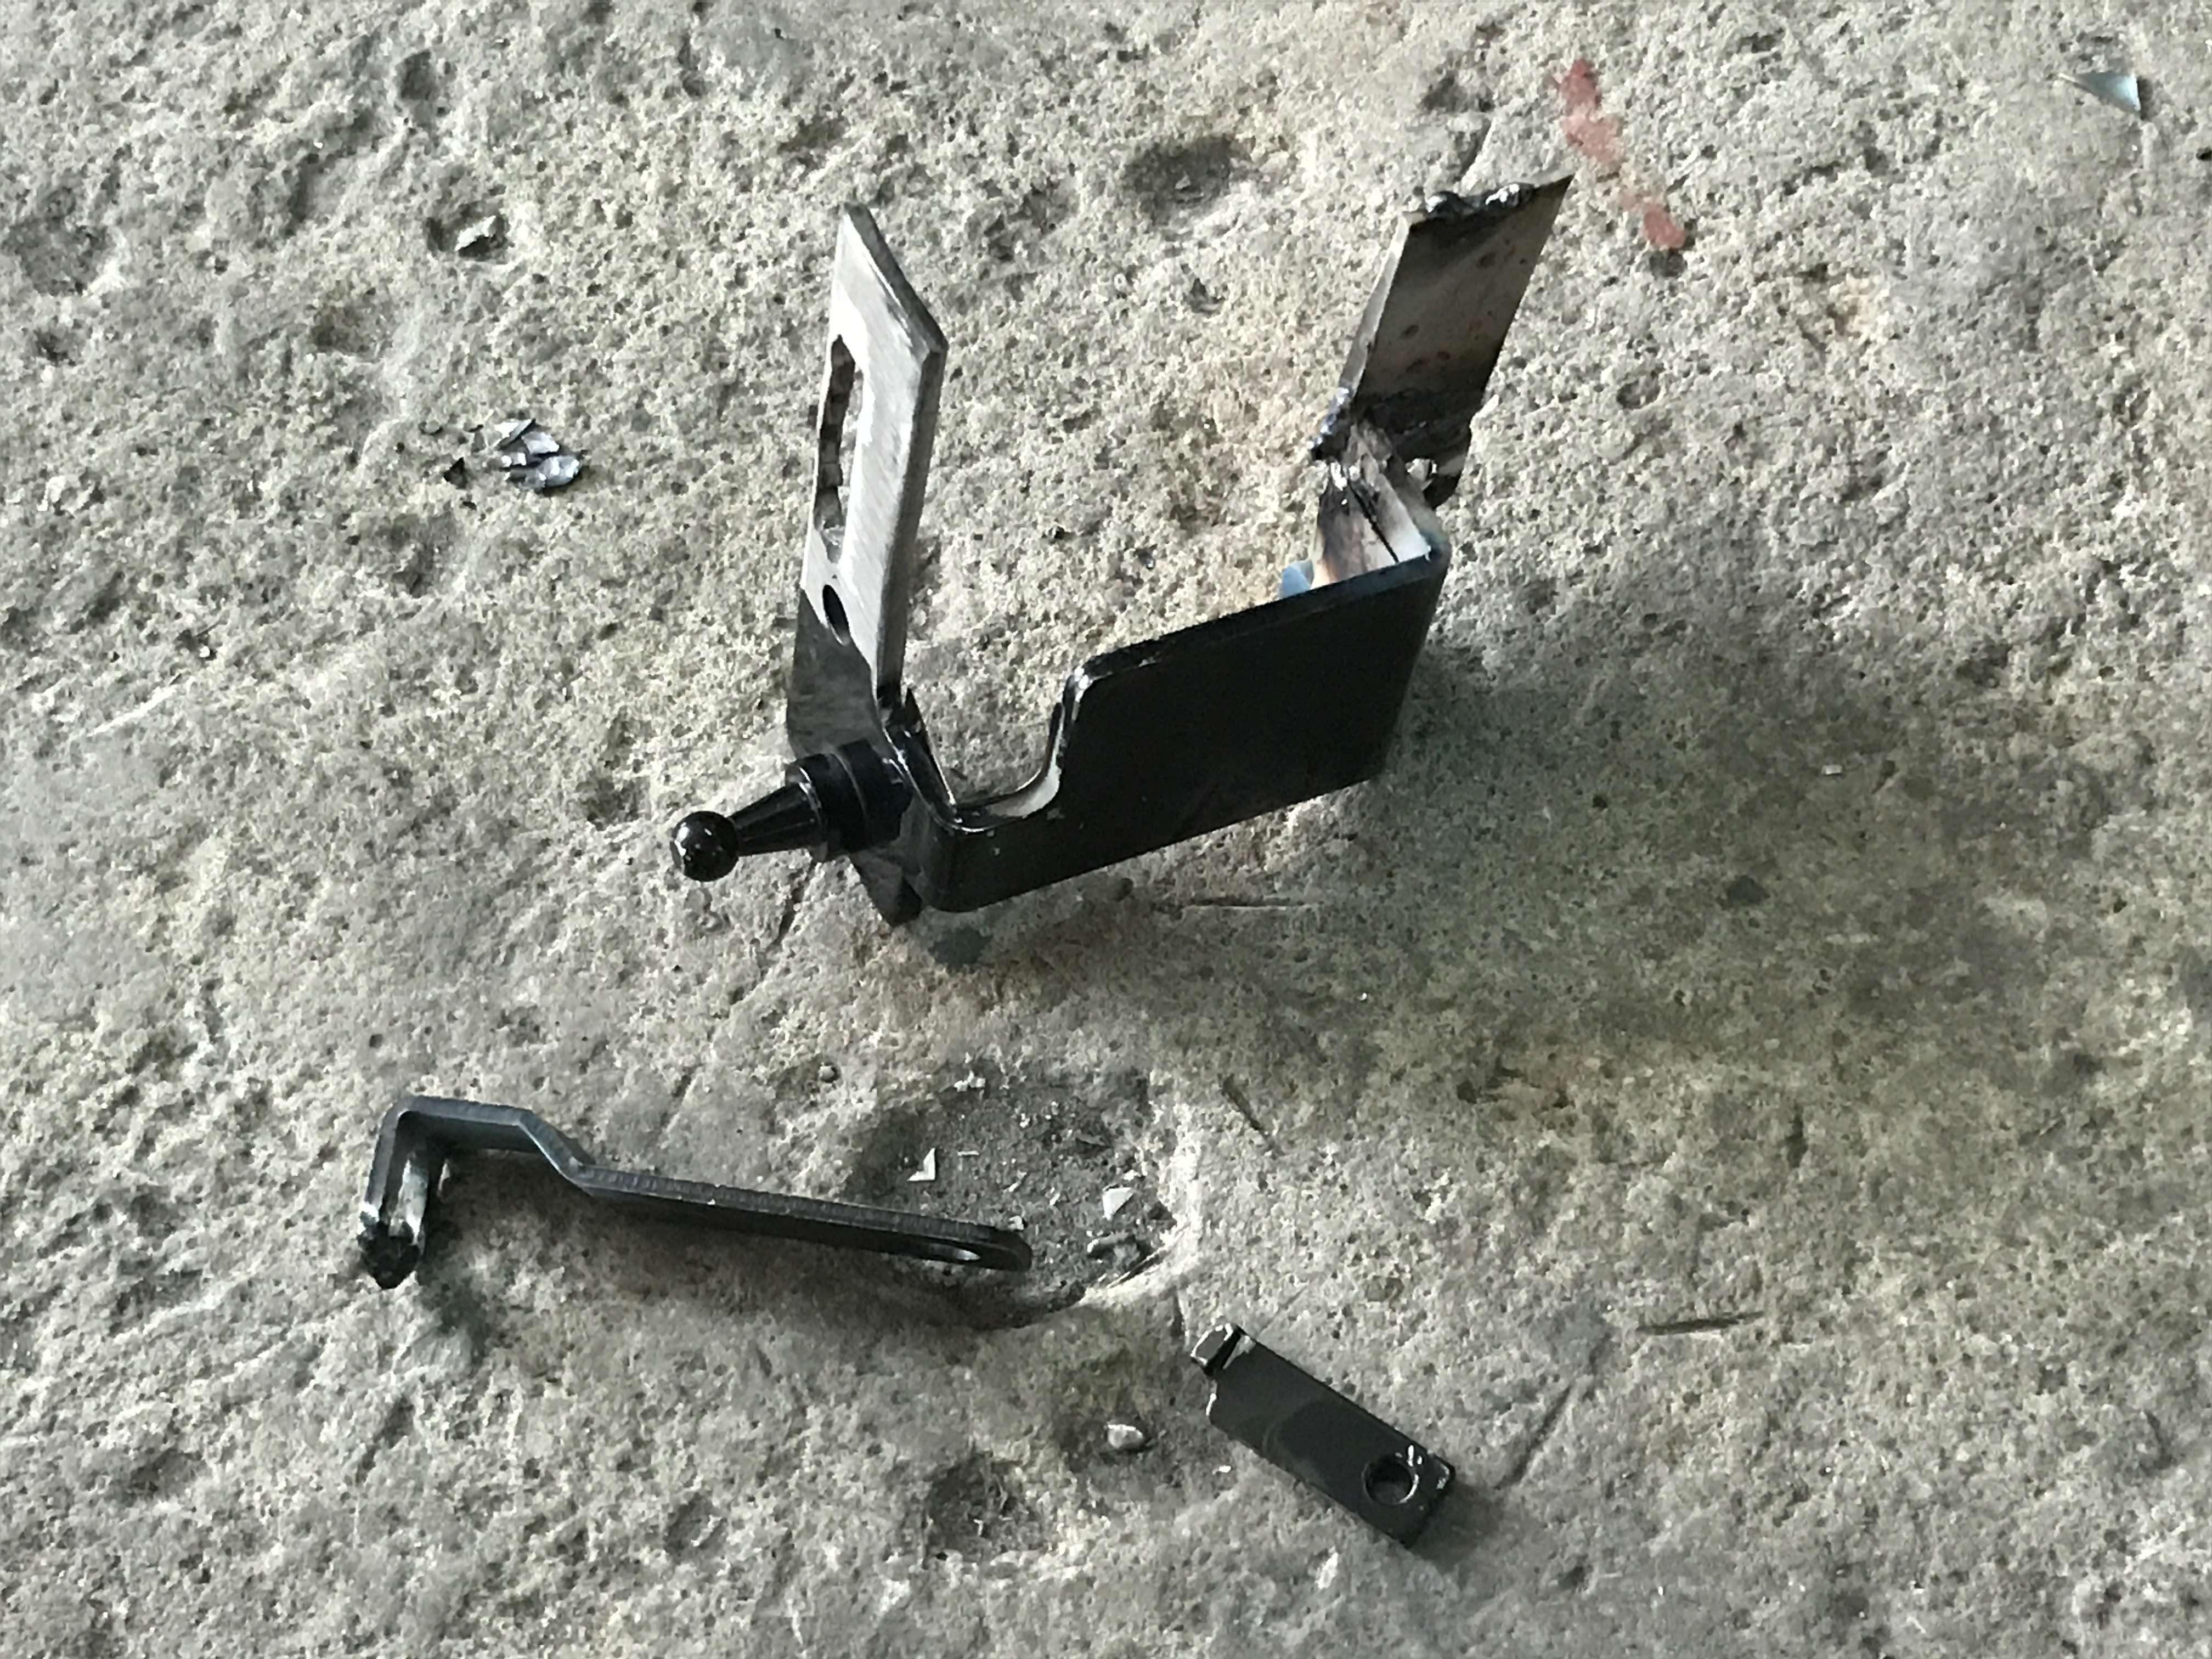
Here is some photos of modification. It tooks me 3 days....
The original one  |
|
Appreciate
1
Maciej@BimmerTech29.00 |
| 02-21-2017, 03:00 AM | #286 |
|
Enlisted Member
20
Rep 38
Posts |
Need to change position of the hole
     |
|
Appreciate
2
Maciej@BimmerTech29.00 Nelson@BimmerTech271.00 |
Post Reply |
| Bookmarks |
|
|


