BMW 3-Series and 4-Series Forum (F30 / F32) | F30POST
>
DIY: F30 OEM Alarm Retrofit (320i/328i)

| 10-17-2016, 12:06 PM | #23 | ||
|
Lieutenant
 203
Rep 413
Posts |
Quote:
I am not able to say if is only cable or also door lock the problem. By the way my car with cables added and door lock changed, and car coded have 8tg option working! |
||
|
Appreciate
0
|
| 10-18-2016, 11:07 PM | #24 |
|
New Member

3
Rep 13
Posts |
Just wanted to thank the OP for this awesome DIY. I finished mine today and had someone code it.
Only issue is that the alarm goes off by itself 4 minutes after I arm it. anyone seen this? |
|
Appreciate
1
Spanky_F3042.00 |
| 10-20-2016, 12:18 AM | #25 | |
|
New Member
3
Rep 13
Posts |
Quote:
|
|
|
Appreciate
0
|
| 10-20-2016, 05:28 AM | #26 | |
|
Lieutenant

77
Rep 411
Posts |
Quote:
|
|
| 10-20-2016, 11:22 PM | #27 | |
|
New Member
3
Rep 13
Posts |
Quote:
BMW refuses to take the part I bought back. |
|
|
Appreciate
0
|
| 11-29-2016, 05:38 AM | #28 | |
|
New Member
4
Rep 8
Posts |
Quote:
|
|
|
Appreciate
0
|
| 11-29-2016, 09:58 AM | #30 | |
|
New Member
4
Rep 8
Posts |
Quote:
|
|
|
Appreciate
0
|
| 02-18-2017, 08:30 PM | #31 |
|
Private First Class
 28
Rep 109
Posts |
Is there a constant 12V wire on the connector to Roof Function Center? If so, what is the pin number? I am looking for always-on 12V for the dash cam that is installed behind the rear-view mirror.
|
|
Appreciate
0
|
| 02-18-2017, 11:17 PM | #32 |
|
Captain

538
Rep 817
Posts
Drives: bmw M3 F80
Join Date: Dec 2013
Location: france
|
Thanks for the tutorial
Mounting on bmw M235i and works perfectly |
|
Appreciate
0
|
| 02-19-2017, 02:35 AM | #33 |
|
Private First Class
21
Rep 128
Posts
Drives: 2015 BMW x5
Join Date: Jan 2014
Location: Las Vegas
|
I had the BMW Assist Retrofit done on my car - are there different part numbers that I would need to do this?
|
|
Appreciate
0
|
| 04-02-2017, 12:03 AM | #34 |
|
Private First Class
60
Rep 137
Posts |
Well finally got around to completing the retrofit.
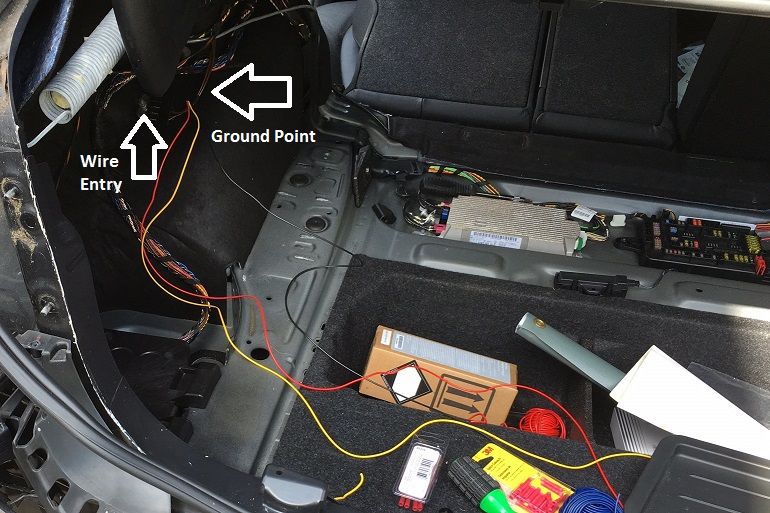
I will say this, everything is pretty straight forward, everything as far difficulty is in the coding. I had to play with the coding in a few modules and change a few aktiv to on. Only issue is, my siren doesnt honk when i lock it. My clown nose is blinking, and showing the vehicle is armed. If i stay in the vehicle and move just a bit, the alarm will activate, but i know it activated because the clown nose will blink much faster. However, no siren. Either a. my siren doesnt work, wish there was a way of testing it. maybe connecting it my battery and using the positive wire to both signal and positive to see if itll trigger a siren, but dont know if i want to risk burning my siren, if it is working. b. coding, which i made sure all accoustic codes were on. maybe i missed a module, but i mainly focused on fzd, rem, nib, fem. I didnt look through other cafds. c. Wiring, so far, i wired it straight to the positive fuse as it said in the diy, F 103 in the trunk. Grounded to a screw i screwed, i didnt want to splice into the bundle. I know ground is good to go because i have my amp using that same wire. Signal, wire is good to go pin 3 to the connector in the roof module. any suggestions? Thinking of returning the siren back to ebay seller. Last edited by SMiGGs; 04-05-2017 at 03:51 PM.. |
|
Appreciate
0
|
| 04-25-2017, 03:21 AM | #35 | |
|
Private First Class
20
Rep 139
Posts |
Quote:
Have you figured this out already? What was it if you did? |
|
|
Appreciate
0
|
| 04-26-2017, 08:00 PM | #36 | |
|
Private First Class
60
Rep 137
Posts |
Quote:
Currently working on a diy for a head up display for the f30, so im looking for a siren and hud module. |
|
|
Appreciate
0
|
| 05-24-2017, 10:23 AM | #37 | |
|
Private
 9
Rep 51
Posts |
Quote:
I just purchased a 2013 328i which does not have an alarm. I saw this post and I'm trying to figure out if its something I'm able to do. My car has a Sunroof and the Teleservices/SOS module. Is there a way to know if I can use this module for this retrofit? Thanks  |
|
|
Appreciate
0
|
| 05-24-2017, 11:57 AM | #38 | |
|
Major General

13344
Rep 7,484
Posts |
Quote:
|
|
|
Appreciate
0
|
| 07-13-2017, 02:23 PM | #39 | |
|
Captain
130
Rep 765
Posts |
Quote:
|
|
|
Appreciate
0
|
| 07-16-2017, 12:34 AM | #40 | |
|
Private
9
Rep 51
Posts |
Quote:
|
|
|
Appreciate
0
|
| 07-20-2017, 11:32 AM | #42 |
|
Private
13
Rep 97
Posts |
I have pretty much zero electrical experience. Would this retrofit be very difficult to do on a F32? (again I have zero wiring experience) Or does anybody know of a shop that will install this for me in Maryland/Northern Virginia?
|
|
Appreciate
0
|
| 08-01-2017, 06:55 PM | #43 |
|
Major General
890
Rep 9,031
Posts |
OP, any change you can get the pics hosted again?
Anyone have leads as to where to get the pieces needed? Thanks.
__________________
Let me get this straight... You are swapping out parts designed by some of the top engineers in the world because some guys sponsored by a company told you it's "better??" But when you ask the same guy about tracking, "oh no, I have a kid now" or "I just detailed my car." or "i just got new tires."
 |
|
Appreciate
0
|
| 08-02-2017, 07:55 PM | #44 | |
|
Lieutenant
77
Rep 411
Posts |
Quote:
http://f30.bimmerpost.com/forums/sho....php?t=1393060 |
|
|
Appreciate
0
|
Post Reply |
| Bookmarks |
|
|