

BMW 3-Series and 4-Series Forum (F30 / F32) | F30POST
>
NBT Hard drive replacement - 2016 435i

| 07-02-2022, 02:46 PM | #1 |
|
Enlisted Member
 27
Rep 35
Posts |
I know this has been covered in other threads with details on software needed to format a replacement hard drive for the NBT head unit, but wanted to supplement those with my experience, and some lessons learned.
Why? If your hard drive dies which for me symptoms were the following: - Clicking and spinning noises from the center console when I first got into the car or turned on the ignition - Bluetooth audio stopped working - Navigation never started successfully - No date/time in iDrive How does it happen? I think for some the hard drive fails after age as the car is a harsh environment temperature wise. For me personally - I ruined the hard drive after spraying a disinfectant spray like this one in the AC vents to try to get rid a moldy smell. Dont ever do this! Just replace the cabin filter or use a product like this that isnt sprayed into the AC core or AC vents. Apparently things are not sealed up very well from the AC vents and I had dripping disinfectant short out and kill my hard drive. You can see some of the residue from the following pictures:    Is it easier to just replace the head unit? Maybe for some, and if you are looking to upgrade newer NBT then sure that makes sense. This is definitely the least expensive option as all that is needed is a inexpensive hard drive. Replaced in a HK audio 2016 435i, here's sticker from my HU if helpful:  Getting front dash trim off and access to head unit I recommend the first few steps of the following video I did not find it necessary to unplug the top dash piece that plugs in the hot/cool temp wheel and hazard lights - but if it's easier for you to set aside you can unplug these. Now that you have access to the head unit remove the two top screws of the unit next the CD/DVD tray:  Now unscrew the 4 torx screws holding the head unit into the dash, put a towel below it and carefully lower it down. It was not necessary to unplug and remove the head unit in order to get access to the hard drive. Unscrew the 2 smaller torx screws at the top of the head unit - you should now be able to lift the L-shaped tray off the top of the head unit. Now you will be looking at the DVD tray - you can simply lift this off and set it aside. (Sorry no pictures of this). Under the DVD tray is the hard drive unit which has a metal tray attached to it. Unscrew the 4 screws holding the tray from the top and lift the hard drive out of the head unit. There are now 4 more screws on the sides of the hard drive and you will be able to remove the hard drive. I replaced the hard drive with the following: 500 GB Toshiba 2.5 inch SATA - MQ01ABD050 If you just want to get your head unit up and running normally again, I think this is a good choice, very cheap for <$20 and is compatible. Process to prepare the replacement hard drive Refer to this post with more details Software/OS that I used: - Windows 11 - VirtualBox 6.1 - QNX SDP 6.5 I had an external hard drive enclosure that I used to connect to my PC via USB and was able to use VirtualBox to get everything to work. This might be less intimidating and easier than having a PC that you can open up and connect the replacement HD directly on the motherboard to. Steps:
Still to do:
|
|
Appreciate
6
|
| 07-03-2022, 02:58 AM | #3 |
|
Lieutenant
 
288
Rep 539
Posts |
Glad you got up and running
 I dont think any SSDs are compatible with NBT because it looks for a temperature value on a specific SMART attribute which no SSD seems to support. I have a copy of the electronic manuals folder if you cant get it sorted any other way. I think its around 1GB or so but since youve got the drive in NBT already itll now be locked and youll have to mess around with hddsecurity to unlock it again. Let me know if you want me to upload them somewhere though. |
|
Appreciate
1
FlorinQCK-2.50 |
| 07-04-2022, 10:29 AM | #6 | |
|
Enlisted Member
27
Rep 35
Posts |
Quote:
thanks |
|
|
Appreciate
1
FlorinQCK-2.50 |
| 07-12-2022, 05:10 PM | #7 | |
|
New Member
3
Rep 8
Posts |
Quote:
|
|
|
Appreciate
1
FlorinQCK-2.50 |
| 07-12-2022, 07:09 PM | #8 | |
|
Lieutenant Colonel
 1052
Rep 1,790
Posts |
Quote:
|
|
| 07-13-2022, 04:07 PM | #9 |
|
Private
 18
Rep 55
Posts |
had the exact same issue
Great solution. I had the exact same problem but in my case even the processor board was toast, so I needed a new HU. Steve Ma from codemybimmer made the new HU work with my car, but that did not last long because a traffic light fell onto my car, likely totaling it. I am glad you found a solution and I will keep it in mind should that ever happen again to me in a new car.
|
|
Appreciate
1
FlorinQCK-2.50 |
| 07-14-2022, 02:11 AM | #10 | |
|
New Member
3
Rep 8
Posts |
Quote:
All the other steps of the how to where clear and succesfull. So now I prepared the harddisk manually with help of the following topic on a different forum. https://www.bimmerfest.com/threads/u...787230/page-15 Only thing I did different is I changed the format commands mkqnx6fs q b1024 /dev/hd0t177 to mkqnx6fs q b512 /dev/hd0t177 because the block size of the toshiba harddisk is 512. Don't know if this was neccesary but it made more sence to me. I have to try the harddisk in the NBT system didn't have time yet so can't tell yet if this way is working |
|
|
Appreciate
0
|
| 07-14-2022, 02:42 AM | #11 |
|
Lieutenant
288
Rep 539
Posts |
Yeah thats fine. Stock drives block size was 4096 and my replacement drives have all been 512. I changed the value in the script too and everything has always worked out great. Im sure youll be fine.
|
|
Appreciate
0
|
| 07-15-2022, 03:32 AM | #12 |
|
your average JAMF

3101
Rep 4,094
Posts
Drives: '21 M2 Comp, '19 Golf R
Join Date: Oct 2005
Location: Cochise County, AZ
|
That replacement drive is just a normal "laptop" spec drive. The HU uses an "automotive spec" drive that's built to handle all the shock, vibration, and heat in a car environment. Hopefully the laptop drive can handle the abuse.
https://toshiba.semicon-storage.com/...dc-series.html
__________________
'21 M2 Comp
'19 Golf R |
| 07-15-2022, 03:41 AM | #13 |
|
Lieutenant
288
Rep 539
Posts |
That is very true. The automotive spec drives are 4200rpm and the MQ01ABD050 is a 5400rpm drive which is probably the biggest difference really, so in theory it's more susceptible to shock etc.
But I replaced the hard drive in my wife's X3's NBT unit with the exact same one a little over a year and a half ago now. It's still working absolutely fine although the temperature variations in the UK aren't as bad as some other countries. It's probably seen a min of -3C/26F in winter and 30C/86F in summer. I guess if the drive does ever die while we still own the car then I'll look at trying to find a 4200rpm drive. At the time I did it her drive was totally dead so it was more an experiment to see if I could even get a replacement going. At least if it does go again, I know I can sort it out |
|
Appreciate
0
|
| 07-15-2022, 02:09 PM | #14 |
|
New Member
3
Rep 8
Posts |
Put the harddisk in the car, but it doesn't work. No bluetooth audio streaming. No navigation and I can't look up the free disk space.
I would like to use the script but I can't seem to figure out how to copy it to the virtual machine running the QNX SDP via cd. Anybody can help me with that? I now did it al manually but I don't have enough knowledge about QNX to check the partitions and folders after performing all the commands. |
|
Appreciate
0
|
| 07-15-2022, 03:57 PM | #15 |
|
Lieutenant
288
Rep 539
Posts |
It's a bit clunky. I copy the files from a FAT32 formatted USB stick (which for me is auto mounted in QNX as /dev/usb0) to the /home folder which is just a RAM drive. If it's the same for you then what I do is this:
cd /fs/usb0 cp create_hdd.sh /home And you can check it's there by doing: cd /home ls The script probably needs the executable permission set so do that then execute the script by doing: chmod +x create_hdd.sh ./create_hdd.sh -i You can verify the partitions by running fdisk /dev/hd0 (if that's the device that it appears as. However if you've put the drive in NBT and booted it up then it might have locked it and it needs unlocking to be readable in anything else. If you put up a screenshot of your fdisk output we'll be able to see what's going on. |
|
Appreciate
0
|
| 07-15-2022, 04:34 PM | #16 |
|
New Member
3
Rep 8
Posts |
I looks like the harddisk isn't locked. I looked at fdisk again and it had really strange partitions with DOS in front of it instead of QNX6.
So started all again and made the 4 partitions as per instructions on the bimmerfest forum. after that saved and quit. Then did the format commands. All went well. But then I made a fault. Instead of using "mount t qnx6 o rw /dev/hd0t178 /mnt/share" I used RO instead of RW. Also did this for the other partitions. Only 177 should have been done with RO. But now when I do enter the right command with rw I get the following message. see attachment. I then deleted all the partitions in Fdisk, made them again did the format commands again. But keep ketting the same fault. I have a feeling I need to wipe the disk a start again but don't know how to do that. preferably I would like to do this proces with the script. but QNX in virtual box doesn't regonize my fat32 usb stick. So when i enter cd /fs/usb0 it doesn't find the file/dir |
|
Appreciate
0
|
| 07-15-2022, 06:49 PM | #17 |
|
Lieutenant
288
Rep 539
Posts |
Hard drive does indeed appear to not be locked which is good. The partitions look all messed up when it is, strange sizes and I think even a negative capacity appears somewhere.
I'll prep a drive up tomorrow and show you what my partitions look like. I think if you had the script working life would be a lot easier though. I think I have had a USB stick show up as something other than usb0 before though. If you do a cd /fs then ls in there, do you see any other usb or msdos devices there? There's two workarounds that come to mind right away. One is is to edit the QNX ISO image and put the create_hdd.sh file in the root of the ISO. That way you'll have access to it from within QNX. Another is to add a 2nd virtual CD/DVD drive to the VM and create an ISO image (using WinISO or something like that) with only the .sh file on. Then you'll be able to access it through the 2nd virtual optical drive. |
|
Appreciate
0
|
| 07-15-2022, 07:53 PM | #18 |
|
Lieutenant
288
Rep 539
Posts |
It seems your partitions are the wrong way round. 177 should be the first starting at cylinder 0 or 1 and you have 180 so that's probably why it isn't happy. My 4th image in this post shows the resulting partition table after running the script and you'll also be able to get all the commands the script runs in the 3rd image.
So here's the outputs I get. I've modded the script with the correct cylinders for a 500GB drive so that's the file I'm using. Also it's interesting to note that this USB stick I'm using appears as hd10-dos-1. I think opening the ISO and copying the script into your ISO so you have access to it from the virtual disk within QNX is the way to go. Sorry about the crappy pics, I'm booting QNX natively rather than using a VM. Firstly I booted into QNX then I ran fdisk /dev/hd0 and deleted all existing partitions on the drive then rebooted QNX to clear any automatically mount points. Running fdisk /dev/hd0 after a reboot confirms it's clear:  Running df proves that the drive is there with no mounted partitions:  I run the script with -i parameter which automatically creates the correct sized partitions, mounts the partitions to the paths displayed and creates the empty folders it displays. Running df again verifies the 4 partitions and mount points: 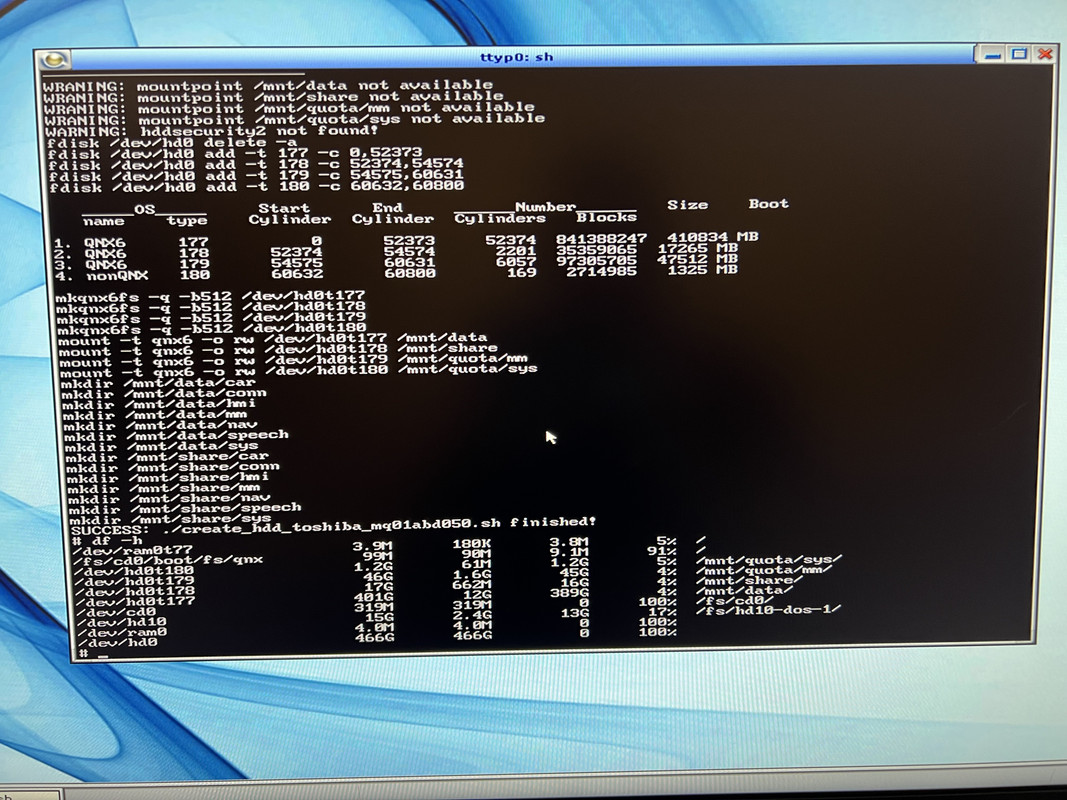 Lastly, here's the output from fdisk /dev/hd0 showing the partitions: 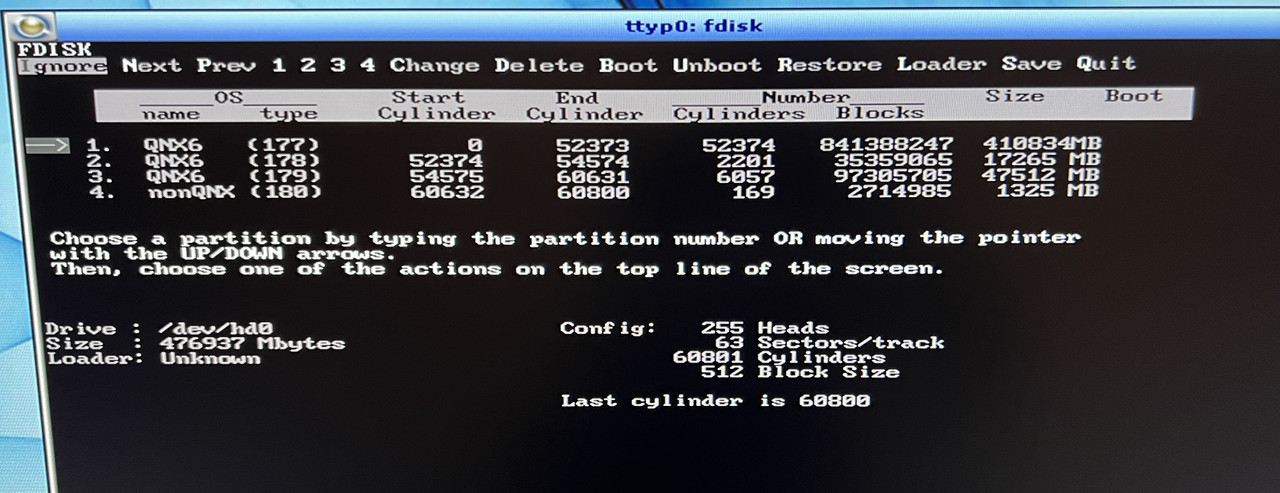 Hope that helps in some way. Last edited by Zheez; 07-15-2022 at 08:06 PM.. |
|
Appreciate
0
|
| 07-16-2022, 10:21 PM | #19 | |
|
Lieutenant Colonel
1052
Rep 1,790
Posts |
Quote:
|
|
|
Appreciate
0
|
| 07-17-2022, 09:14 AM | #20 |
|
New Member
3
Rep 8
Posts |
Zheez is giving great tips and you guys are really a big help.
I managed to get the script in the iso file. So i am able to copy it to the home folder and make ik executeble. I have deleted all partitions with Fdisk and rebooted QNX. Check with df -h and all looks good. Then I run the script succesfully. As seen in the attachment. All looks good. But then I mounted the harddisk in my NBT unit and in the car and nothing works. No navigation, no bluetooth audio. If I insert a usb stick with the latest map data it won't regonize it. So pulled the harddisk out and connected it to my virtualbox again and when i enter df -h the partitions still look good but the mounted folders are completly different. as you can see in the other screenshot attached Edit: deleted partitions and run the script again. after finishing rebooted QNX and then enter the comand df -h and get the same strange mounting directories. Somehow i looks it doesn't really create the directories fysically on the harddrive. Last edited by Spinnaker; 07-17-2022 at 09:26 AM.. |
|
Appreciate
0
|
| 07-17-2022, 10:09 AM | #21 | |
|
Lieutenant Colonel
1052
Rep 1,790
Posts |
Quote:
|
|
|
Appreciate
0
|
| 07-17-2022, 12:51 PM | #22 |
|
New Member
3
Rep 8
Posts |
I don't think is has something to do with the script. I got it from the bimmerfest forum from the guy who made the script in the first place.
I think the problem has something to do with using QNX in a virtual enviremont. On te bimmerfest forum there is also somebody who has almost the same problem as me. The advice given to him is to use QNX native. So that is what I'm going to do. Got my old trusty Toshiba (what a coincidence) laptop and I'm now burning the QNX iso on a DVD. After that I'm going to insert the harddrive I'm going to use in the NBT in the laptop and boot it with the QNX DVD and then run the script again |
|
Appreciate
0
|
Post Reply |
| Bookmarks |
| Tags |
| nbt harddrive |
|
|


