

BMW 3-Series and 4-Series Forum (F30 / F32) | F30POST
>
DIY: F30 Comfort Access Rear Door add-on / retrofit

| 01-26-2017, 12:55 PM | #1 |
|
Major
 1140
Rep 1,136
Posts |
DIY: F30 Comfort Access Rear Door add-on / retrofit
Hello again everyone! Been a while since I have done any write-ups, so I figured I would start off the new year with an easy retrofit before moving on to some of the others I have planned for this spring. Not sure why I never thought of this one before, until someone mentioned it in a post on another thread, it got me thinking how nice it would be to have these on the rear doors, and sure enough, it is quite enjoyable once installed. The best part of this retrofit too is that it requires no coding!!
Total cost for this ended up being around $60 USD, which was relatively inexpensive compared to other retrofits I have done as I was able to find really good deals for black door handles. Searching on eBay for the door handles using generic color terms (black, blue, etc. instead of “Black Sapphire” or “Estoril Blue”) will allow you to find the correct door handles at good rates. Just make sure to look over the pictures to make sure there is no damage, and to confirm that they are the Comfort Access handles (look for ridges on the top of the handle or the wiring connector at the end) DISCLAIMER: As will all DIY projects, undertake this at your own risk. I am not responsible for anything that happens to you or your car! Pre-Requisites: To complete this add-on, your vehicle must already be equipped with the Comfort Access system. **NOTE** Prior to performing this retrofit, make sure you have the set the Door/Lock settings in iDrive to unlock all 4 doors, otherwise the Driver’s rear door will not unlock. Parts List: (Note: Part #’s may vary per vehicle. Parts listed below are for a US F30 sedan. Check RealOEM or ETK to confirm correct Part #’s for your vehicle) - Driver and Passenger Comfort Access Door Handles – The F30 uses the same dimension handles on front and rear, so you just need to locate a spare set of handles from the front doors to install on the rear doors. All you need is the outside grab handle with the wiring connector. The part numbers vary once they are painted based on the color, which is why I did not include an entire list here. Use the search tips above to help with locating your handles - Socket Contact Wiring Pins for Door Connections – Female - 61130005197 x6 - Socket Contact Wiring Pins for Door Connections – Male - 61130005198 x6 - OEM Wire Taps - 61138364566 x6 Tools Required: - Socket Set with 10mm socket - Hex/T set - Flat Screwdriver/Pry tool for removing the door panel - Very Small Flat Screwdriver - 18-ga. wiring in 3 colors – I used Red(power), Black(ground), and Blue(signal) - Wire Stripper - Wire connectors/solder depending on your preference - Standard black electrical tape - X-Acto blade/ scissors for helping to remove the door adhesive Prep Work: - Disconnect Negative Terminal from Battery – Make sure all doors are unlocked, windows are up, and trunk is open first - Remove Driver and Passenger Side under dash trim panel - Remove all floor trim pieces along the Driver and Passenger side of the vehicle - Remove the bottom panel of the B-Pillar trim by pulling outward at the bottom and sliding down - Remove the Passenger side trim piece that covers the FEM - Remove the Rear Seat Bolsters on both sides and fold the rear seats down - Remove the Driver side trim piece in the same location as above. In order to remove this, you will need to use the Phillips Head Screwdriver to remove the handle for the hood release (optional depending on which way you run the wiring) Removing Existing Door Handle – Both sides: The steps for the following parts are the same for both Driver and Passenger side doors. The only differences will be in the wiring. - To get started, you will need to remove the door panels on the driver and passenger rear doors of the vehicle. This is a relatively simple process, with tutorials available on the internet. Simply pry off the trim piece on the door(the CF-wrapped piece shown here (NOTE: Front door picture used but process is the same), then remove the two Hex screws inside the handle. Once those are removed, start at one end and begin prying the door panel loose. Once the panel is loose, you can lower it down, you do not need to remove/disconnect any cables/connectors. - Going slowly to avoid tearing the material, gently pull back the foam-like material from the door on the end closest to the car as well as near the top part of the door furthest from the car. Try to keep as much of the adhesive in place as possible so that it will resecure properly once you are finished. - Remove the plastic cap that is on the outer edge of the door, and use a hex bit to unscrew the covering cap that is next to the door handle on the outside, as shown below 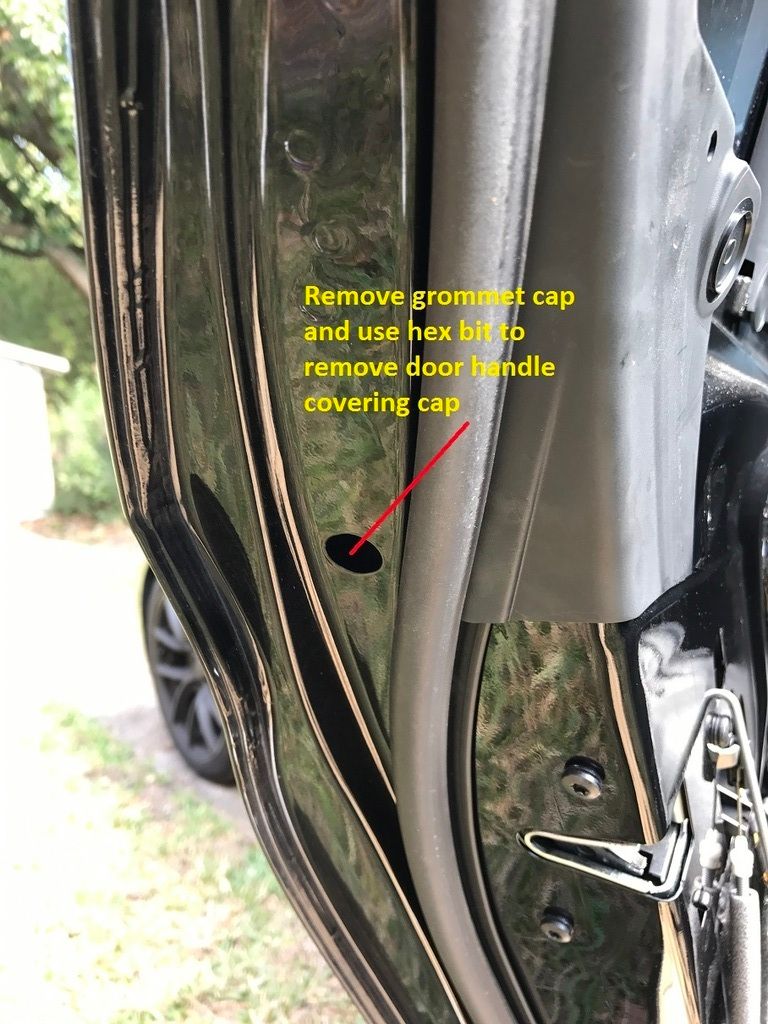 - You can now gently pull the door handle which will cause it to pop loose. You can then slide the old handle out. Connecting the wiring inside the door: **Note: For some of the pictures below, images of the front door connectors are used, but the process is the same for the rear doors, you just would not have the HSD Wires for the cameras** - Disconnect the door wiring harness from the body of the car by pulling up on the tab below. Once you have pulled it up enough, it will come loose and slide out. 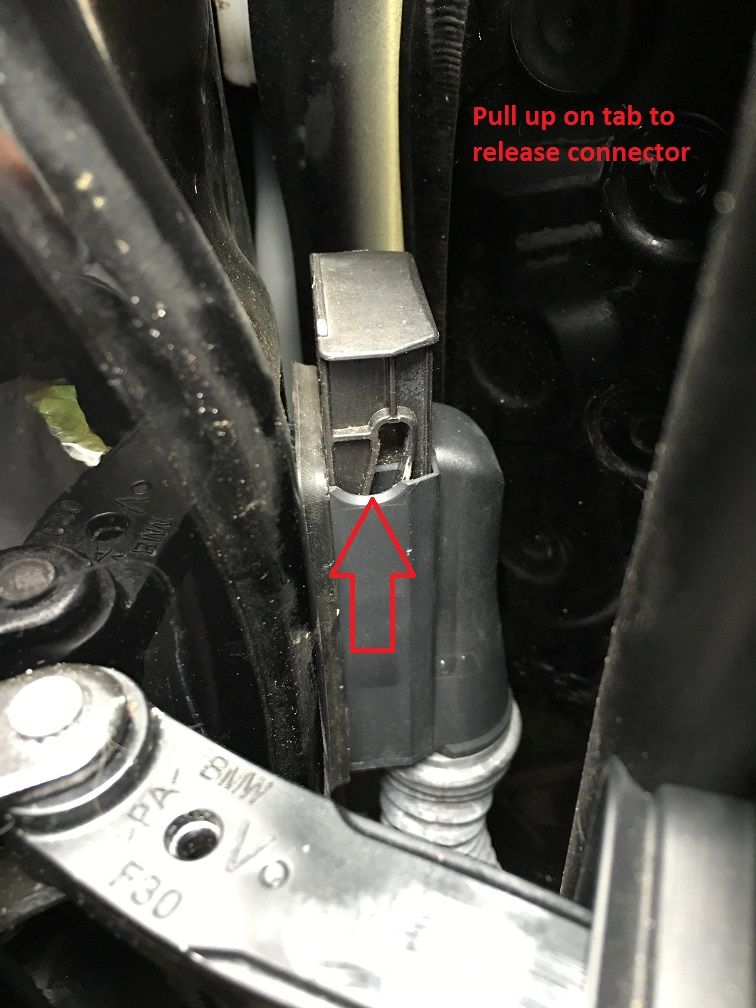 - Now you will need to pull the wiring harness loose from the door to help with running the wiring through to the connector, as shown below 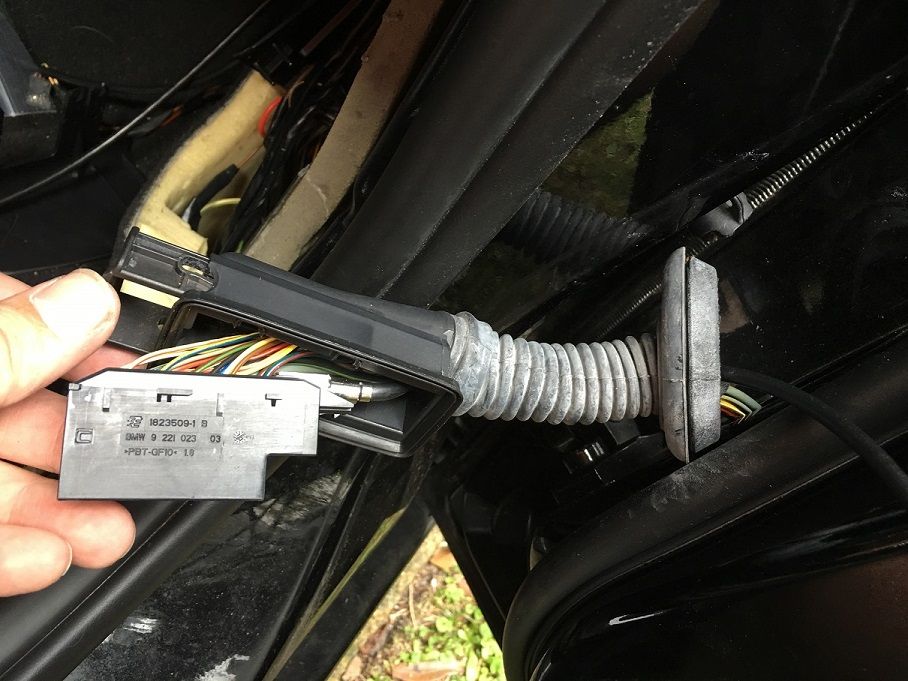 - Start by making a 3-wire harness using the 3 different color wires. Attach 1 of the Female connectors (61130005197) to the end of each wire. - Run this wiring through the harness tubing to reach the connector, then connect the pins to the following slots which should be empty (if not, use different slots which are available): Power Wire (red) – Pin Slot #26 Signal Wire (blue) – Pin Slot #27 Ground Wire (black) – Pin Slot #28) - Replace the grommet from the wiring tubing to the door, but do not yet reattach the connector to the body of the car - Now, run the new wiring set you made along the existing wiring harness, securing it as you move through the door, as shown below 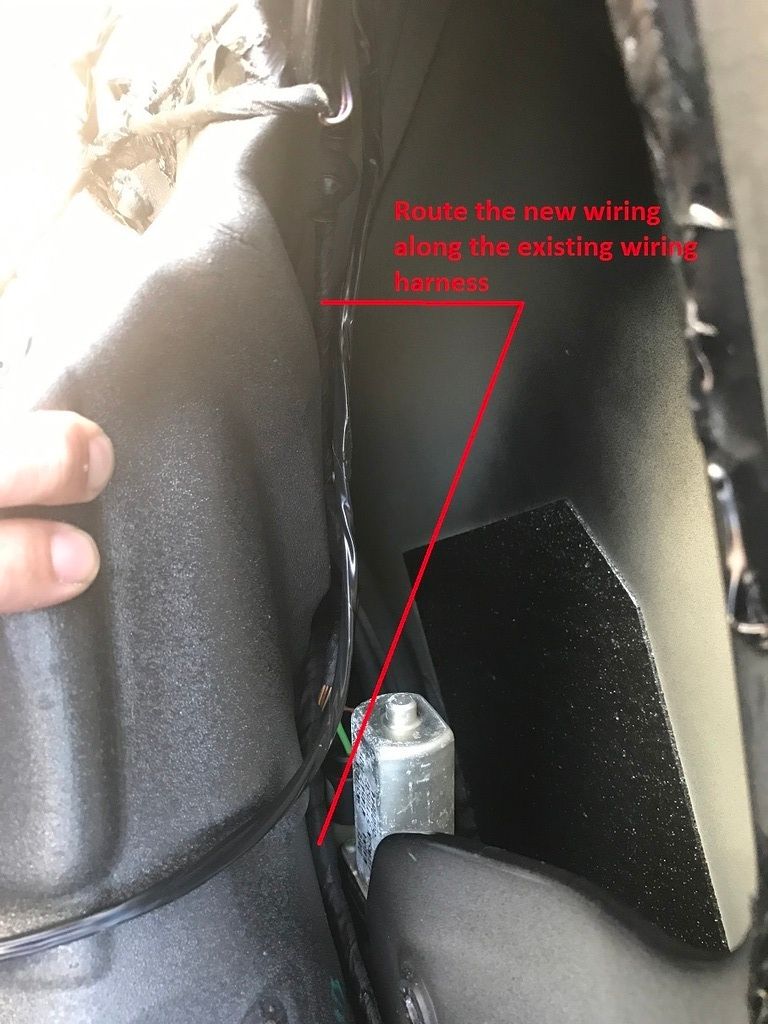 - When you reach the top part of the door furthest from the car, there will be a hole that you should see from when you removed the foam covering. Run the wiring through this hole and out the opening left when you removed the old door handle. Do not secure the wiring at this end yet as you will want to pull back any slack after you connect the harness. 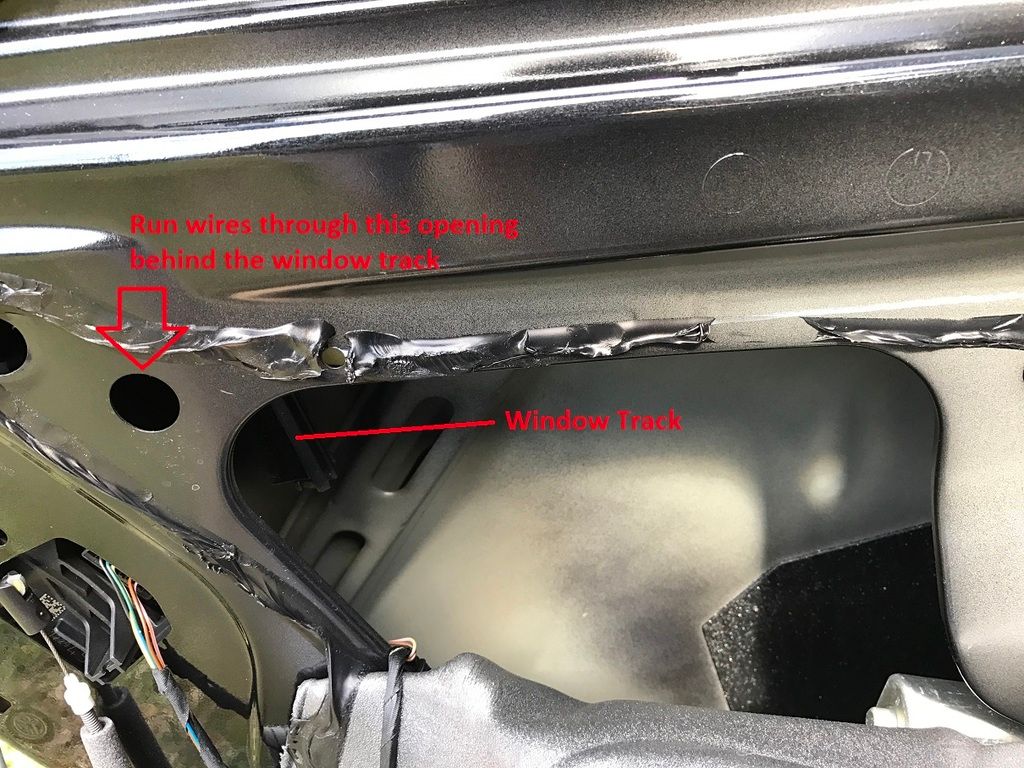 - Working from the outside of the door, you have 2 options at this point. You can choose to permanently connect the wiring from the new CA handle, or you can use quick disconnect connectors. I opted to use the connectors, so that in the event the door handle needs to be removed, it would be easily re-installed. - Using the image below, connect your Power, Ground, and Signal wires to the corresponding wires on the handle. The wiring is the same for both left and right handles, just make sure you are holding the connector the same way when viewing the wiring as shown below: **Note: The wire marked Not Used is a 12v Positive wire for the front door ambient lighting connections, but is not needed for the rear doors. Make sure you secure it/tape it/cap it/etc so that it does not risk making contact with a metal surface inside the door** 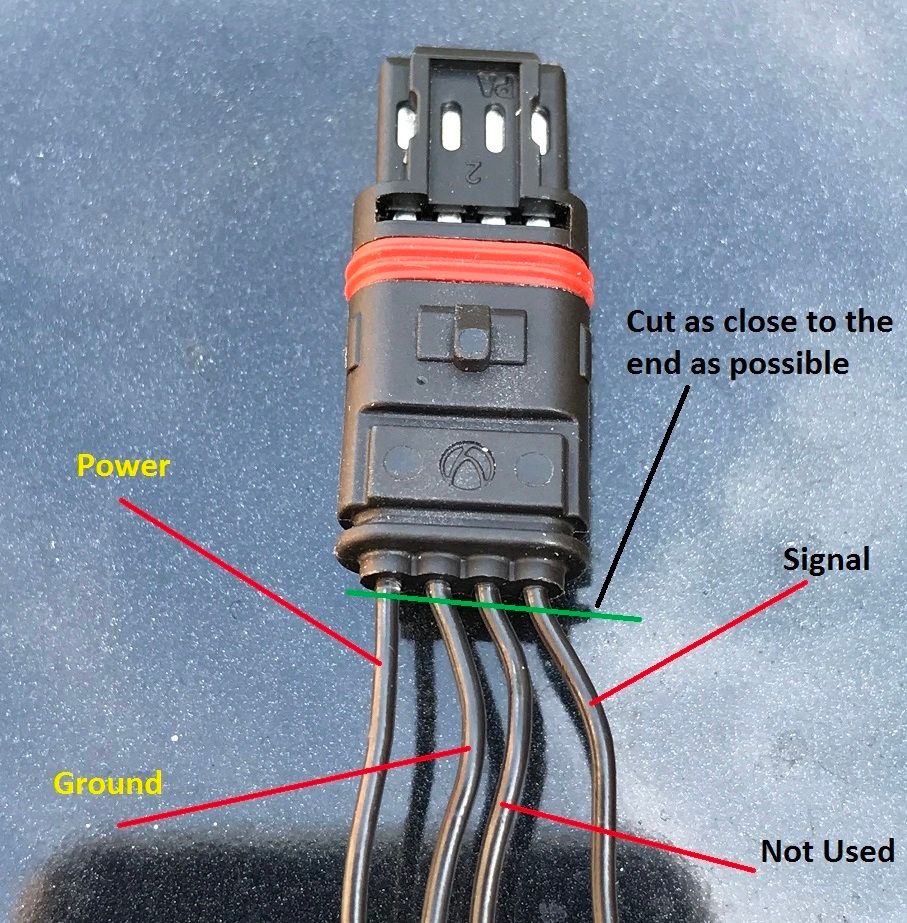 - Once you have connected the wiring, tuck the connectors back inside the door and insert the end of the handle into the door. - Insert a long flat headed screwdriver into the hole you used to remove the covering cap and use it to pull the door latch towards the outside of the door. You will then be able to move the back part of the door handle into place so that it will open the door properly. Unfortunately I did not get a picture of this process, I will see if I can find something similar to show exactly what to do for this step. - Now that the handle is back in position, you can replace the covering cap and screw it back into place through the hole in the door. When finished, don’t forget to replace the plastic cover over the hole. - Next, with the handle in place, you can secure any slack from the wiring harness, then reattach the foam covering on the inside of the door. - Once you have made sure all connections are still in place, you can now replace the door panel, making sure to push all plastic rivets back into place and replace the two hex screws in the door panel to secure it in place, then replace the door handle trim piece. Connecting the wiring inside the car: Now that you are finished with the door, the next step is to install the wiring inside the car - For the driver’s side, there are 2 options. You can choose to run the 3 wires around through the back of the car to the FEM, or you can run them up to the Driver’s side door connector and tap the Comfort Access wires there. Since I chose to run them around to the FEM, the steps below will outline that process. Starting on the Driver’s Side: - Loosen the connector from the body of the vehicle by pushing down on the tab and pulling it into the vehicle - Remove the blue tab that holds the wiring in place, then you can insert 3 of the Male connectors (61130005198) into the matching slots that you installed on the door side of the connector earlier, which should be: Power Wire (red) – Pin Slot #26 Signal Wire (blue) – Pin Slot #27 Ground Wire (black) – Pin Slot #28) 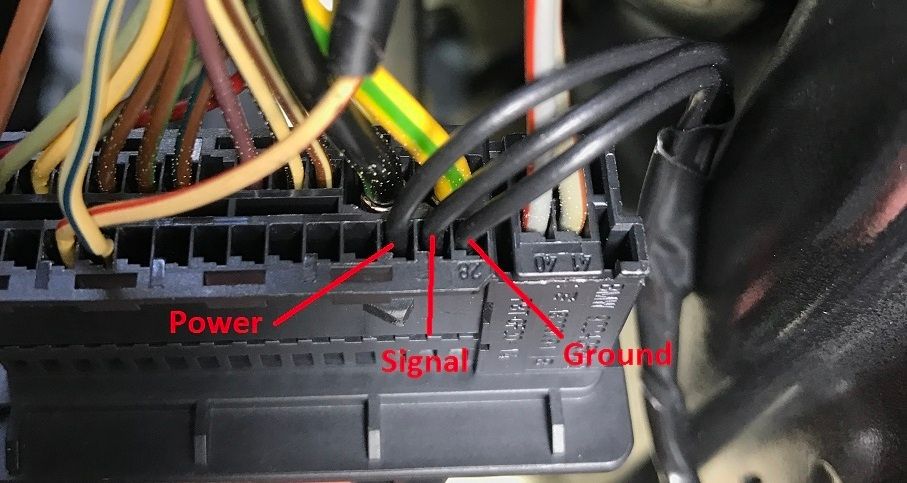 - Attach your wiring to the connector ends, then run the wiring along the bottom carpeting and up the driver’s side bolster. You can then run it through along the wiring path behind the seats, then down the passenger’s side bolster to the B-Pillar area. - Complete the connector steps above for the Passenger Side door wiring. You can then take the Power and Ground wires and use the OEM wire taps to tap the power and ground wire of the harness you just ran from the driver’s side. You will need to run a separate 4th wire for the Passenger side Signal Wire as they go to different connections. - Continue running your wiring to the FEM and make the following connections on the FEM: Power wire – Pin #30 on connector A173*3B Ground wire – Brown wire on connector A173*3B Driver Signal wire – Pin #33 on connector A173*9B Passenger Signal wire – Pin #34 on connector A173*9B 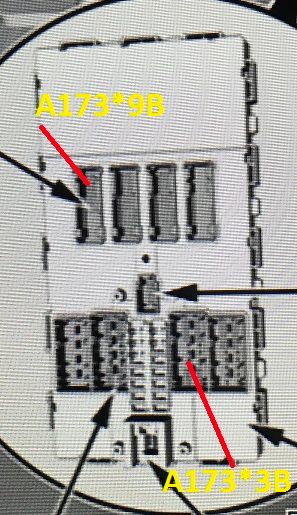 - Once you have finished your wiring connections, reconnect the Negative Battery Terminal to restore power to the car. - Make sure all 4 doors are closed, and you can now walk around the vehicle and test the new rear door handles, which should unlock/lock the car as the front handles normally do. - Once you have verified everything is working, replace all of the trim panels inside the vehicle. Congrats! You can now use CA on all 4 doors! |
| 01-27-2017, 09:06 PM | #2 |
|
First Lieutenant
 318
Rep 387
Posts |
This is pretty incredible. I have wanted this for a very very long time, now the hunt begins for some cheap handles.
What was the not used cord you mentioned that has to do with lighting? Alex.
__________________
Current: 2023 G20 LCI M340i xDrive
History: 2005 E90 325i > 2008 E90 328xi > 2011 E90 LCI 335i xDrive > 2013 F30 328i xDrive > 2016 F30 LCI 340i xDrive > 2020 G20 M340i xDrive WE ARE! |
|
Appreciate
0
|
| 01-27-2017, 11:09 PM | #3 | |
|
Major
1140
Rep 1,136
Posts |
Quote:
Also on the handles, the part number is the same across the F-model 1, 2, 3, and 4 series, as well as the M2, M3, and M4, which should help increase the odds of finding a good deal. |
|
|
Appreciate
0
|
| 01-27-2017, 11:32 PM | #4 |
|
First Lieutenant
318
Rep 387
Posts |
I have lighting in the door handles, and so should you.. I had a 2013 328 previously and it had it.
__________________
Current: 2023 G20 LCI M340i xDrive
History: 2005 E90 325i > 2008 E90 328xi > 2011 E90 LCI 335i xDrive > 2013 F30 328i xDrive > 2016 F30 LCI 340i xDrive > 2020 G20 M340i xDrive WE ARE! |
|
Appreciate
0
|
| 01-28-2017, 08:43 AM | #5 | |
|
Major
1140
Rep 1,136
Posts |
Quote:
On the rear doors, since these did not come with the CA handles from the factory, the illumination is wired differently, therefore when you are replacing the handle, that particular wire in the handle not used since the system is already wired for the illumination. |
|
|
Appreciate
0
|
| 01-30-2017, 10:23 AM | #6 | |
|
Brigadier General
 4007
Rep 3,535
Posts
Drives: 328d Wagon, M2 Comp, i4 eD35
Join Date: Sep 2016
Location: Bay Area, CA
|
Quote:
|
|
|
Appreciate
0
|
| 01-30-2017, 11:27 AM | #7 | |
|
Major
1140
Rep 1,136
Posts |
Quote:
|
|
|
Appreciate
0
|
| 01-30-2017, 12:13 PM | #8 | |
|
Brigadier General
4007
Rep 3,535
Posts
Drives: 328d Wagon, M2 Comp, i4 eD35
Join Date: Sep 2016
Location: Bay Area, CA
|
Quote:
I wonder if the Bimmertech retrofit will be the same way or not. |
|
|
Appreciate
0
|
| 01-14-2018, 02:45 PM | #10 | |
|
Private First Class
 41
Rep 146
Posts |
Quote:
Edit: they won't Last edited by shadowx360; 03-14-2018 at 12:07 AM.. |
|
|
Appreciate
0
|
| 01-19-2019, 09:32 PM | #11 |
|
Second Lieutenant
87
Rep 221
Posts |
roxxor Thanks for the writeup! I'm trying to wrap my head around everything and i think everything makes sense except for the connections to the FEM module. Am I supposed to splice into existing wires on the connector? Or are these empty pin locations that I utilize? If it's the latter, do I need more of the male pin connectors (P/N 61130005198) to plug into the connector? because by my count, i would have used up all 6 in the door connectors.
Got in touch with OP and he cleared things up for me. The connections to the FEM are made by splicing into existing wires using the wire taps. For some reason I had it in my head that the door handle wiring would be made using the wire taps, but you can just use regular quick connections or something. Last edited by oranga; 01-30-2019 at 03:34 PM.. |
|
Appreciate
0
|
| 06-21-2019, 10:28 PM | #12 |
|
Private First Class
41
Rep 146
Posts |
I was following this DIY for retrofitting the comfort access, and I wanted some clarification on the wiring. I am only doing rear driver side door since I frequently toss a bag there, so it makes sense to try to tap the driver's side wires. To get access to the connector on the driver's side, you have to first pop out the external portion, then remove the footwell/pedal trim with 2x 10mm nuts. Then remove the Philips screw holding the hood release, and another Philips screw hidden underneath the release. Pop the footwell side panel off by pulling on it, and reaching with your hand behind all the padding to access the internal portion of the connector.
At the connector on the driver's side (Connector X28*1B), signal goes to pin 24 (yellow), power goes to pin 23 (red with yellow stripe). The pins are located in the center "row" on the connector, just look for a yellow wire right next to a red with yellow stripe. There are many options for ground. On the front driver's side connector, pin 27 which is brown wire at the end of the center "row" on the connector is ground. I actually terminated the ground inside the rear driver's side door itself, at the rear driver's side door connector, tracing the wire from pin 14 of Connector X8*1B which is a brown wire (ground). This saved a male and female connector. There are also two T20 screws holding an unpainted metal bar on the inside of the B pillar that is also well grounded and does not require an extra wire tap. These colors are the same all the way to the FEM. For the passenger side, it's all the same colors until the connector at the rear passenger door, it becomes yellow with a white stripe all the way to the FEM. So realistically you only need to run two lines from the FEM or either door (signal and power). If I were doing both sides I would run three wires to the FEM (2x signal, one power). The website newtis.info has all of the wiring diagrams and pinouts for all the connectors. Also, instead of cutting the wires on the handle, I just stuck three male connectors into the pins and then shrink wrapped each one for insulation. It's a little loose but holds a connection well, though I'd get 3x 0.35mm male connectors if I were to do this again since those should fit a bit tighter. I also found this video helpful in a lot of the steps, though he is using a pre-built harness: Last edited by shadowx360; 06-23-2019 at 02:31 PM.. |
|
Appreciate
1
B58*440i12.50 |
| 04-06-2020, 03:20 PM | #13 |
|
Second Lieutenant


93
Rep 270
Posts
Drives: 2015 X5d M Sport Metallic Whit
Join Date: Feb 2015
Location: Woodstock, Ontario
|
Roxxor - thanks very much for the write up...I did this in two stages as times has been tight for a while so had to relearn some of the trickier steps but the write up was very helpful. I ran the wires to the FEM module in the passenger footwell...it’s tight in there to do taps (I got the BMW ones as suggested which are excellent)...be careful where you tap though as you need to be able to slide the connector back into the casing before plugging it back in (and yes each connector has a casing which you must remove to properly insert the male and female connectors - ask me how I found out - Doh!). This took longer than I anticipated and took more patience than I expected (I’d hate to attempt one your your harder DIYs! And I’ve done plenty!). What an awesome change though - nuts that our F30s didn’t come with this from factory. Thanks again.
|
|
Appreciate
0
|
| 09-05-2020, 07:03 PM | #14 |
|
Private First Class
41
Rep 146
Posts |
Update as I did this a second time on a different car. This time I wanted a more OEM approach, as I noted some water ingress at where the CA handle plug is located. The factory plug is waterproof and while the plug was mentioned several times in forum threads, no one has ever been able to find it. It took a couple weeks of scouring and reaching out to OEM plug suppliers, but I was able to pin the socket down as a Hirschman MicroSealedConnector Pin Housing 805-188, which BMW appears to have removed from their entire lineup, going as far as putting in the effort to update their MAF sensors, and the only change is that they use a different plug. Luckily, the E70 and E90 series both used this plug inside their heated mirrors, and thus this plug is available as an adapter on AliExpress, as item #33036377166. You can also find it by searching "W106-A" or "BMW heated mirror connector" for $4. Instead of terminating the ground wire inside the door itself with small risk of water intrusion, I terminated it on a T20 screw attached to a bare metal bar located inside the B pillar. I end up running 3 wires to FEM as I did last time.
|
|
Appreciate
1
B58*440i12.50 |
| 03-31-2024, 09:34 PM | #15 |
|
Enlisted Member
 13
Rep 44
Posts
Drives: 1997 Ford Probe GT
Join Date: May 2017
Location: San Antonio, TX
|
Finally got around to doing this today, Took two plus years for both passenger and driver side door handles in Tanzanite Blue Metallic (X10) to show up on eBay at a reasonable price. Thanks Roxxor and also Shadowx360.
|
|
Appreciate
0
|
Post Reply |
| Bookmarks |
|
|


