|
|
|
|
 |
|
 |
BMW Garage | BMW Meets | Register | Today's Posts | Search |
 |

|
BMW 3-Series (E90 E92) Forum
>
E93 Audio Build - HAT, Mosconi, Audison, MoBridge,
|
 |
| 08-14-2011, 06:21 PM | #1 |
|
First Lieutenant
 23
Rep 375
Posts |
E93 Audio Build - HAT, Mosconi, Audison, MoBridge,
Some of you may remember this:
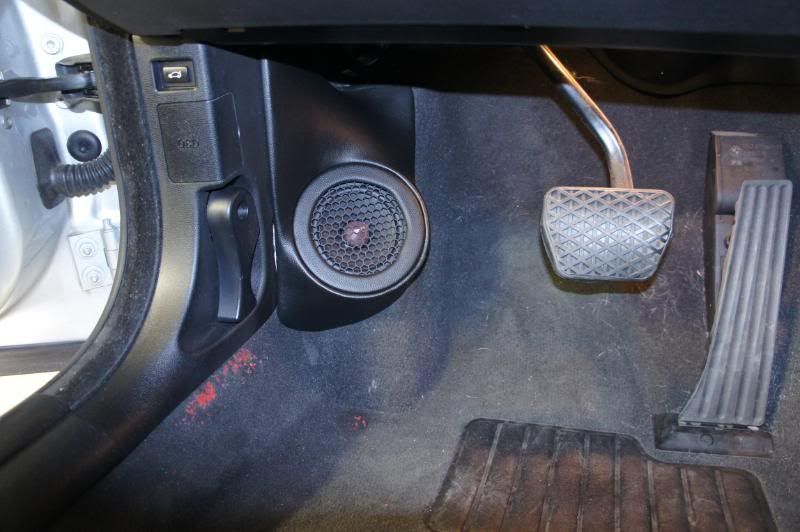
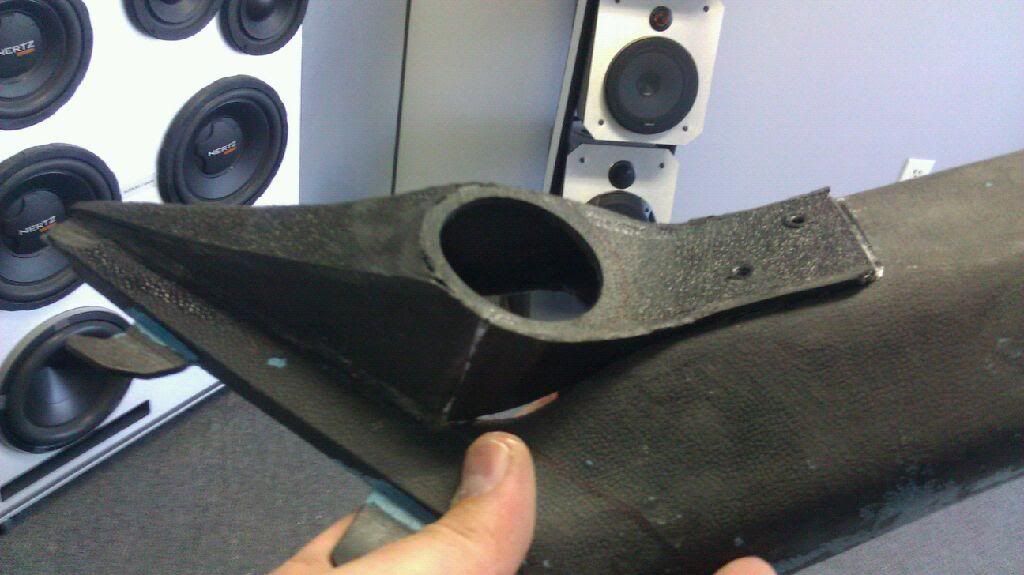
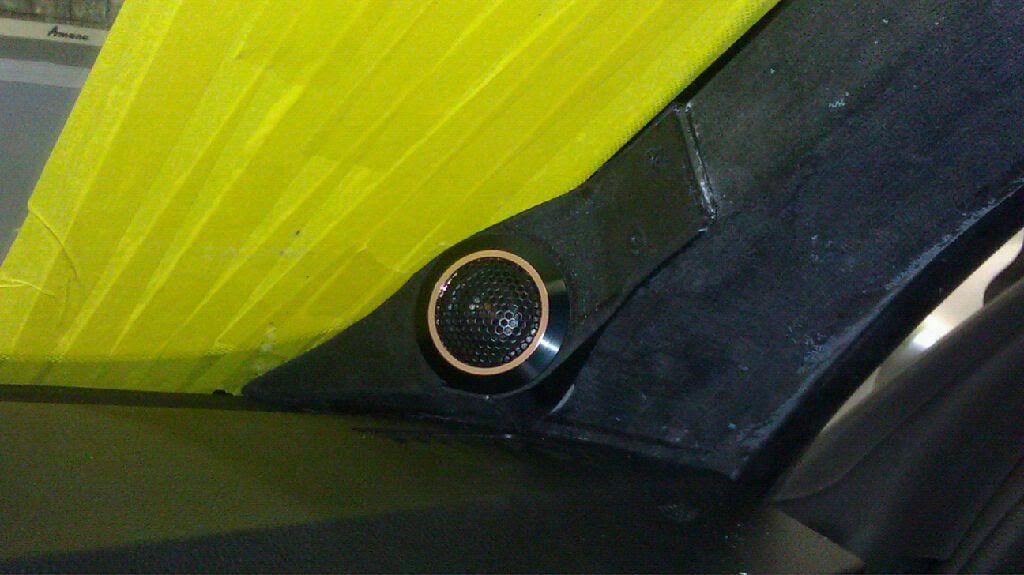
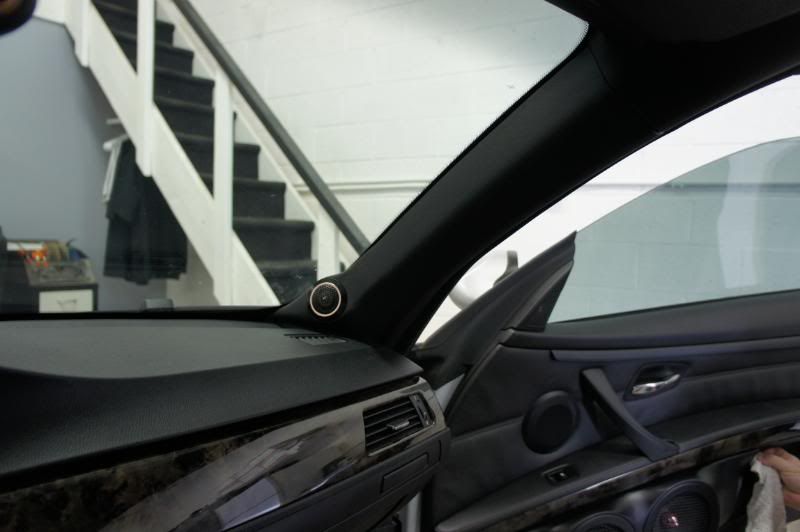
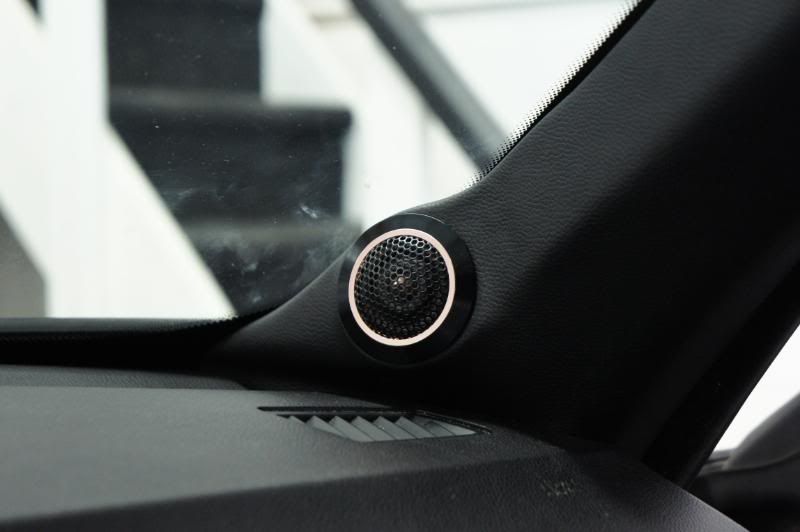
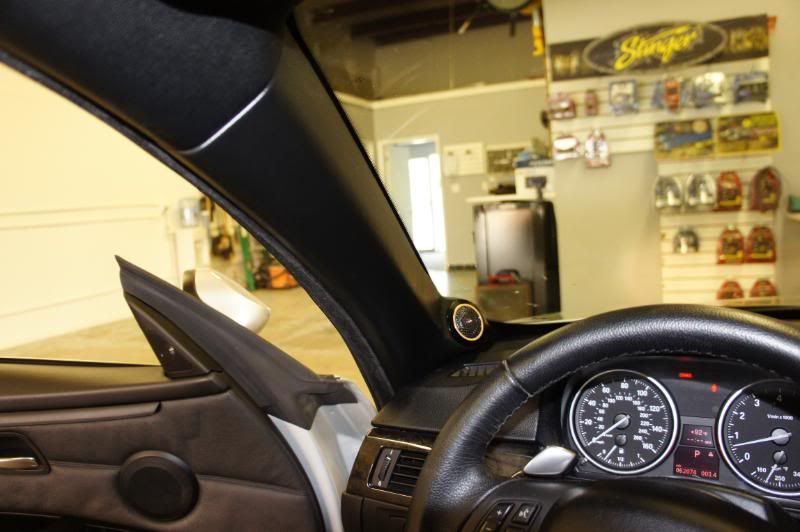
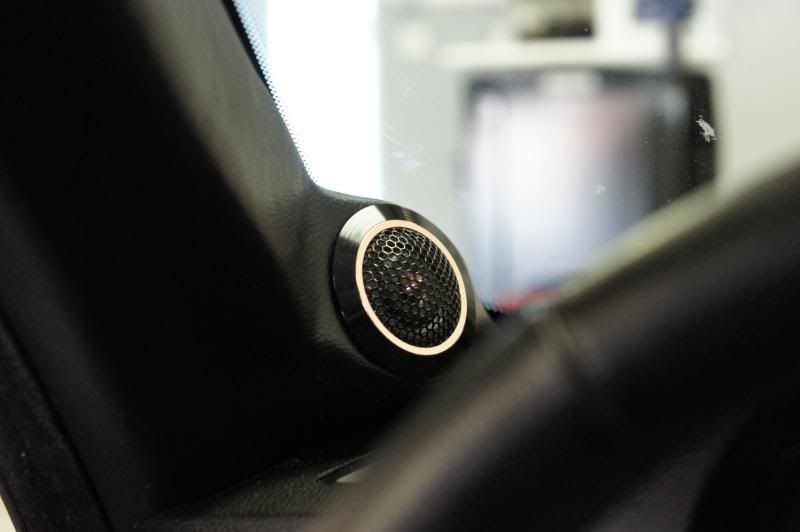
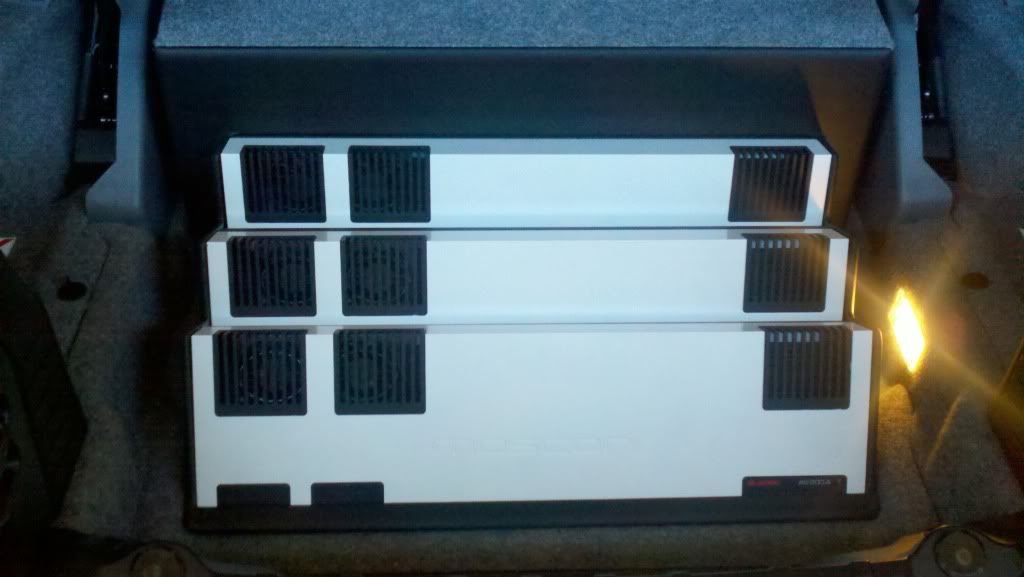
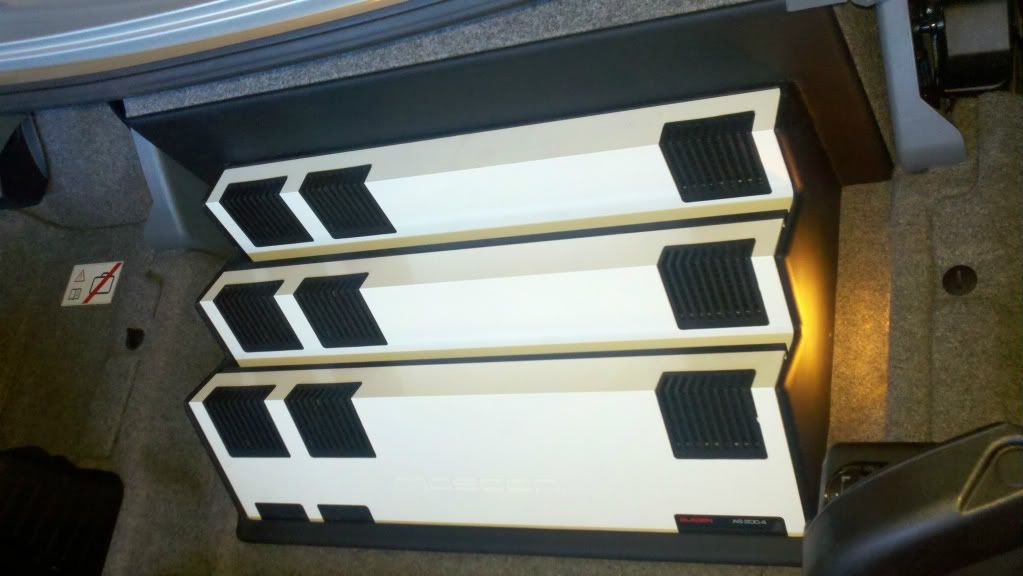
http://www.e90post.com/forums/showthread.php?t=482810 In the interest of time, and self preservation (it's over 100 degrees everyday in the summer, I decided to take the car to one of my buddies that owns a shop in Mesa, AZ. Jon at Handcrafted Car Audio did a fantastic build and was able to take my vision for a high SQ build and turn it in to a reality. ( handcraftedcaraudio.com ) I scrapped the concept of horns and high output for something a bit more modest, and high fidelity sounding. What I decided to do was gut the entire system I had built and start completely over. Source: OEM HU/IDrive Processing: MoBridge DA1000 Processing: Audison BitOne.1 Amplification: 3 Mosconi AS 200.4 Class A/B Amps Speakers: Tweets: Hybrid Audio Technologies L1 Pro R2 Midrange: Hybrid Audio Technologies L4SE Midbass: 2 per door Hybrid Audio Technologies L6SE Subbass: 2 Morel Ultimo SC 10" Subwoofers Each piece of equipment was carefully considered, and in most cases, auditioned to ensure they had the proper tonal accuracy I was looking for. One of my main concerns in this build was to make sure that my sound quality didn't "fly out the window" when my top is retracted. This necessitated the dual midbasses in the doors, as well as the high amount of amplification. Each 4 channel amp puts out 200 watts x 4 channels, and when bridged (as in the subs case) pushes out 950 watts x 2. This should ensure enough output to keep me happy with the top down. Prior to taking the car to Jon, I took an opportunity to listen to the midranges and the tweeters to find out what location was going to be best. By propping up the midranges with a set of towels, I was able to adjust the positioning and height to make sure i was going to get a good clean centered image. I settled on a position that was high and set back, with the drivers side more on axis with the driver, and the passenger side more on axis with the driver than the passenger. This provided a very wide and high soundstage. 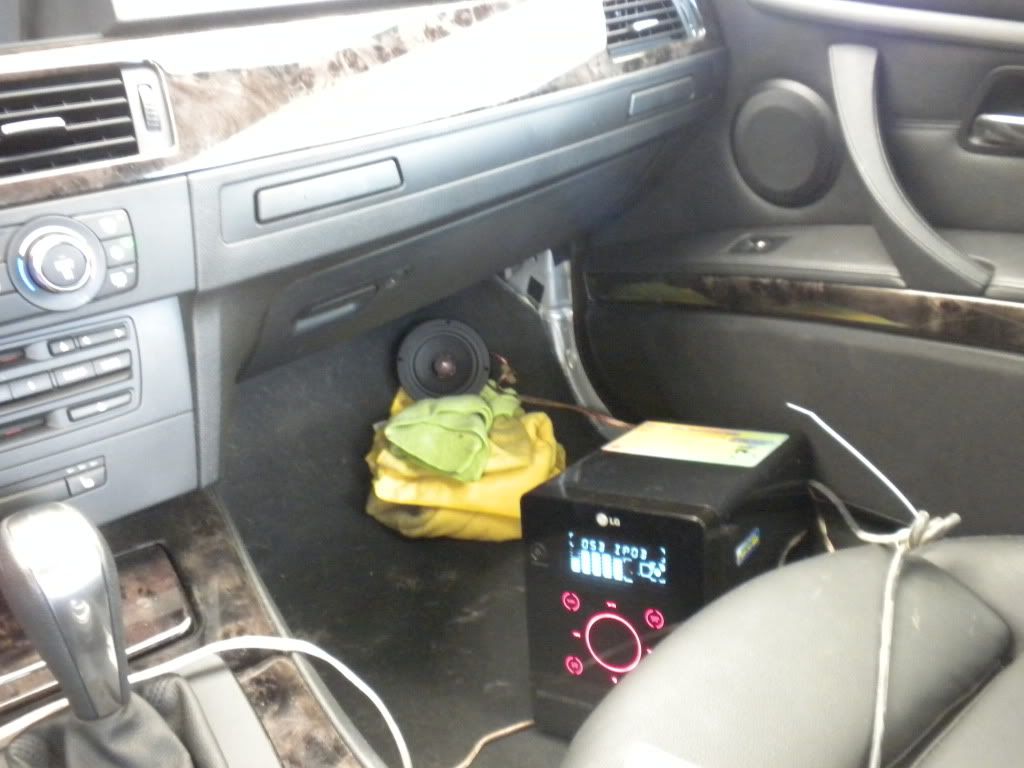 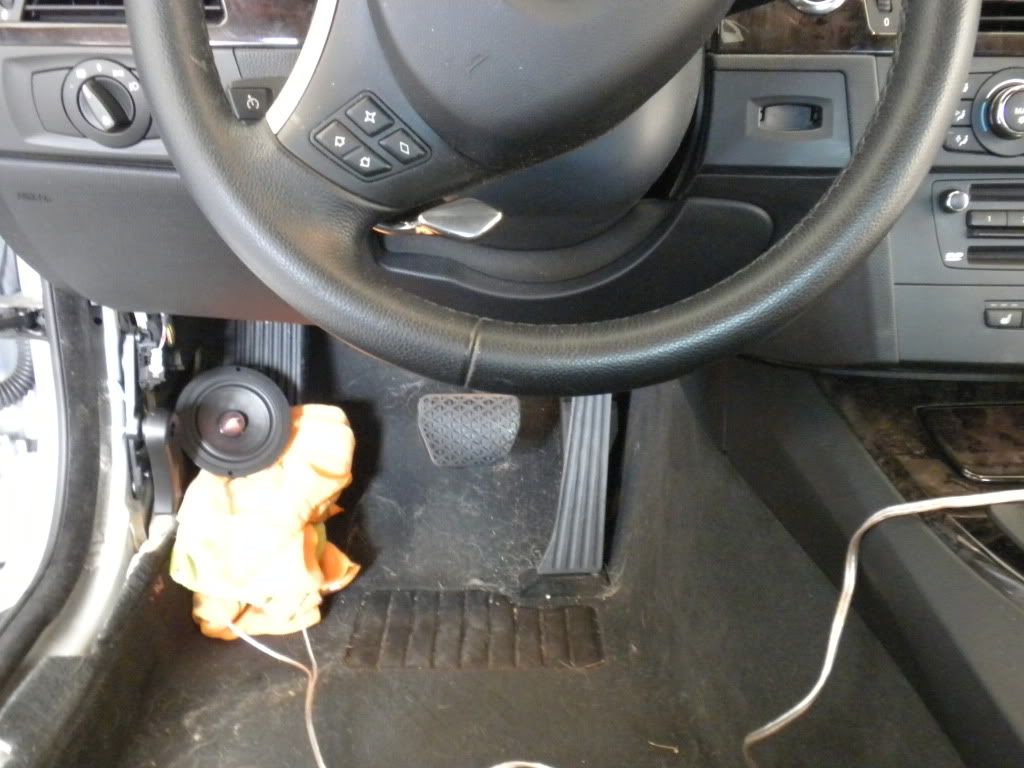 I performed the same tests with the tweeters, with the decision already made that they will be going in the pillars  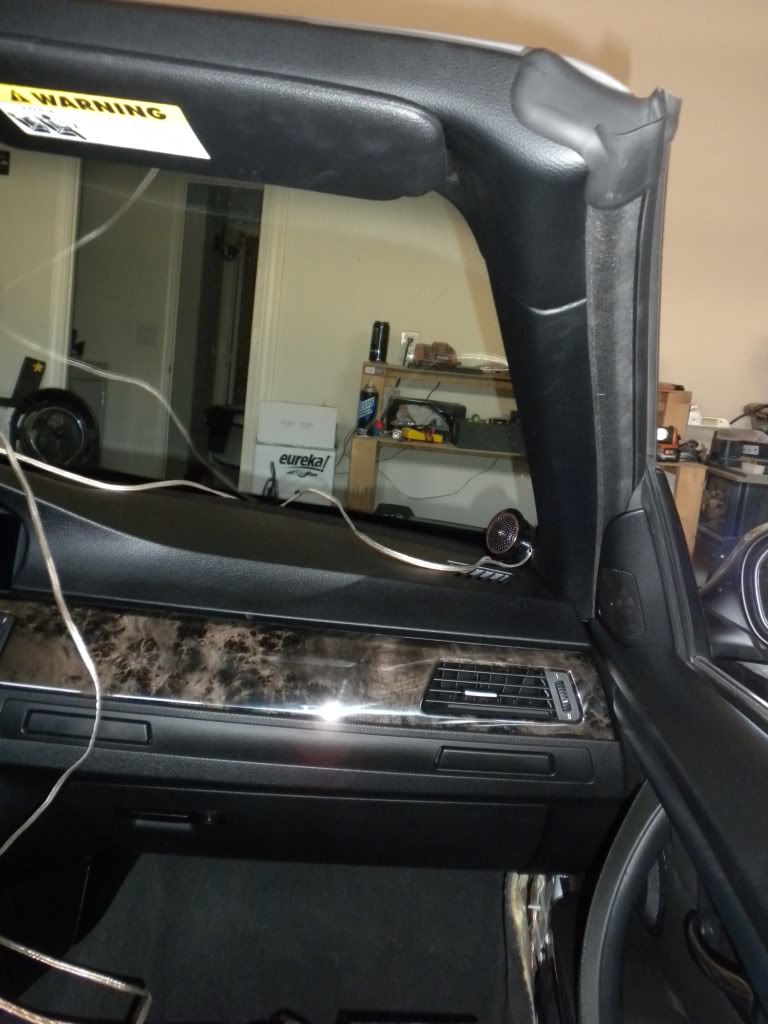 Since I already decided to tear up the doors with the previous build, I knew that the only place the midbass locations would go would be in the door. However, I won't be able to reuse the jehnert panels, as the outer diameter of the L6SE's were too large, so new ones needed to be made. After the testing was completed, I took the car and all the supplies to the shop and dropped it off for almost two weeks. As mentioned earlier, I made my goals clear to Jon: great SQ, factory look and feel and integration, and the rest was up to him. A shot of all the gear: 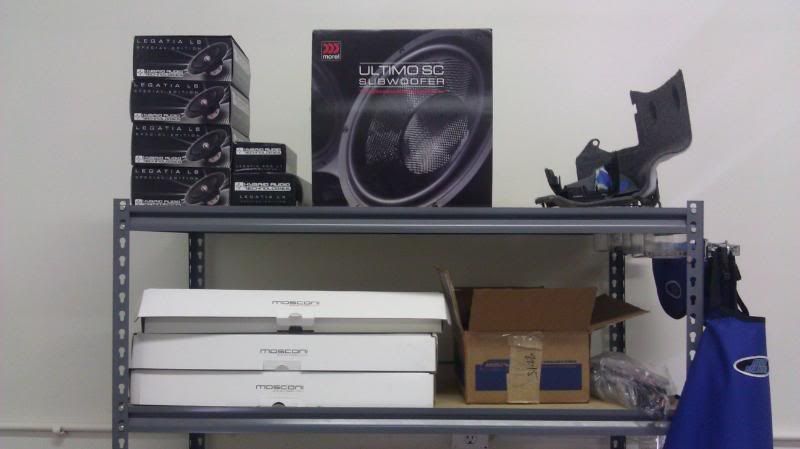 (quoting Jon) I decided to start with the sub enclosure, because that needed to be done and mounted in order for the amp rack to go in and wiring to take place. 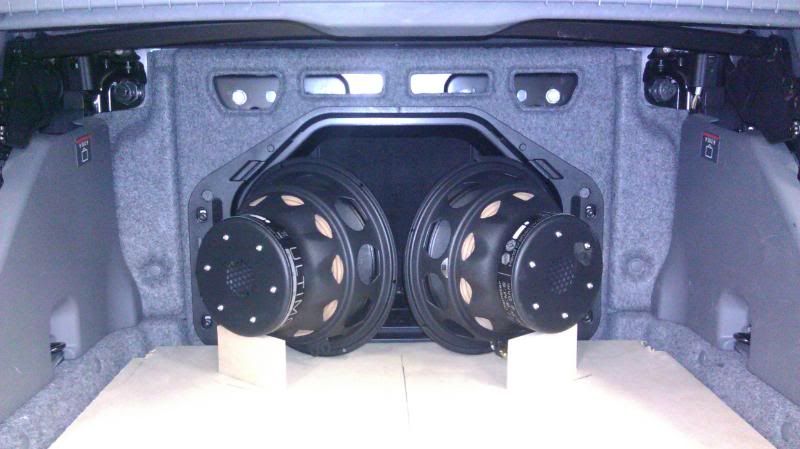 So, I mocked up the angle of the subs roughly on the bottom of the enclosure.  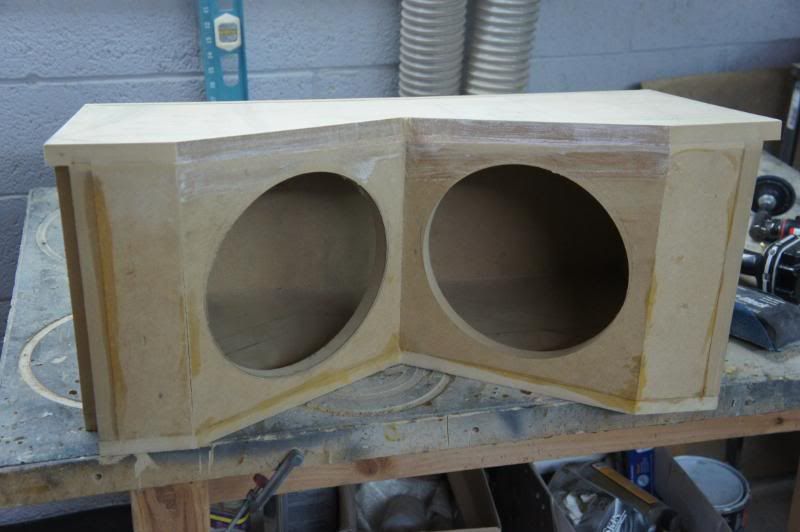 Fast forward a few steps which, I'm sure are pretty self explanatory, and most of the enclosure is done. 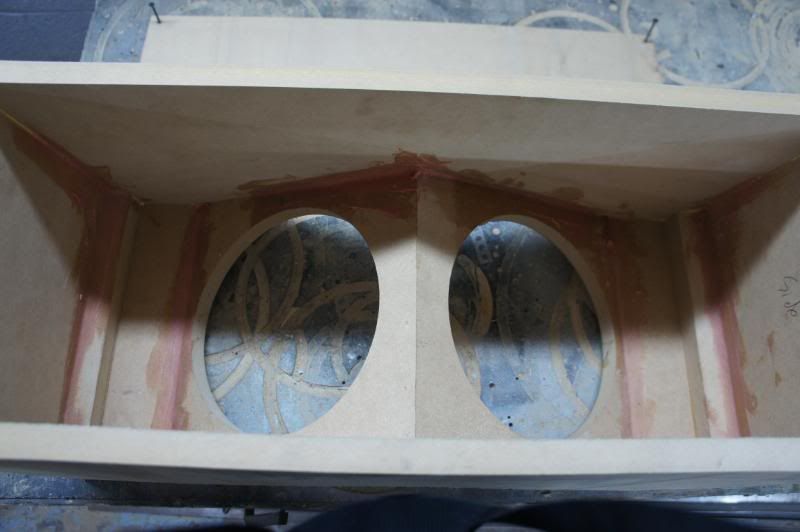 I made the back the last part to go on because the enclosure will mount using factory bolt holes located around the ski pass area. 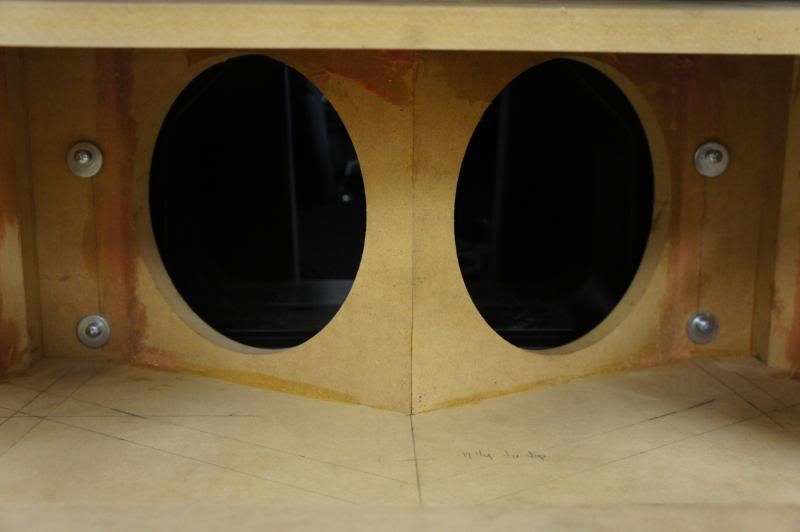 Like so Once that was done, I started work on the amp rack which would be a custom steel piece that holds all 3 amps in a magazine rack kind of way. I like to make "copies" of amps to work with so I don't risk damaging the amp itself. 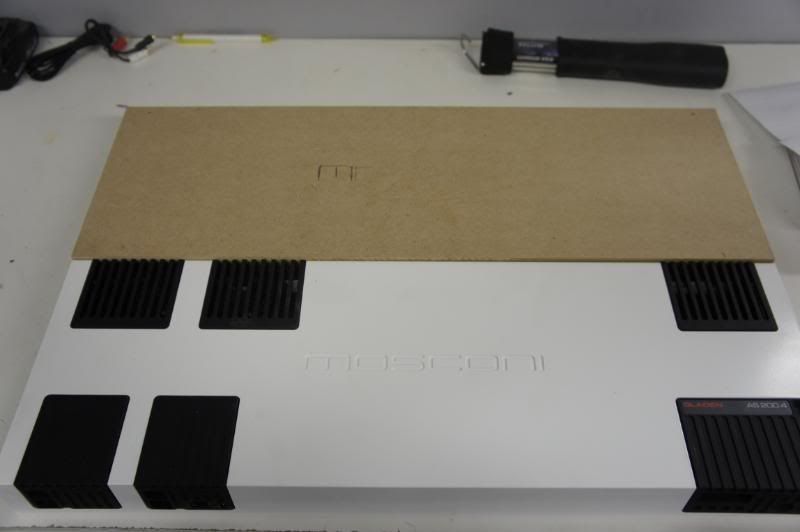 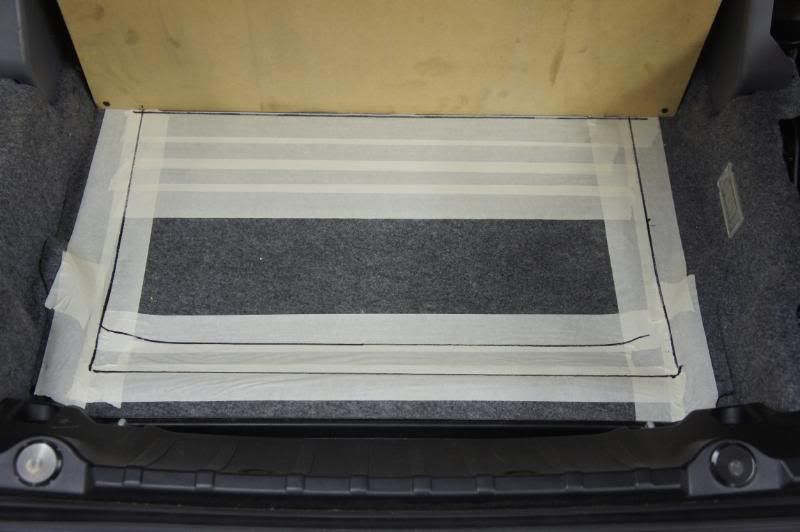 I marked out the width of the amps onto the floor piece so I would know where to cut. 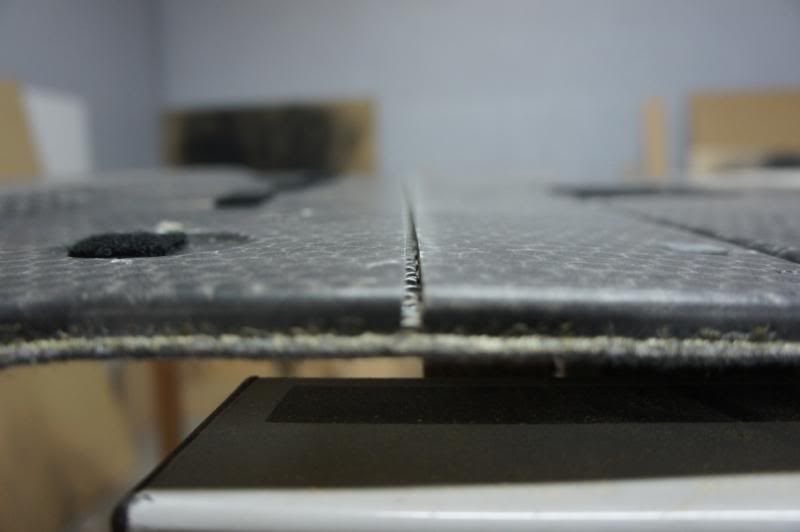 Before actually cutting the hole out, I ran the piece over the tablesaw with the blade set just high enough to cut away the corrugated plastic like material, so the panel would have a new pivot point. |
| 08-14-2011, 06:28 PM | #2 |
|
First Lieutenant
23
Rep 375
Posts |
 Here is my area to work with. 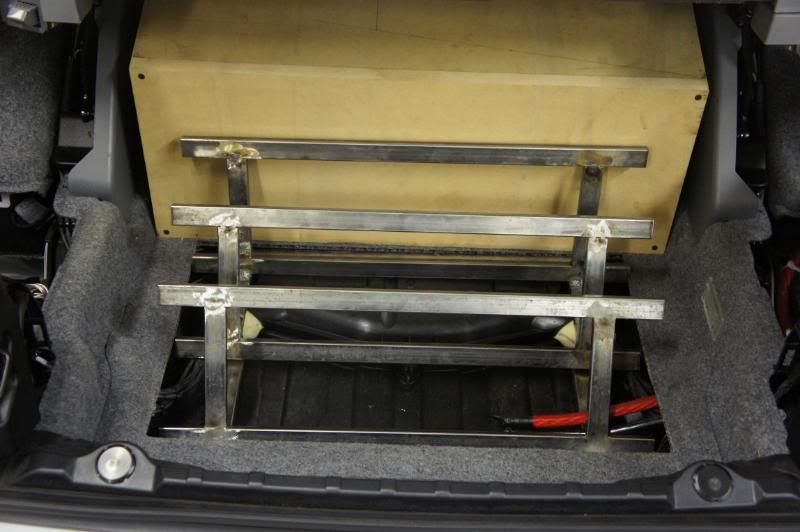 I skipped a few steps here, but i tend to get in the zone when I am welding and don't stop for pics. It's a pretty basic (although time consuming) design though, as you can see.  the amp rack was mounted to the floor of the vehicle with 3 1/4-20" threadserts. 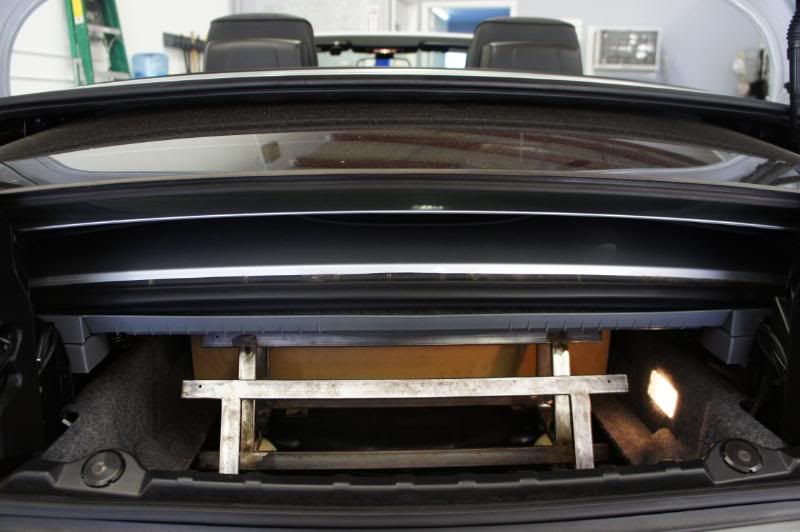 For those who are wondering, yes, I did check for clearance. Got a good 1/2". 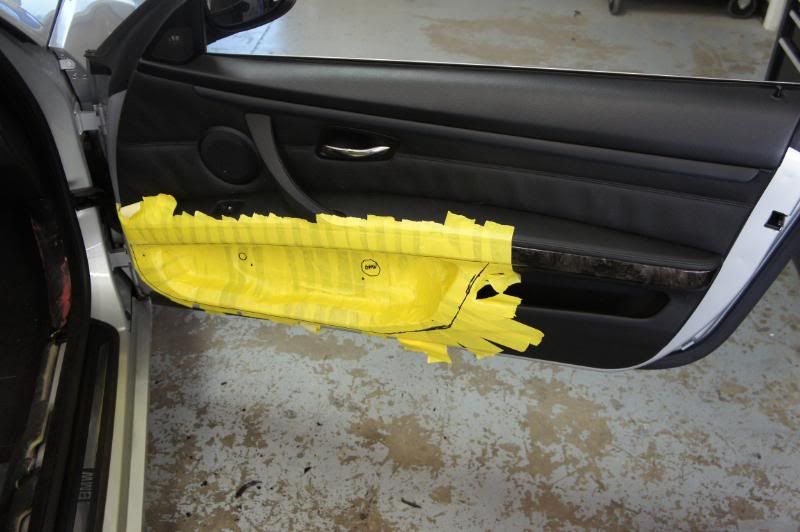 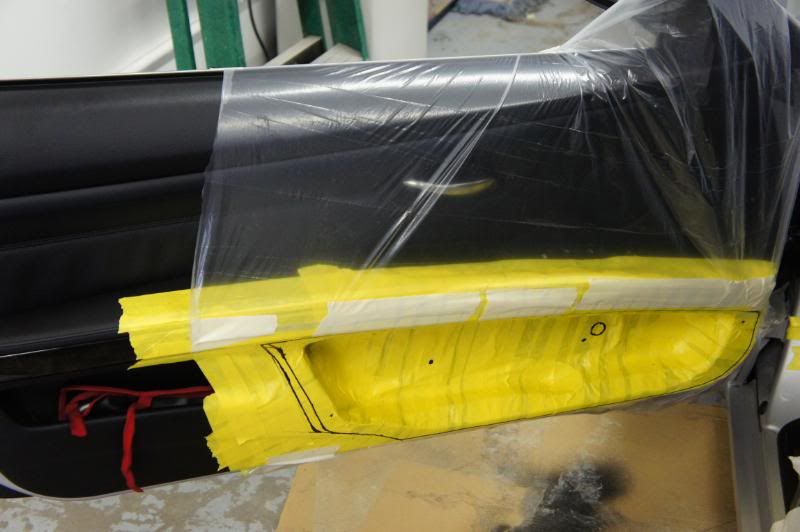 On to the pods. this whole area was already decided to be the location for the mids, and really there is no other option. Hell, this almost wasn't even an option! 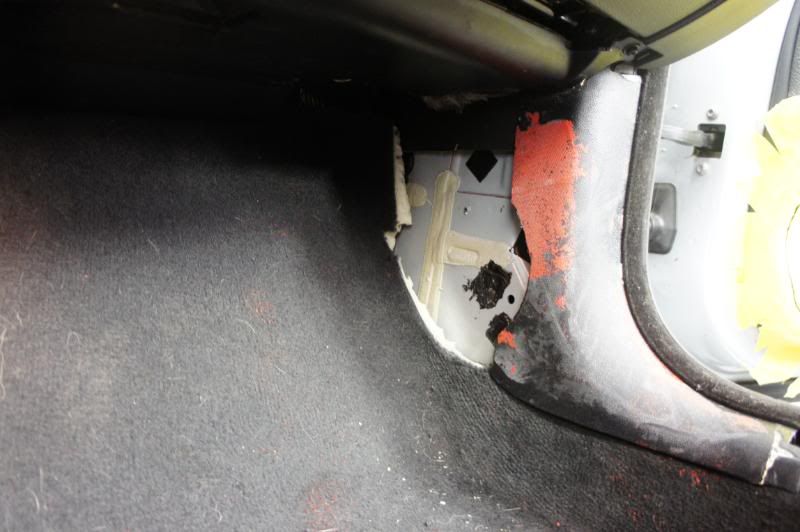 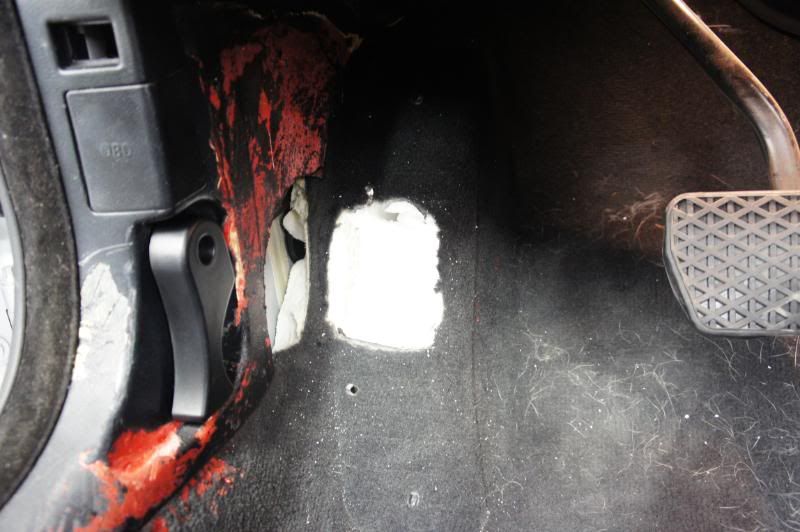 Here is the start of the kickpods. I like to make pods as add-on pieces instead of building onto factory plastic. In this vehicle, I was able to remove alot of foam to allow the speaker pods to be more pushed back and less obtrusive. 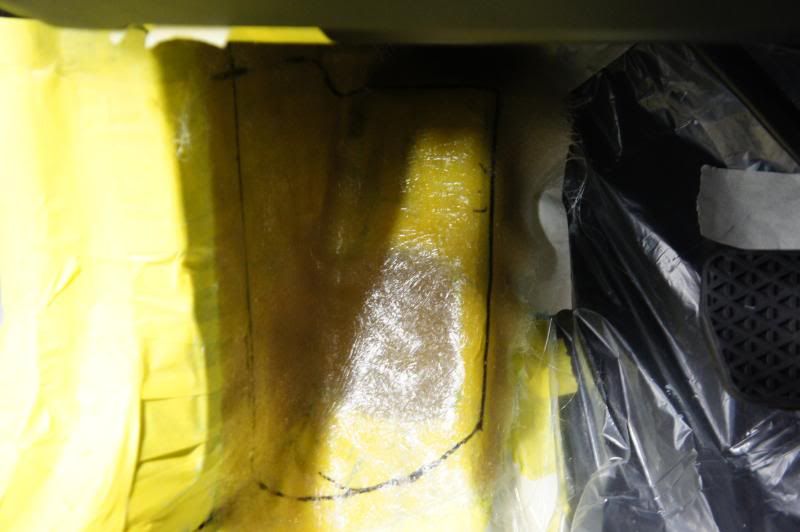 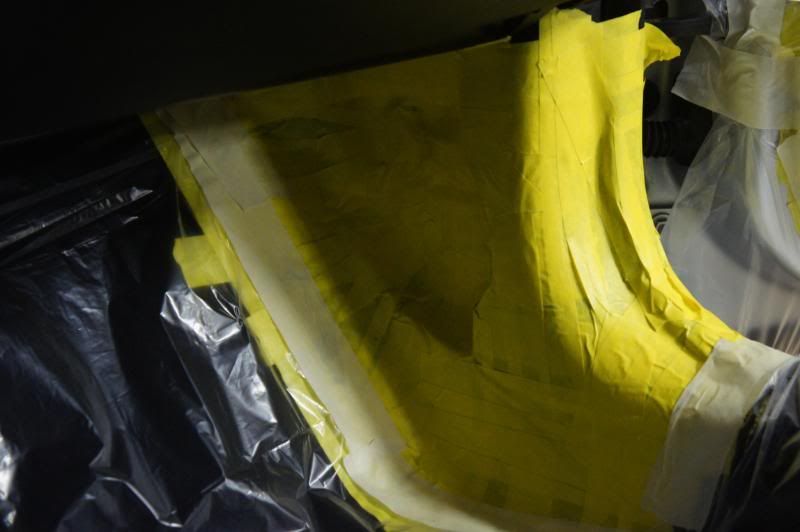 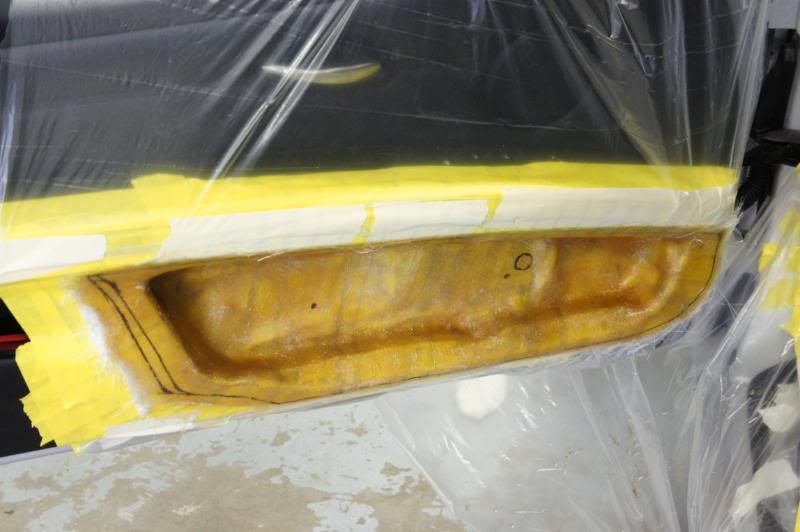 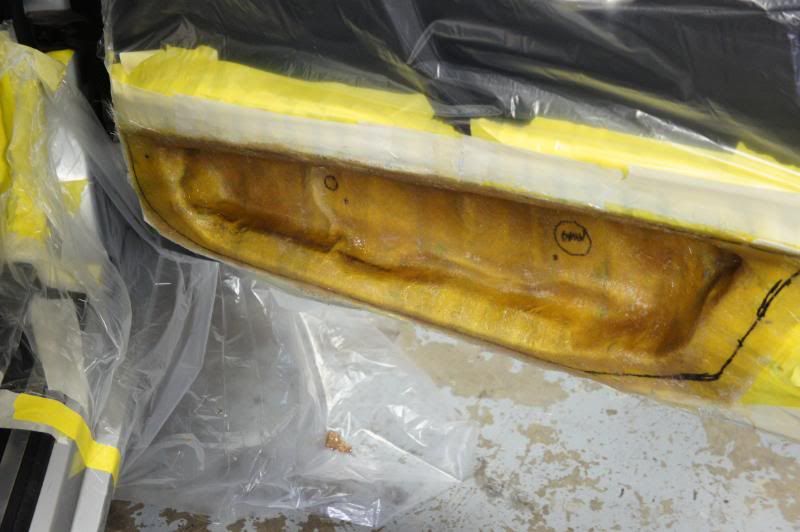 Fiberglass laid, pretty standard. On the drivers kick, I simply laid glass into the pockets and then laid glass on top of everything, planning to cut out the excess after it cured. 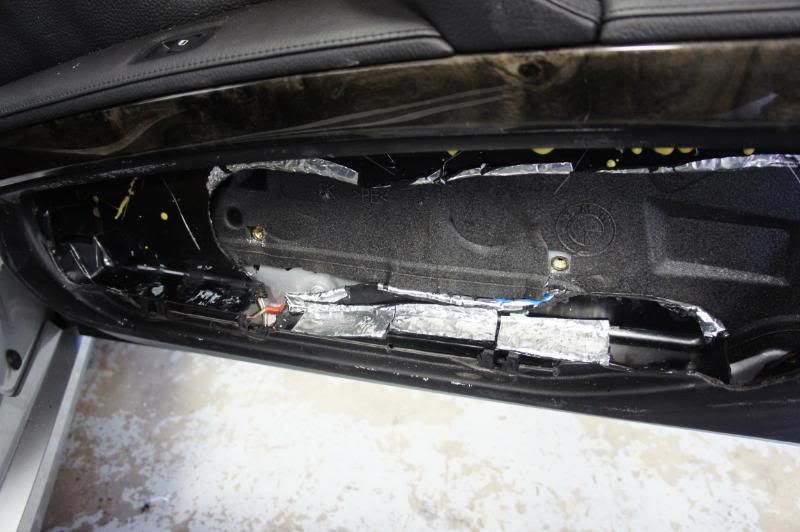 Here you can see the two mounting points, 2 1/4-20" threadserts, that secure the door pod. Each side was this way and it was crazy tight! 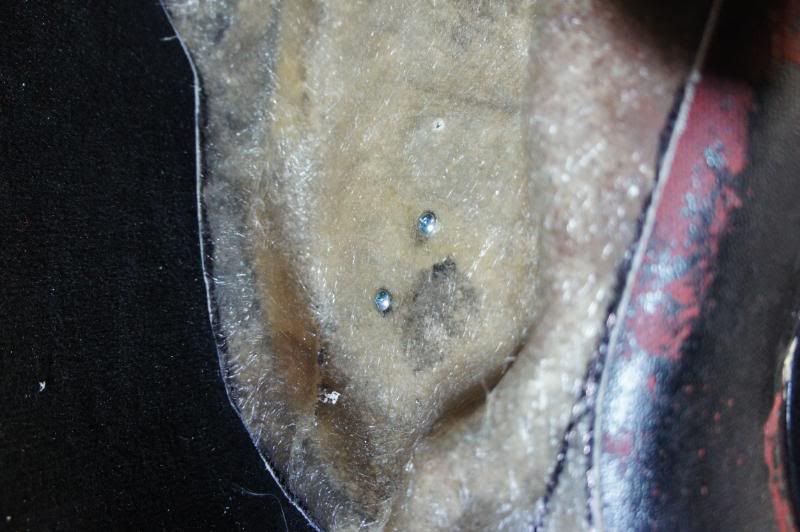 Similar treatment for the kicks, except I just drilled and tapped machine screws into the steel in the kick area. |
|
Appreciate
0
|
| 08-14-2011, 06:35 PM | #3 |
|
First Lieutenant
23
Rep 375
Posts |
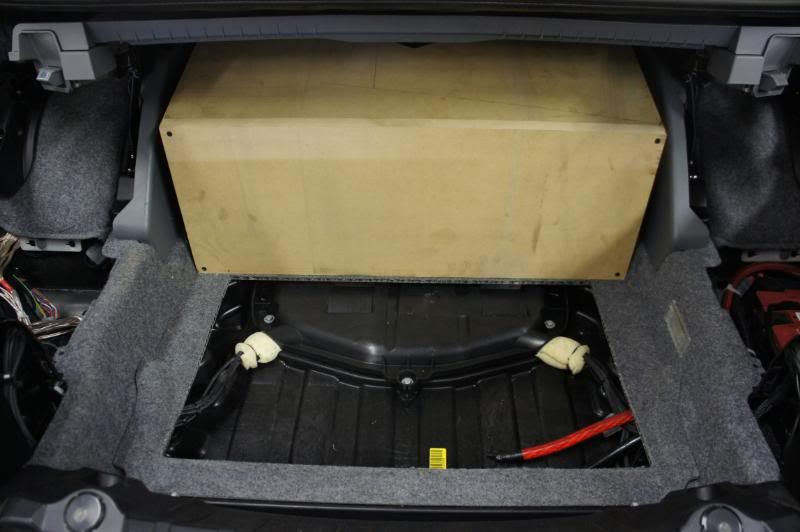
 Getting an idea of where the speaker rings would go. I wasn't crazy about the shape, But there wasn't many options for speakers of this size in this location. 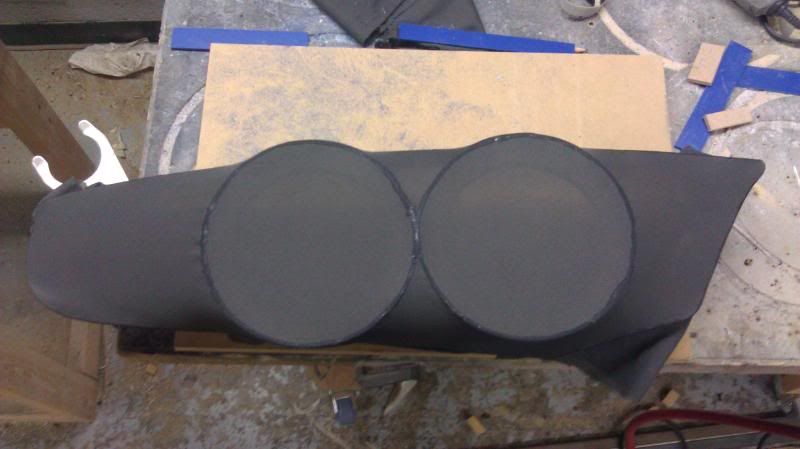 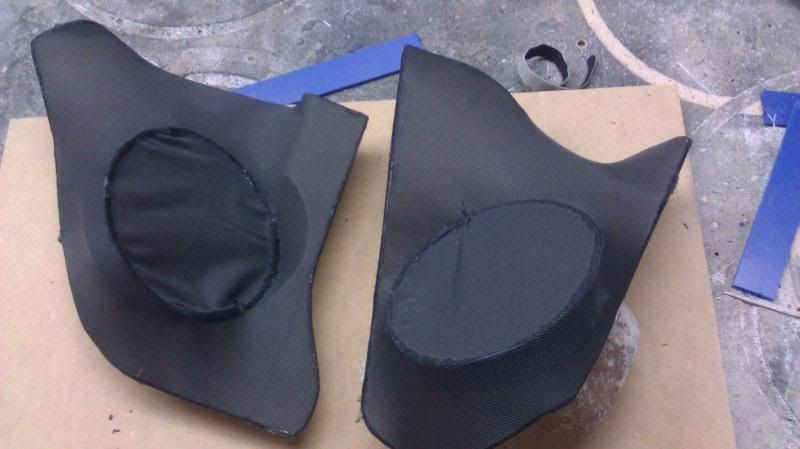 Pretty basic stuff here 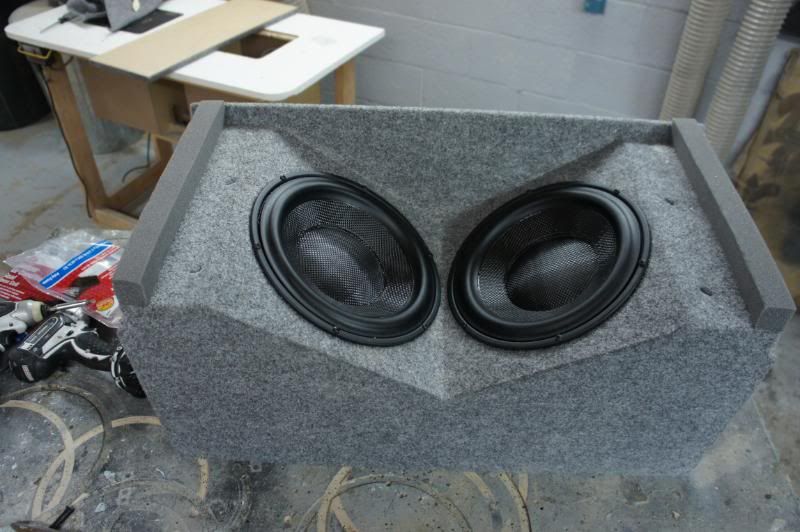 Getting into the finished picture area already, here is the sub enclosure. I used the foam on the sides to try to seal the enclosure off from the trunk. I was pretty happy with the fact that i wrapped this whole thing in one piece of carpet! 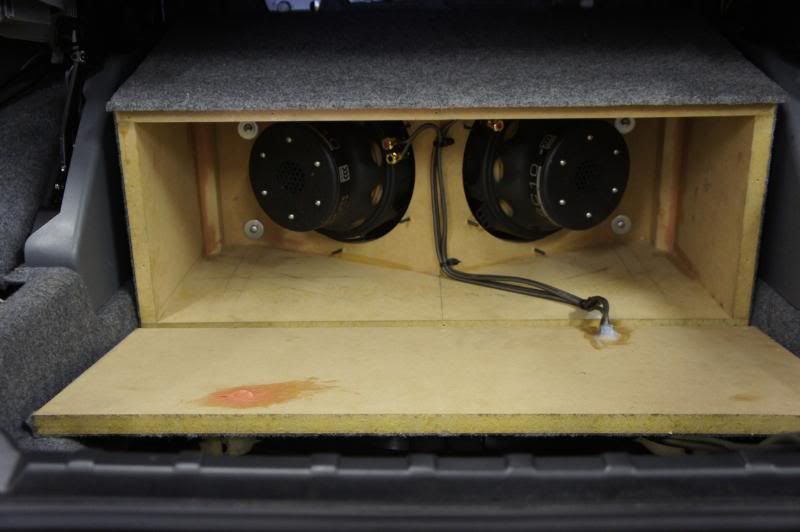 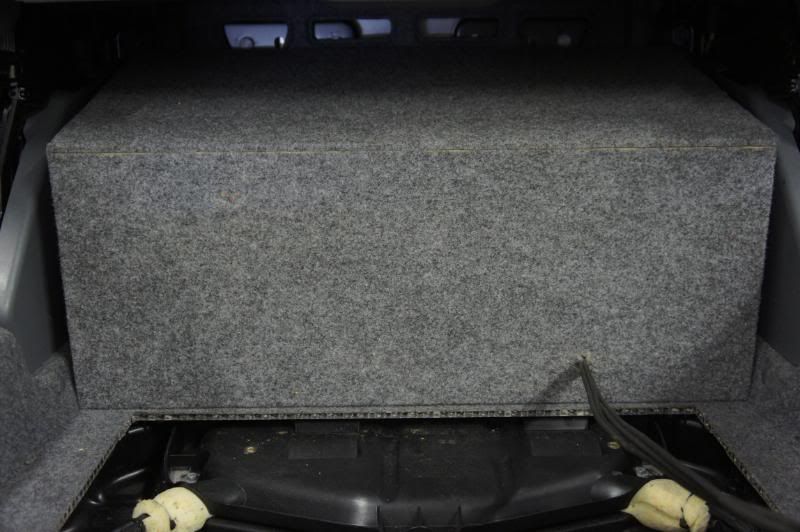 Enclosure installed and the back screwed on.  I also did a little lighting to show off the subs a bit. 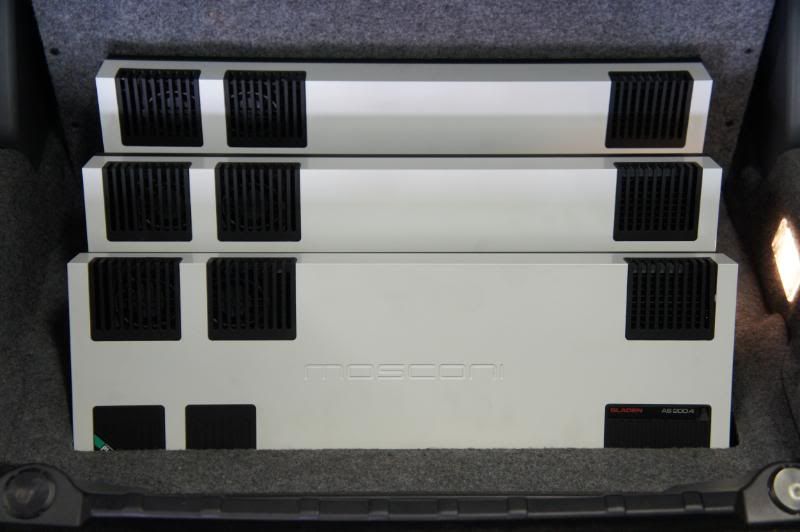 All the amps installed and tuned. 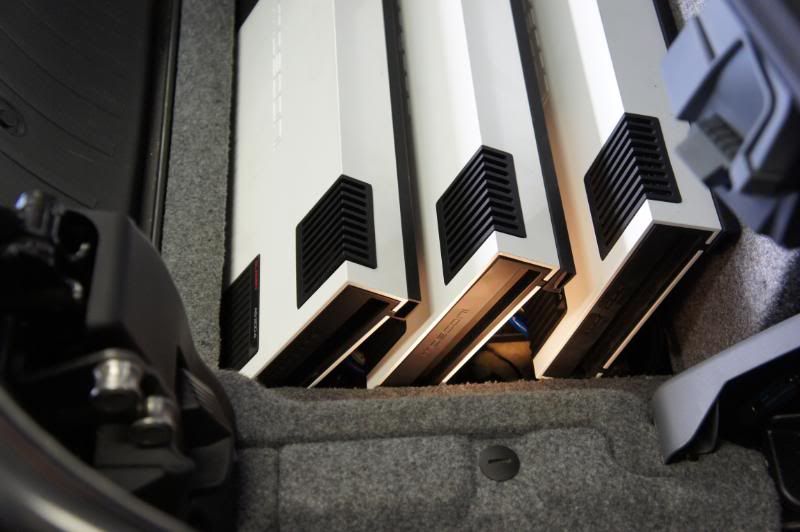 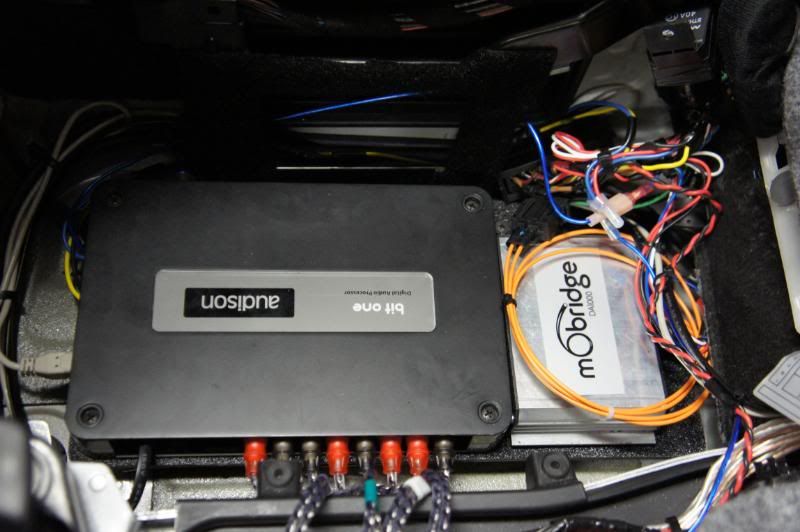 Here is the BitOne and Mobridge piece in place of the factory amp, mounted on a piece of 1/4" ABS. Yes, I organized the wiring better before buttoning it up. 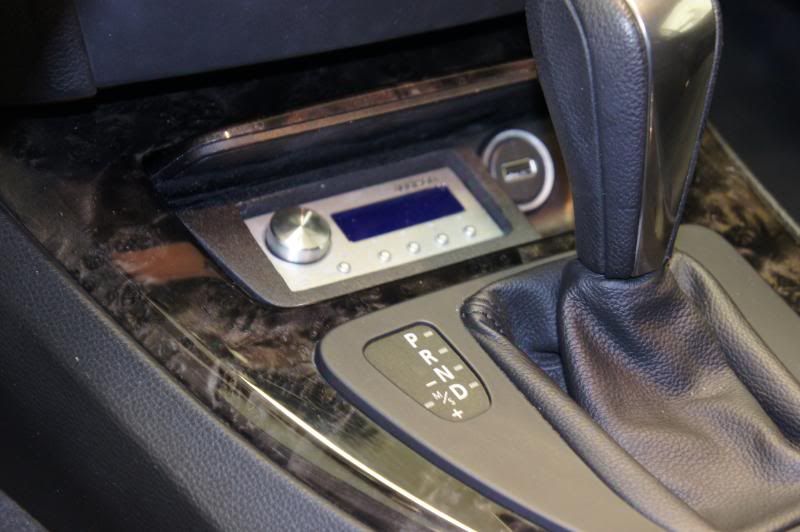 Here is the DRC and the USB connection tucked away inside the unused ashtray. 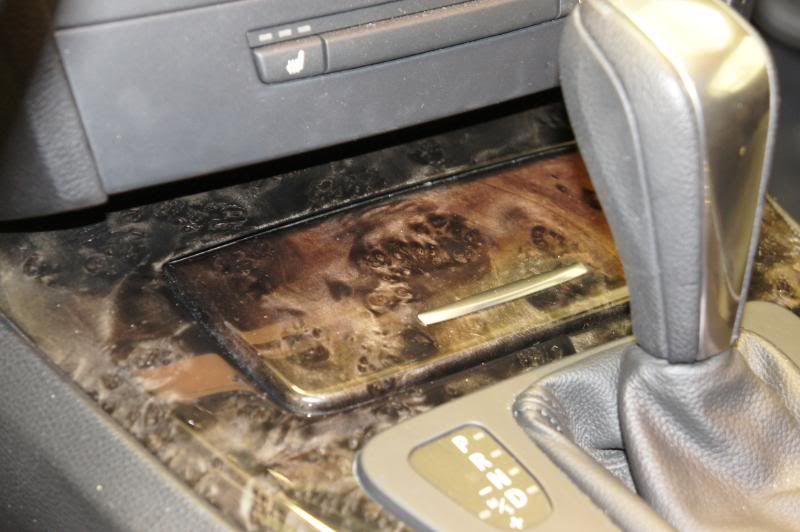 And hidden from view. 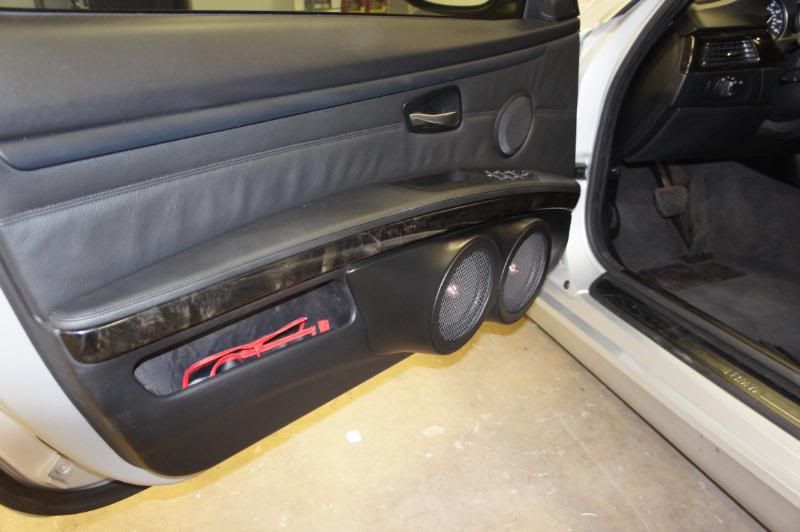 Drivers side door pod all done and grilles installed. 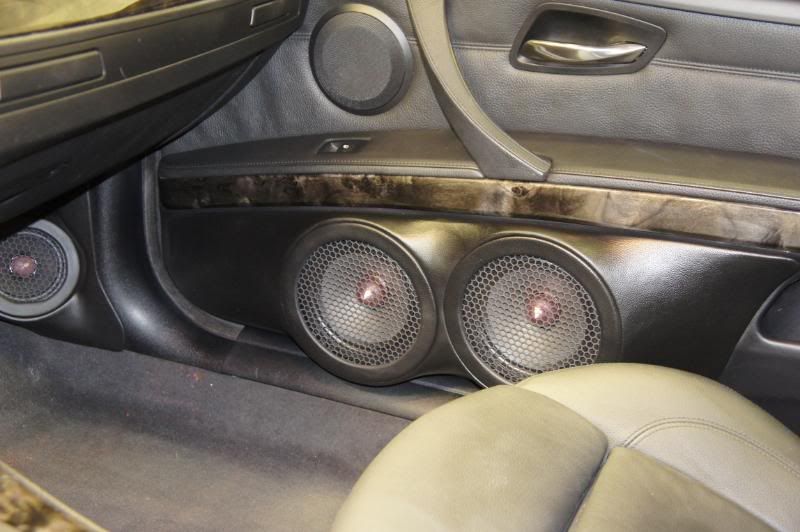 Passenger's side. 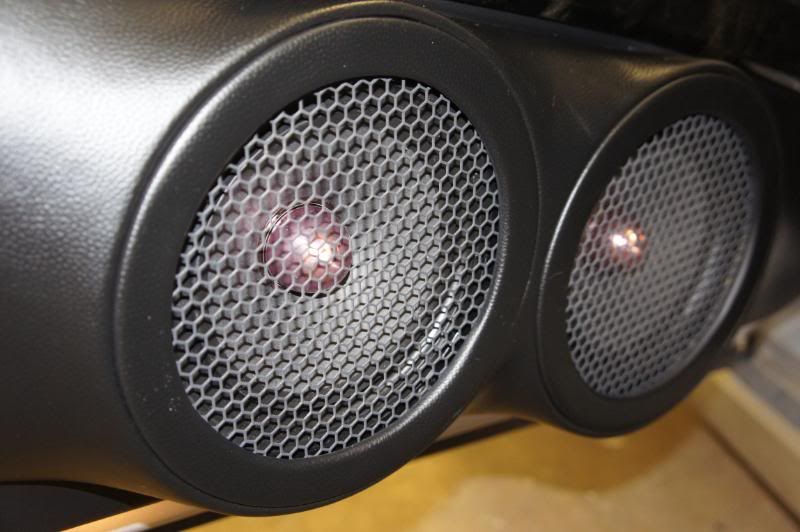 Close up of the honeycomb grille. 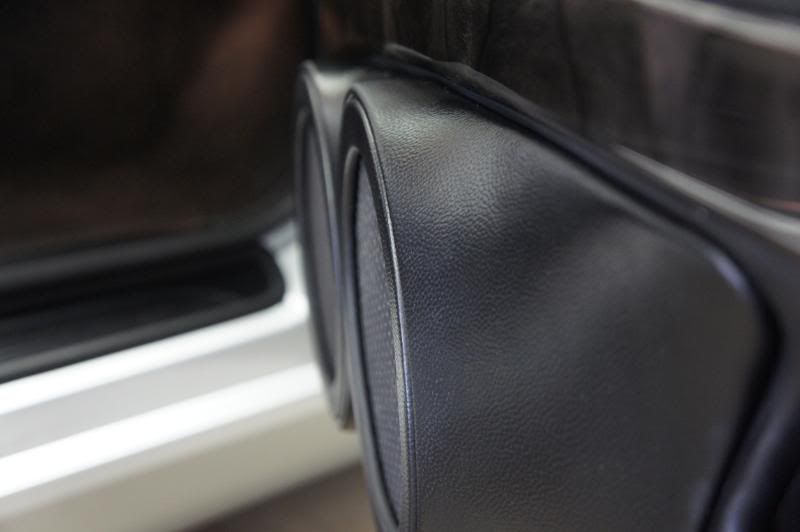 These grilles were really tight. |
|
Appreciate
0
|
| 08-14-2011, 06:46 PM | #5 |
|
First Lieutenant
23
Rep 375
Posts |
  Lastly, a trim panel to tie it all in together. Final touch... 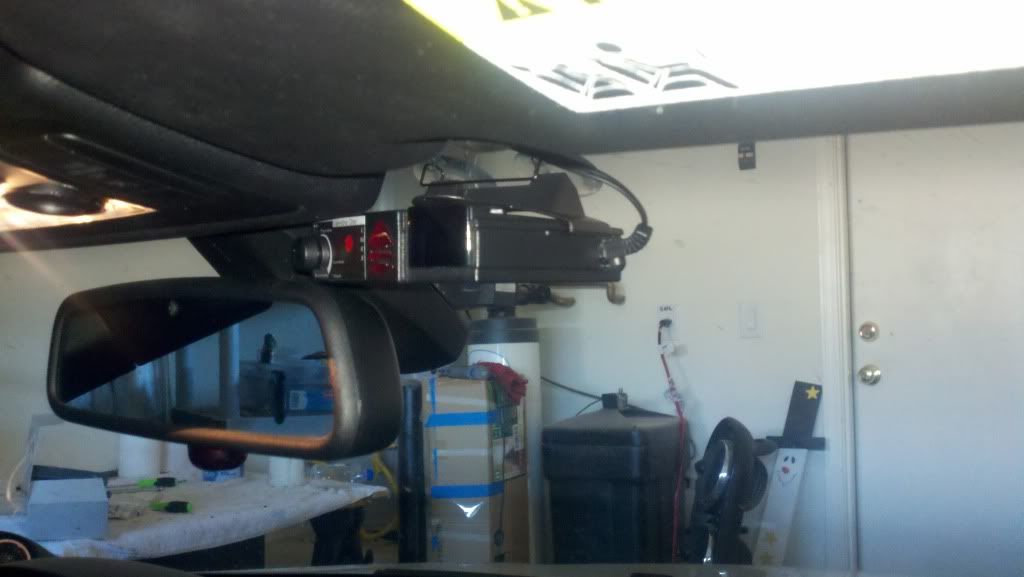 Adding the V1 hardwired to the car. Overall, I am completely satisfied with how this turned out. The car sounds fantastic and with some more seat time I'll be able to tune this more. As it sits now, it's the best system I've had, so I can't complain  Let me know what you guys think. |
|
Appreciate
0
|
| 08-15-2011, 01:02 AM | #6 |
|
Brigadier General
 

394
Rep 3,161
Posts |
wow. well done.
__________________
2015 M3 BPM Tuned, Eibach, Magnaflow and more www.tmrmzine.com/m3/f80
SOLD E92 Slēk Carbon Fiber Widebody M3 www.tmrmzine.com/m3/slek/ SOLD E92 335i Stage 3+ with all the toys www.tmrmzine.com/335/ SOLD E39 M5 Modded, What a great car! www.tmrmzine.com/m5/ |
|
Appreciate
0
|
| 08-15-2011, 07:57 PM | #7 |
|
Brigadier General
300
Rep 3,969
Posts |
Great job and excellent choice of components. You obviously didn't care much for the stealth look. The places I go, that system would not last a week!
__________________
Mobridge DA2 > JBL MS-8 > ARC XDi 600/4 > JBL Gti 408 Mids & Vifa OT19 Tweeters; PG Ti2 1600.5 > Morel HCW-10 & IDMax 15
|
|
Appreciate
0
|
| 08-16-2011, 10:40 PM | #8 |
|
Second Lieutenant
13
Rep 210
Posts |
Professional job. Why not just replace the oem twitters?
__________________
DCT, 19" 313s, 30% tint, Clear Reflectors, Nav, PDC, H/K+BSW Speakers, Infinity 10" subs
|
|
Appreciate
0
|
| 08-21-2011, 11:27 AM | #11 | ||||
|
First Lieutenant
23
Rep 375
Posts |
Quote:
even though I didn't stay with hornsQuote:
Quote:
Quote:
|
||||
|
Appreciate
0
|
| 08-21-2011, 10:05 PM | #13 |
|
First Lieutenant
23
Rep 375
Posts |
each of these amps come with a 175 amp mini anl fuse as the fuse for the amp... of course i'm not running near to the max on this... but i can happily say i have no dimming headlights or battery warnings on my dash. not bad for the sheer size of those massive amps.
|
|
Appreciate
0
|
| 08-21-2011, 10:31 PM | #14 |
|
Brigadier General
394
Rep 3,161
Posts |
any issues with the mobridge? Everything work perfectly?
__________________
2015 M3 BPM Tuned, Eibach, Magnaflow and more www.tmrmzine.com/m3/f80
SOLD E92 Slēk Carbon Fiber Widebody M3 www.tmrmzine.com/m3/slek/ SOLD E92 335i Stage 3+ with all the toys www.tmrmzine.com/335/ SOLD E39 M5 Modded, What a great car! www.tmrmzine.com/m5/ |
|
Appreciate
0
|
| 08-21-2011, 10:49 PM | #15 |
|
First Lieutenant
23
Rep 375
Posts |
everything works perfect... my idrive always has a bit of delay before allowing me to make any changes once starting the car, but that's always been the case. it's tough to swallow the 700 for the mobridge, but it works flawlessly and i haven't had any problems (except with the ones i had with EAS earlier... If you are going to get one, don't go through them)
I'm just glad it's done, and now i'm spending the time to dial it in properly. |
|
Appreciate
0
|
| 11-04-2011, 11:52 PM | #16 | |
|
Brigadier General
394
Rep 3,161
Posts |
Quote:
__________________
2015 M3 BPM Tuned, Eibach, Magnaflow and more www.tmrmzine.com/m3/f80
SOLD E92 Slēk Carbon Fiber Widebody M3 www.tmrmzine.com/m3/slek/ SOLD E92 335i Stage 3+ with all the toys www.tmrmzine.com/335/ SOLD E39 M5 Modded, What a great car! www.tmrmzine.com/m5/ |
|
|
Appreciate
0
|
| 11-05-2011, 09:41 AM | #17 | |
|
First Lieutenant
23
Rep 375
Posts |
Quote:
no 8's under the seats, i didn't want to screw up the imaging. having the woofers in the doors is hard enough, but after quite a bit of tuning i think i'm starting to get things dialed in. |
|
|
Appreciate
0
|
| 02-12-2014, 01:52 PM | #18 |
|
Major
 
103
Rep 1,184
Posts |
hey man, excellent build... i want to steal your box design lol (but make it dual ported), i was wondering what were the dimensions? the bottom plate depth and box height would suffice... im struggling to work out the max size i can make the box with the shelf down :\
appreciate it
__________________
PAST: 2007 E93 335i 6MT NOW: 2012 F10 M5  Facebook: Achu Ckr|Twitter: AchuCkr|Instagram: AchuCKR|Flickr: AchuCKR|G+: achu.ckr THE BUILD THREAD|COMPILATION OF PHOTOS |
|
Appreciate
0
|
 |
| Bookmarks |
|
|